
Same Lot Calibration for Flawless Black and White Checkerboard Marble

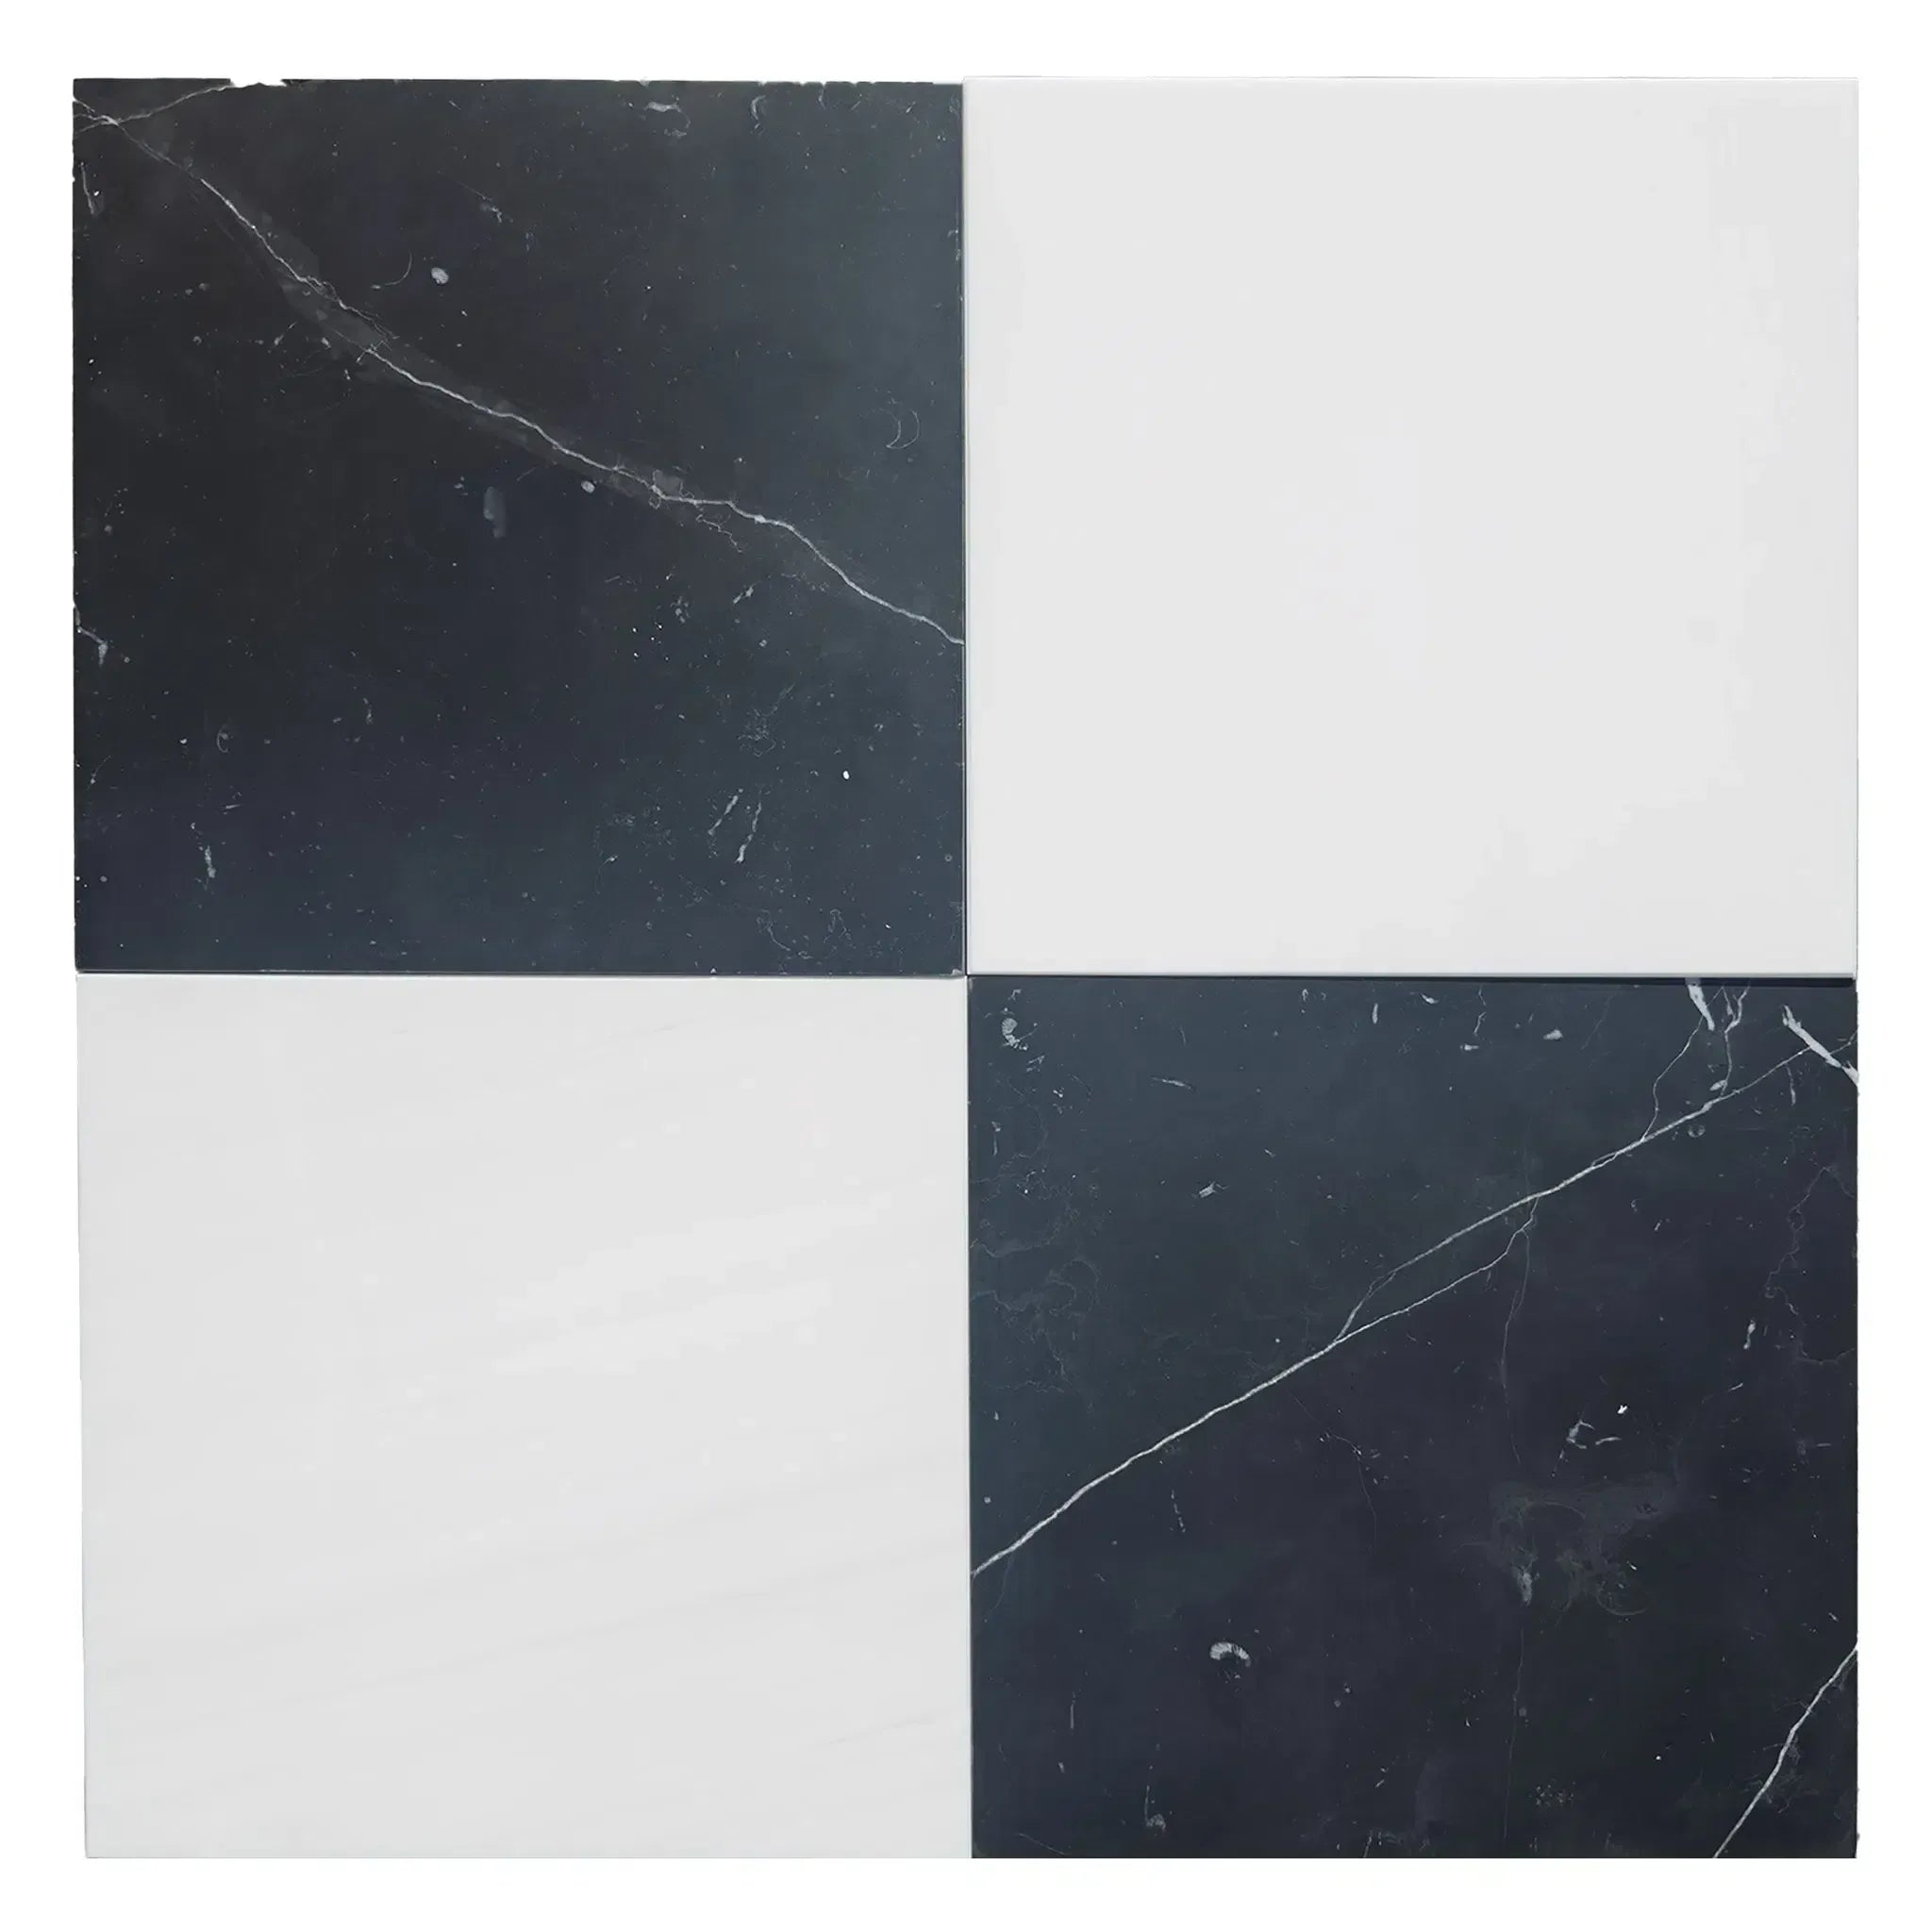
The classic pairing is Nero Marquina black paired with Carrara or Bianco Dolomite white, and if you’re set on black and white checkerboard marble for a floor, order samples in both a polished and honed finish before you commit. Confirm calibration with your supplier so the squares sit flush without lippage. For high-traffic rooms, lean honed and seal it once it’s installed.
TL;DR:
- Use Nero Marquina with Carrara White for the highest contrast, or pair Nero Marquina with Bianco Dolomite for a brighter white look.
- Smaller tiles create a busier, vintage feel, while larger 12x12 squares give a more architectural, modern appearance suitable for open spaces.
- Honed finishes soften contrast and reduce glare, making black and white checkerboard floors more practical for high-traffic or wet areas.
- Ensure all tiles come from the same lot and are properly calibrated to prevent misalignments and gaps during installation.
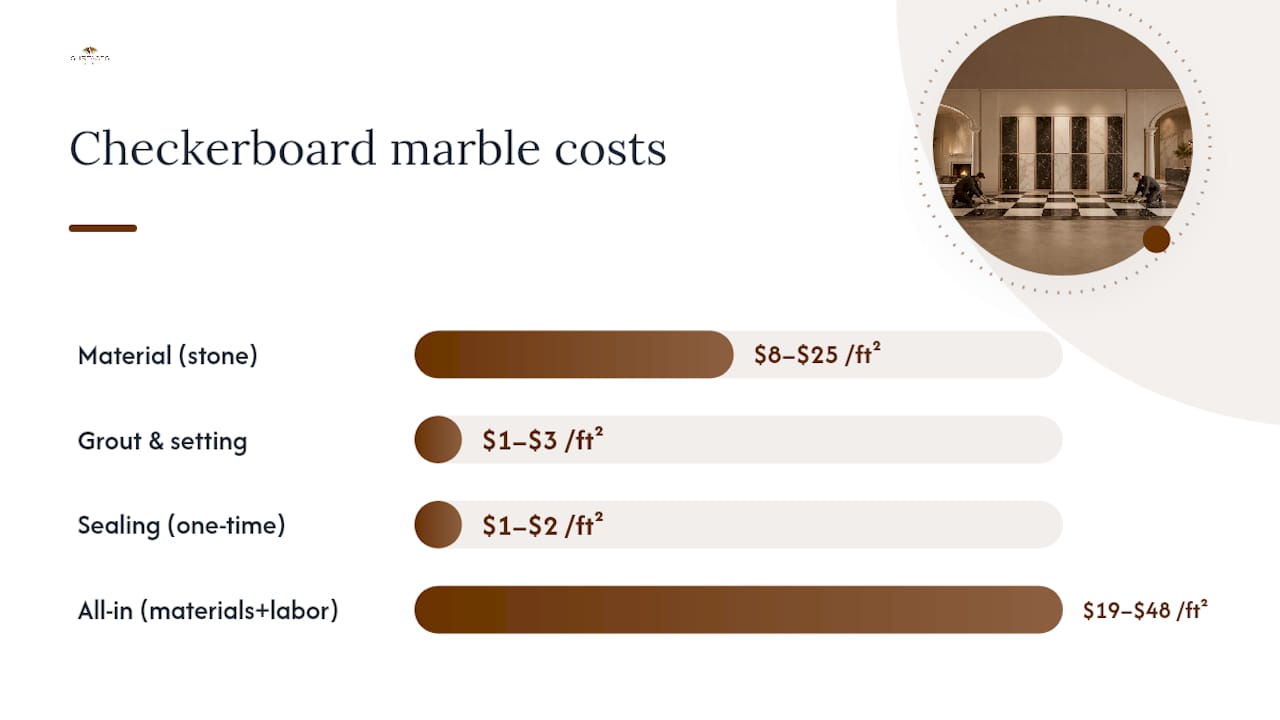
- Expect total costs between $19 and $48 per square foot, including materials, labor, sealing, and resealing over the floor’s lifespan.
Table of Contents
- What Stones Make the Best Black and White Checkerboard Marble?
- How Do Tile Size and Finish Change the Look?
- Where Does Checkerboard Marble Work Best?
- Installation and Layout Rules for a Flawless Checkerboard
- Sealing, Cleaning, and the Real Downsides
- How to Buy and Order Samples the Right Way
- Why Surfaces Galore Is a Trusted Source for This Look
- Typical Timeline From Order to Finished Floor
- What Does Black and White Checkerboard Marble Cost?
- How Does Marble Compare to Ceramic, Porcelain, or Vinyl Checkerboard?
- What This Guide Gets Right That Most Design Advice Misses
- Ready to Order? Where to Start in the Surfaces Galore Catalog
- Sources
- FAQ
What Stones Make the Best Black and White Checkerboard Marble?
Nero Marquina remains the standard black choice. It’s quarried in Spain, carries fine white veining through a deep charcoal base, and reads as dramatically as any stone on the market when set against a bright white counterpart, according to an analysis comparing it directly to Carrara. Carrara, quarried in Italy, brings soft gray veining and a cooler undertone that suits minimalist rooms. Bianco Dolomite runs whiter and more uniform, which tightens the contrast even further.
A checkerboard pairs one strong black stone with a lighter white one, and the black stone drives the contrast while the white stone’s undertone (cool gray versus warm cream) shifts the whole mood, per research on checkerboard stone selection. Crema Marfil, a warm Spanish limestone, works when you want a softer, less clinical alternative to bright white.
- Nero Marquina + Carrara White: the sharpest, most classic contrast
- Nero Marquina + Bianco Dolomite: brighter white, slightly bolder look
- Nero Marquina + Crema Marfil: warmer, less severe pairing
Matching pairings are available pre-selected by suppliers, including the Siena in Bianco Dolomite 6X12 and Nero Marquina 4X12 Set and the Rojo Alicante / Carrara White / Nero Marquina 2X2 Mosaic, providing a coordinated starting point instead of sourcing two separate stone lots independently.
Pro Tip: Using Nero Marquina only in a border or feature strip, with Carrara filling the rest, delivers drama without turning an entire kitchen floor into a high-contrast statement.
How Do Tile Size and Finish Change the Look?
Scale changes everything about how a checkerboard reads. Small 2x2 or 3x3 mosaics feel busy and energetic, closer to a vintage bathroom floor than a formal entry. Larger 12x12 squares slow the pattern down and feel more architectural, better suited to open kitchens and foyers where you want the floor to anchor the room rather than compete with it.
Finish matters just as much as size. Honed marble mutes glare and softens the contrast, which makes a dramatic black and white combination easier to live with day to day, while polished finishes deepen the black and brighten the white for maximum drama, according to the same checkerboard finish guide. Tumbled finishes add texture and a worn, antique feel, which suits a vintage black and white tiles look better than a sleek, modern one.
- Polished: highest contrast, most reflective, shows scratches faster
- Honed: matte surface, quieter contrast, easier to maintain
- Tumbled: soft edges and texture, best for a rustic or Old World aesthetic
Grout choice finishes the job. A thin, matching-tone grout line keeps the grid crisp; a wider, contrasting grout line softens the squares into each other.
Pro Tip: If you love the drama of polished marble but worry about slip risk in a bathroom, order both finishes as samples and test them wet in the actual room lighting before deciding.
Where Does Checkerboard Marble Work Best?
A checkerboard floor isn’t neutral. It’s a statement, and where you put it determines whether that statement helps or overwhelms the room.
- Foyers and entryways: low daily wear, high visual payoff. This is where a full-contrast Nero Marquina and Carrara floor earns its keep.
- Kitchens: works well but consider honed finish for slip control near sinks and stoves, plus a matte sealer for grease resistance.
- Bathrooms: classic vintage black and white tiles application, especially in smaller squares; watch for slip resistance in wet zones.
- Commercial lobbies and boutique hotels: checkerboard marble flooring reads as luxury marble decor instantly and holds up under professional maintenance programs.
Surrounding materials change how loud the floor feels. Warm wood cabinetry and brass fixtures calm down a stark black and white marble floor, while white walls and chrome hardware amplify the contrast. If full checkerboard feels too aggressive for your space, a cream-and-brown or gray-and-white version using Crema Marfil delivers the same pattern with far less visual punch. Explore more marble pattern ideas before finalizing a layout.
Installation and Layout Rules for a Flawless Checkerboard
A checkerboard pattern has zero tolerance for sloppy tile sizing. Every seam has to line up, which means the installation rules here are stricter than for a random-pattern floor.
- Confirm calibration first. Tiles or mosaic sheets from different production lots can vary in size just enough to throw off a tight grid; insist on same-lot supply for a full-floor checkerboard, since calibration mismatches are one of the most common installation failures.
- Dry-lay before bonding anything. Laying the pattern out loose on-site lets you confirm alignment and see how the stone’s natural color and shade variation actually reads under real light, a step professional installers recommend as standard practice.
- Choose your starting line. A centerline start balances the pattern symmetrically around the room; an off-center start lets you avoid cutting full squares at a doorway or vanity.
- Check the substrate. Marble telegraphs subfloor imperfections. Flatness tolerances matter more here than with textured tile, and movement joints need to be planned before the first tile goes down.
Material math matters too. Budget some extra material for cuts, breakage, and future repairs, usually a moderate overage to cover these needs, and always verify shade and thickness consistency across boxes before installation day, not after. Review a full tile layout walkthrough if you’re coordinating the job yourself.
- Rent or borrow a laser level to check substrate flatness before ordering mortar
- Ask your fabricator for safety data sheets covering cutting and dust exposure
- Keep at least one extra box of each color on hand for future repairs
Sealing, Cleaning, and the Real Downsides
Sealing schedules depend on the specific sealer, stone porosity, finish, and foot traffic; some impregnating sealers require only an initial application, while others need occasional reapplication over time, according to sealer maintenance guidance from Prosoco. A kitchen island floor with daily spills needs a tighter resealing schedule than a formal living room.
Here’s the part vendors gloss over: sealers block staining, they don’t stop etching. Marble is calcium carbonate, and any acidic liquid, lemon juice, vinegar, wine, will dull the polish on contact regardless of how well the floor is sealed. That’s the honest downside of marble flooring, and it’s permanent unless the surface gets re-honed.
- Never use vinegar, bleach, or generic all-purpose cleaners on marble
- Test any new cleaning product on a spare tile or hidden corner first
- Wipe spills immediately, especially in kitchens
- Reseal on a schedule based on your specific sealer and traffic level, not a blanket annual rule
Long-term costs to budget for including resealing, occasional honing to remove etch marks, and keeping spare tiles for repairs. Full guidance on cleaning marble floors covers daily routines in more depth.
How to Buy and Order Samples the Right Way
Order at least two or three samples of each stone in the finish you’re leaning toward, and view them in the room’s actual daylight and evening light before ordering the full quantity. Marble photographs inconsistently, and a slab that looks bright white online can read warm or gray under your kitchen’s actual bulbs.
Before placing a full order, ask your supplier:
- What’s the stone’s origin, and is it consistent lot-to-lot?
- Is a matching lot available if you need replacement tiles in five years?
- What finish options exist, and can you get samples in more than one?
- What’s the return policy on unused samples or overage material?
Lead times for direct-import marble typically run longer than domestic stock, since shipments come by container rather than truck, so build that into your renovation schedule early. Cost estimates should account for stone price per square foot, grout, labor, and a waste allowance of 10 to 15% for cuts and breakage.
Pro Tip: Order your samples at least six to eight weeks before your target installation date; that buffer covers shipping delays without pushing back your contractor’s schedule.
Why Surfaces Galore Is a Trusted Source for This Look
Surfaces Galore imports its marble, travertine, and limestone directly and ships nationwide, which means checkerboard buyers deal with one supplier instead of chasing down two separate stone lots from two separate vendors. That direct-import model also keeps trade pricing competitive for designers and contractors managing multiple projects.
Catalog matches built for this exact use include:
John, who writes on stone selection and installation for the Surfaces Galore blog, covers pattern planning and material matching in more depth in the Nero Marquina marble guide. Trade customers working on bulk or commercial orders can request quotes and technical guidance directly through customer support.
Typical Timeline From Order to Finished Floor
Most checkerboard projects take several weeks from ordering samples to installation completion, with much of that time spent sourcing materials rather than installation.
Sample selection and approval can take up to a couple of weeks under real lighting conditions. Shipping times for direct-import marble may vary from a few weeks to over a month depending on stock availability and shipment schedules. Domestic-stock items move faster; special-order calibrated sets take longer.
Installation is generally the shortest phase; experienced crews may complete a mid-size checkerboard floor in several days including preparation and grouting, while larger projects can take longer.
Add buffer time for two things people forget: acclimation (letting stone sit in the installation environment for 24 to 48 hours before setting) and sealing, which needs to happen after grout cures, typically 48 to 72 hours post-installation. Rushing either step is the most common reason checkerboard floors develop uneven sealing or grout haze later.
If you’re coordinating a kitchen remodel around other trades, order your marble the same week you finalize cabinet layout. Marble lead times often run longer than cabinetry lead times, and a floor that arrives late holds up everything else.
What Does Black and White Checkerboard Marble Cost?
Material cost for checkerboard marble typically runs from $8 to $25 per square foot depending on the stone, with Carrara and Crema Marfil on the lower end and premium-grade Nero Marquina pushing toward the higher end. Pre-matched sets, like a Bianco Dolomite and Nero Marquina pairing sold together, often price more predictably than sourcing two stones from separate vendors because the calibration and quantity math is already worked out.
Installation labor costs for a standard checkerboard layout can vary and may be higher for rooms with complex cuts, curves, or border details. That range reflects the extra time a true checkerboard demands compared to a straight-lay floor: dry-laying, tighter tolerance checks, and more careful cutting around thresholds.
Budget for grout and setting materials separately, typically $1 to $3 per square foot, and always add a 10 to 15% waste allowance to your total square footage before ordering. For a 200 square foot foyer, that’s the difference between ordering 200 square feet and ordering 220 to 230, which avoids a mid-project scramble for matching-lot replacement tile that may no longer be available.
Sealing adds a modest one-time cost after installation, generally $1 to $2 per square foot for a professional application, plus periodic resealing down the line depending on the sealer type and traffic. Altogether, a mid-size kitchen or foyer checkerboard project in real marble typically lands somewhere between $19 and $48 per square foot all-in, materials and labor combined, before any custom border or medallion work.
How Does Marble Compare to Ceramic, Porcelain, or Vinyl Checkerboard?
Marble wins on permanence and resale value but loses on upfront cost and forgiveness. Porcelain and ceramic checkerboard tiles typically run $3 to $10 per square foot installed, a fraction of natural stone, and they resist staining and etching far better since they’re manufactured rather than quarried. If your household lives in the kitchen and treats lemon juice like a contact sport, porcelain checkerboard tile is the more practical daily choice.
Vinyl and luxury vinyl tile checkerboard patterns cost even less, often $2 to $6 per square foot installed, and they’re the fastest to install and easiest to replace. But vinyl reads as exactly what it is: a printed pattern. It doesn’t carry the depth, veining, or light reflection that real marble does, and it won’t hold value the same way in a home sale.
Marble’s real advantage is that no two floors look alike. Every slab carries unique veining, which is exactly what gives monochrome marble design its character; porcelain and vinyl reproduce the same pattern tile after tile with zero variation. For a foyer or feature area where the floor is meant to be noticed, that natural variation is the whole point of spending more. For a high-traffic mudroom where durability trumps drama, porcelain is the more sensible call.
What This Guide Gets Right That Most Design Advice Misses
Most articles on checkerboard marble sell the fantasy and skip the fine print. They’ll show you a gorgeous Nero Marquina and Carrara floor and never mention that calibration mismatches between tile lots are the single most common reason a “checkerboard” ends up looking like a poorly fitted puzzle.
The conventional advice treats finish choice as purely aesthetic. It isn’t. Honed versus polished is a livability decision as much as a style one, and I’d argue most homeowners underestimate how much glare and slip resistance matter in a kitchen or bathroom until they’re living with the wrong finish. If you’re on the fence, honed wins for anywhere with water or grease exposure.
The other thing overlooked: sealing gets sold as a cure-all, and it isn’t. A sealed floor still etches. Buyers who understand that going in make peace with marble’s character instead of feeling betrayed by the first lemon juice mark. Prioritize same-lot calibration and the right finish before you fall in love with a specific stone pairing.
— John | Surfaces Galore
Ready to Order? Where to Start in the Surfaces Galore Catalog
Surfaces Galore sources its marble, travertine, and limestone directly from quarries and ships nationwide, so a checkerboard project doesn’t require chasing down two vendors for two stones that may or may not match in calibration or lot.
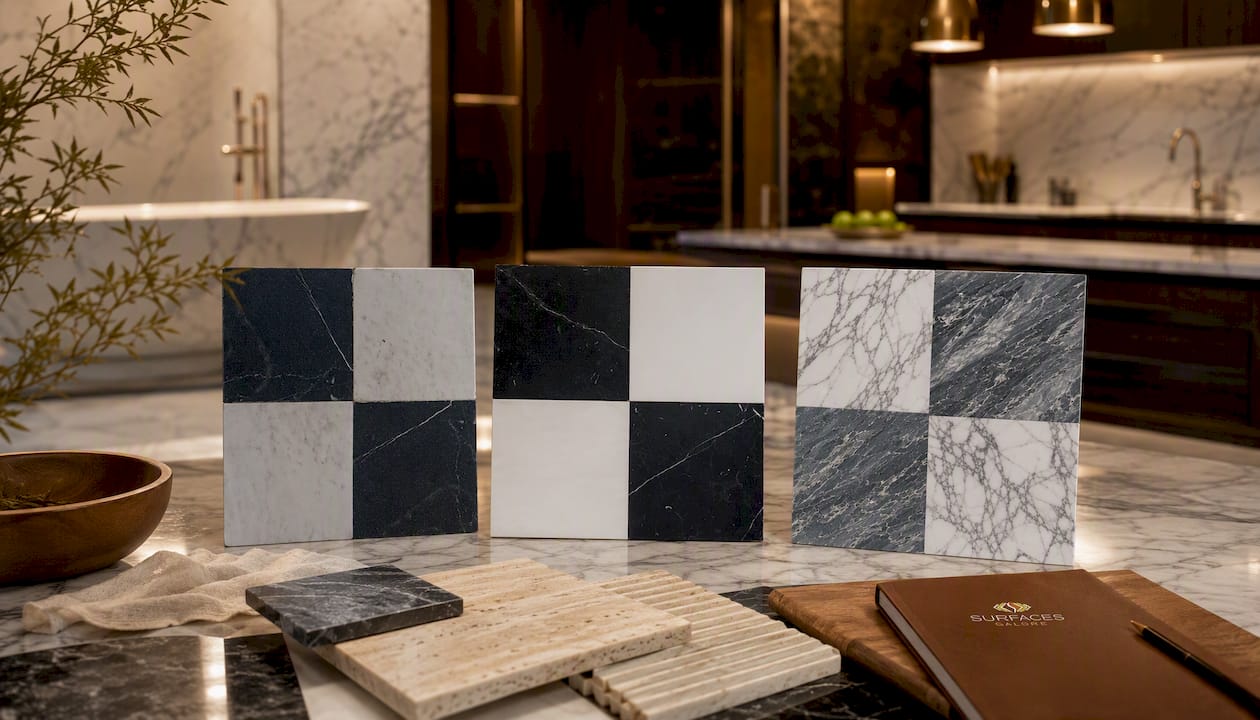
Start with the Natural Stone collection to browse the full range of black and white pairings, or go straight to a pre-matched option like the Siena in Bianco Dolomite 6X12 and Nero Marquina 4X12 Set if you already know your layout. The Rojo Alicante / Carrara White / Nero Marquina 2X2 Mosaic works well as a sample piece if you’re trying to visualize a mosaic-scale checkerboard before committing to full tile size.
Order physical samples before you buy in quantity, and view them under your own lighting. If you’re managing a commercial project or need a bulk trade quote, reach out to Surfaces Galore’s customer support team directly for lead times and pricing on larger orders.
Sources
- Marble Checkerboard Floors: Stone, Tile Size & Finish Guide | Flooring Magazine
- Marble Checkerboard Floor Installation Guide | SF Marble
- Nero Marquina Marble vs Carrara Marble: Which Type Complements Minimalist Interiors?
- Cdn
FAQ
What Does a Black and White Checkered Floor Symbolize?
Historically, black and white checkerboard flooring signaled formality and craftsmanship, common in grand European foyers and later in mid-century American kitchens and bathrooms as a marker of classic, timeless design.
What Are the Downsides of Marble Flooring?
Marble etches when it contacts acidic substances like lemon juice or vinegar, and sealing prevents staining but not etching; it also requires periodic resealing and can be more slip-prone when polished and wet.
Is Black Marble Expensive?
Black marble like Nero Marquina typically costs more than common white marbles due to sourcing and demand, though pricing varies by grade, finish, and whether it’s sold in a pre-matched set or sourced separately.
What Are the Floor Tile Trends Heading Into 2026?
Monochrome marble design, including black and white checkerboard patterns, continues trending alongside honed finishes and mixed-scale layouts that combine large-format tile with mosaic borders for texture and contrast.
Recommended
- Matching Marble Slabs for Seamless Luxury Surfaces
- Understanding Marble Tile Calibration For Precise Design
- How to Match Tile Patterns for Flawless Design Results
- Marble Tile Matching for Cohesive Luxury
This article is provided for general informational guidance only. Natural stone varies in color, veining, texture and performance. For installation, sealing, cleaning and maintenance, follow the product manufacturer’s instructions and consult a qualified installer or stone-care professional. Always test cleaning and sealing products in an inconspicuous area first. Surfaces Galore is not responsible for damage, discoloration, etching, staining, installation issues or other problems resulting from

Leave a comment