
Marble Shower Installation Workflow for Elegant Results

A single mistake during installation can cause thousands in repairs to a marble shower. Homeowners now spend more than ever on bathroom renovations, making durable and beautiful results a top priority. Careful preparation, planning, and finishing techniques transform raw marble into an elegant shower that stands up to daily use. With the right steps, you can achieve a flawless finish that protects your investment and highlights marble’s natural beauty.
Table of Contents
- Step 1: Assess Site Conditions And Prepare Surfaces
- Step 2: Plan Layout And Dry-Fit Marble Tiles
- Step 3: Apply Waterproofing And Installation Materials
- Step 4: Set Marble Tiles Accurately In Place
- Step 5: Grout, Seal, And Finish The Surface
- Step 6: Inspect And Verify Installation Quality
Quick Summary
| Key Point | Explanation |
|---|---|
| 1. Assess site conditions thoroughly | Conduct a detailed inspection to identify structural issues and prepare surfaces for installation. |
| 2. Dry-fit tiles for layout planning | Arrange tiles before installation to visualize design and ensure correct placement. |
| 3. Apply waterproofing for protection | Use a quality waterproof membrane to prevent moisture damage and enhance durability. |
| 4. Set tiles accurately and check levelness | Position tiles carefully using spacers to ensure uniform gaps and alignment throughout. |
| 5. Conduct a quality inspection after grouting | Review installation for alignment, grout consistency, and possible issues to ensure a flawless finish. |
Step 1: Assess site conditions and prepare surfaces
Before diving into your marble shower installation project, you will need to thoroughly evaluate and prepare the site for optimal results. This critical first step ensures a smooth and successful installation process that prevents future complications.
Begin by conducting a comprehensive site inspection. Look carefully at the existing surfaces including walls, floors, and substrate conditions. According to preservation guidelines from the General Services Administration, preparation involves meticulously removing any extraneous substances like old caulking, paint residue, or previous installation materials that might interfere with your new marble surfaces.
Measure the entire installation area precisely and check for any structural issues such as uneven surfaces, water damage, or potential moisture problems. Pay special attention to wall studs and floor jointing to confirm they can adequately support the weight of marble tiles. Any underlying structural weaknesses must be addressed before proceeding with installation.
Pro Tip: Use a professional grade laser level to ensure perfectly straight and even surfaces during your initial assessment.
Document your findings through detailed measurements and photographs. This documentation will serve as a valuable reference throughout the installation process and help you anticipate potential challenges before they become expensive problems.
Your next step will involve preparing the surfaces for actual marble installation by creating a clean, level, and stable foundation that will support your elegant new marble shower.
Step 2: Plan layout and dry-fit marble tiles
Now that you have assessed your site conditions, it is time to plan your marble shower tile layout with precision and creativity. This crucial stage allows you to visualize the final design and make strategic decisions about tile placement before permanent installation.
Begin by spreading out your marble tiles and creating a preliminary arrangement. According to preservation and design research, dry-fitting tiles enables designers to anticipate aesthetic and functional outcomes. Carefully consider the natural variations in marble patterns and select placement that highlights the stone’s unique characteristics.
Measure your shower space meticulously and create a grid layout on the floor using chalk lines or a laser level. This helps you determine exact tile positioning and identify potential cutting requirements. Pay attention to tile symmetry and minimize small tile cuts near edges or corners for a more professional appearance.
Pro Tip: When dry-fitting marble tiles, leave consistent spacing between tiles to account for grout lines and ensure a balanced final look.
For more detailed guidance on installation techniques, check out our marble tile installation guide. Take time to experiment with different tile orientations and patterns until you find the most visually appealing arrangement that complements your shower space.
Once you are satisfied with the dry-fit layout, photograph your arrangement as a reference for the actual installation process.
 This step prepares you for the precise and careful marble installation that will transform your shower into an elegant sanctuary.
Step 3: Apply waterproofing and installation materials
With your marble tiles dry-fitted and layout planned, the next critical phase involves applying specialized waterproofing and installation materials to protect and secure your elegant marble shower surface. This step is fundamental to ensuring long-lasting durability and preventing potential moisture related damage.
According to preservation research, proper waterproofing is essential to prevent issues like efflorescence and water penetration that can compromise marble’s structural integrity. Begin by thoroughly cleaning the prepared surface and applying a high quality waterproof membrane specifically designed for stone installations. This membrane creates a critical barrier that shields your substrate from potential moisture intrusion.
Select a premium thinset mortar compatible with marble tiles and designed for wet environments. When mixing the mortar, follow manufacturer instructions precisely and maintain consistent water ratios. Apply the mortar using a notched trowel at a 45 degree angle to create uniform ridges that ensure maximum tile adhesion.
Pro Tip: Work in small sections to prevent the mortar from drying before tile placement and maintain consistent pressure when setting each marble tile.
Carefully place your marble tiles onto the mortared surface using gentle twisting motions to eliminate air pockets and ensure complete contact. Use spacers to maintain uniform grout lines and create a professional looking installation.
For more detailed techniques, explore our guide on kitchen backsplash sealing which offers additional insights into protecting natural stone surfaces. Your meticulous approach during this stage will create a waterproof foundation for a stunning marble shower that will endure for years.
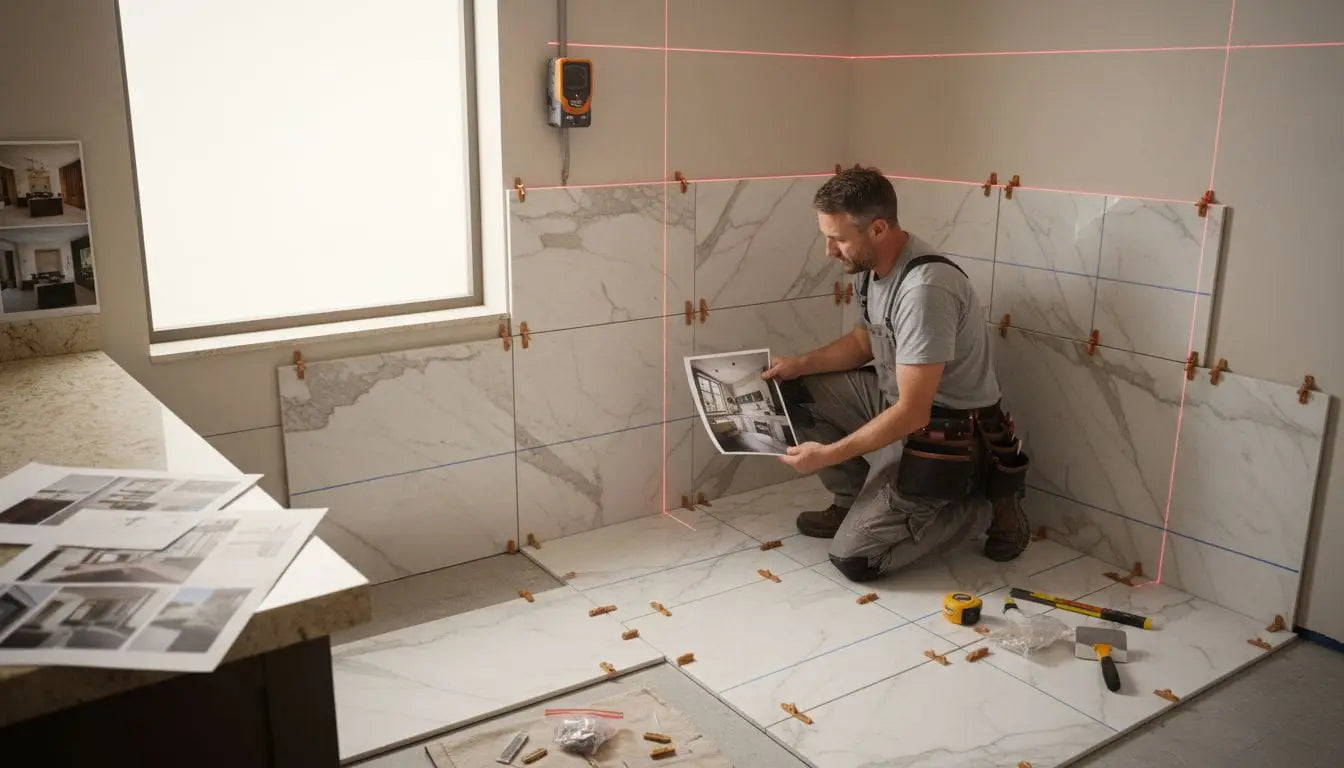
Step 4: Set marble tiles accurately in place
With waterproofing and mortar applied, you are now ready to set your marble tiles with precision and care. This critical stage transforms your carefully planned layout into a stunning shower surface that showcases marble’s natural beauty and elegance.
According to luxury bathroom design research, achieving an elegant marble installation requires meticulous attention to tile placement that highlights the stone’s unique veining and patterns. Begin by carefully positioning each marble tile onto the prepared mortar surface, using gentle pressure and a slight twisting motion to ensure complete contact and eliminate potential air pockets.
Align each tile precisely using your predetermined layout grid. Pay special attention to maintaining consistent spacing between tiles for uniform grout lines. Use tile spacers to guarantee even gaps and a professional looking result. Work systematically across the surface, checking alignment and levelness as you progress.
Pro Tip: Use a rubber mallet with a soft protective surface to gently tap tiles into perfect position without risking surface damage.
For comprehensive guidance on perfecting your installation, explore our marble and travertine tile installation guide. As you set each tile, periodically step back to verify overall pattern consistency and make any necessary adjustments before the mortar sets.
Your methodical approach during this stage will ensure a flawless marble shower that reflects your craftsmanship and design vision.
Step 5: Grout, seal, and finish the surface
With your marble tiles precisely set, the final stage of your shower installation involves grouting, sealing, and finishing the surface to protect and enhance your beautiful marble tiles. This crucial step transforms your installation from a raw construction project into a polished and elegant marble shower.
According to preservation research on marble surfaces, proper finishing techniques are essential to protect against moisture penetration and maintain the stone’s natural beauty. Begin by selecting a premium grout that complements your marble’s color and texture. Mix the grout according to manufacturer specifications and apply it carefully using a rubber float held at a 45 degree angle to ensure complete coverage between tiles.
Work methodically across the surface, pressing grout into tile joints and removing excess material. Allow the grout to set partially before using a damp sponge to clean tile surfaces and create smooth even lines. Pay special attention to wiping away grout residue to prevent hazy deposits that can diminish marble’s natural luster.
Pro Tip: Use a grout sealer specifically designed for natural stone to prevent staining and protect your intricate tile work from moisture damage.
For comprehensive insights into grouting techniques, check out our marble and travertine tile grout installation guide. After the grout has fully cured, apply a high quality stone sealer using a clean lint free cloth to protect your marble and enhance its natural beauty.
Your meticulous approach in this final stage will ensure a stunning marble shower that combines durability with timeless elegance.
Step 6: Inspect and verify installation quality
With your marble shower tiles installed, grouted, and sealed, the final critical step is a comprehensive quality inspection that ensures your meticulous work meets the highest standards of craftsmanship. This careful verification process protects your investment and guarantees a flawless marble shower installation.
According to preservation research, thorough post installation inspection is essential to maintaining stone integrity and identifying any potential issues before they become costly problems. Begin by examining the entire surface under bright natural and artificial lighting to reveal subtle imperfections that might be missed during installation.
Check each marble tile for proper alignment, consistent grout lines, and even surface levelness. Look closely for any lippage between tiles where one tile edge sits higher than adjacent tiles. Verify that grout lines are uniform in width and depth, and that no excess grout remains on tile surfaces. Run your hand gently across the surface to feel for any uneven areas or potential tile movement.
Pro Tip: Use a small mirror and flashlight to inspect hard to see areas and catch any subtle installation irregularities that might be invisible at first glance.
Carefully inspect the waterproofing and grout lines for any potential moisture penetration points. Test the overall stability of the installation by applying gentle pressure to various tile sections and listening for any hollow sounds that might indicate incomplete mortar coverage.
With your inspection complete, you can now confidently enjoy your beautiful new marble shower knowing that every detail has been carefully evaluated and perfected.
Here’s a summary of each installation step and its main focus:
| Step | Main Actions | Key Focus |
|---|---|---|
| 1. Assess & Prepare | Site inspection Remove old materials Check structure |
Surface readiness Structural integrity |
| 2. Plan Layout & Dry-Fit | Arrange tiles Dry-fit layout Grid measurement |
Design planning Tile positioning |
| 3. Waterproof & Apply Materials | Clean surfaces Apply membrane Spread mortar |
Water protection Proper adhesion |
| 4. Set Tiles | Position tiles Align with spacers Check level |
Precision Pattern consistency |
| 5. Grout & Seal | Grout joints Clean residue Apply sealer |
Finish quality Long-term protection |
| 6. Inspect & Verify | Quality check Surface inspection Test stability |
Flawless result Issue prevention |
Elevate Your Marble Shower Project with Premium Stone and Expert Support
Installing a marble shower demands precision from surface preparation to meticulous tile setting. This article highlights common challenges like ensuring waterproofing integrity and achieving flawless grout lines. If you want your elegant marble shower to truly stand the test of time without costly mistakes, choosing the right natural stone and installation materials is key. At Surfaces Galore, we understand the critical importance of high-quality marble and travertine that pairs perfectly with professional techniques.

Bring your marble shower vision to life with confidence by exploring our wide selection of authentic natural stone at Surfaces Galore. Whether you are planning layout and dry-fitting or sealing and finishing your shower, our premium stone and expert guidance will help ensure a durable and beautiful result. Start your transformation today and experience how the right materials can simplify every step from waterproofing to the final inspection. Discover the difference at Surfaces Galore now.
Frequently Asked Questions
What should I check before starting my marble shower installation?
You should conduct a thorough site inspection to assess existing surfaces and structure. Remove any old materials and ensure that walls and floors are even and stable, supporting the weight of the marble.
How do I effectively plan the layout for my marble shower tiles?
Begin by dry-fitting the tiles to create a preliminary layout you are satisfied with. Use a chalk line to mark a grid on the floor for precise tile alignment and determine any necessary cuts.
What waterproofing measures do I need to apply before installing marble tiles?
Apply a high-quality waterproof membrane to the prepared surface to prevent moisture intrusion. Ensure that the membrane is applied thoroughly to create a protective barrier before spreading the mortar for tile adhesion.
What steps should I take to ensure my marble tiles are properly set?
Position each marble tile carefully onto the prepared mortar, using spacers to maintain uniform gaps for grout lines. Check for alignment and levelness frequently as you progress across the surface during installation.
How can I prevent staining and damage to my marble surface after installation?
Use a grout sealer specifically designed for natural stone to protect your marble from moisture and staining. This protective layer should be applied after the grout has cured fully to maintain the elegance of your shower for years to come.
What do I need to do during the final inspection of my marble shower installation?
Inspect the entire surface for alignment, consistent grout lines, and signs of potential moisture penetration. Check for any uneven areas and test the stability of the installation by gently applying pressure to different sections.
Leave a comment