
Multi-Room Tile Options That Create Seamless Flow

The simplest, most reliable way to coordinate tile across adjoining rooms is to extend the same tile (or a closely matched version of it) through every connected space, since that removes the guesswork around color, height, and grout that trips up most renovation plans. It isn’t the only right answer, but it’s the one that works for the widest range of homes.
For layouts where a single tile won’t cover every need (moisture in a bathroom, budget limits in a mudroom), three other approaches hold up well:
- Same tile throughout — one product, one grout, zero transition planning. Best for open-plan kitchens, dining rooms, and connected living areas.
- Coordinated tile family — same material and finish, different size or format, tied together by matching grout. Good when rooms have different traffic or moisture demands but you still want visual agreement.
- Distinct tiles with a designed transition — different tiles joined by a threshold, reducer, or profile such as a Schluter® system, guided by installation standards from groups like the Tile Council of North America (TCNA). This is the right call when function must win over uniformity, like a bathroom floor next to a hardwood hallway.
Surfacesgalore works with all three approaches daily, sourcing the marble, limestone, and travertine that make the first two options possible without sacrificing durability.
Key Takeaways
The most reliable multi-room tile plan extends one tile (or a tightly coordinated family) through connected spaces, with height planning and grout consistency doing the real work of making it feel seamless.
| Point | Details |
|---|---|
| Default to one tile | Running the same tile through open, connected rooms is the simplest way to achieve visual flow. |
| Match grout across zones | Consistent grout color ties different tiles together; contrasting grout should stay contained to one feature area. |
| Plan height before ordering | Confirm tile thickness, mortar depth, and underlayment early to avoid unplanned reducers or thresholds. |
| Scale patterns to the room | Pair bold patterns like herringbone or checkerboard with calmer neighbors rather than repeating the same scale everywhere. |
| Choose materials by exposure | Porcelain suits wet, high-traffic rooms; natural stone from Surfacesgalore suits entries and living spaces built around continuity. |
Table of Contents
- What Are the Best Multi-Room Tile Options for a Cohesive Home?
- Which Tile Patterns Work Best Across Adjoining Rooms?
- Porcelain, Ceramic, or Natural Stone: Which Material Fits Multiple Rooms?
- How Do You Transition Tiles Between Rooms?
- Should Grout Color Match or Contrast Between Rooms?
- What Should You Check Before Tiling Multiple Rooms?
- Which Room Pairings Work Best for Coordinated Tile?
- Which Tile Approach Fits Your Home?
- A Note From the Field on Multi-Room Tile Planning
- Explore Natural Stone Options for Your Multi-Room Project
- Sources
- FAQ
What Are the Best Multi-Room Tile Options for a Cohesive Home?
Picking a strategy isn’t really about taste first. It’s about traffic patterns, moisture exposure, budget, and how your rooms connect physically. Here are five approaches that consistently work, and where each one earns its keep.
Single-tile run through connected rooms. Running one tile continuously through an open floor plan is the most cohesive option available, and it’s also the one that makes a modest square footage read larger. Continuous tile floors with minimal grout lines reinforce that sense of scale, particularly with large-format tile. The tradeoff: you need one tile that performs everywhere, including wet zones, so pick a material rated for the most demanding room in the run.

Same family, different formats. Keep the material and finish consistent (say, a honed travertine) but shift the size between rooms. A 24 inch by 24 inch field in the kitchen can pair with a smaller mosaic accent in a connected powder room. Matching grout color across both keeps the eye reading it as one surface even though the format changed.
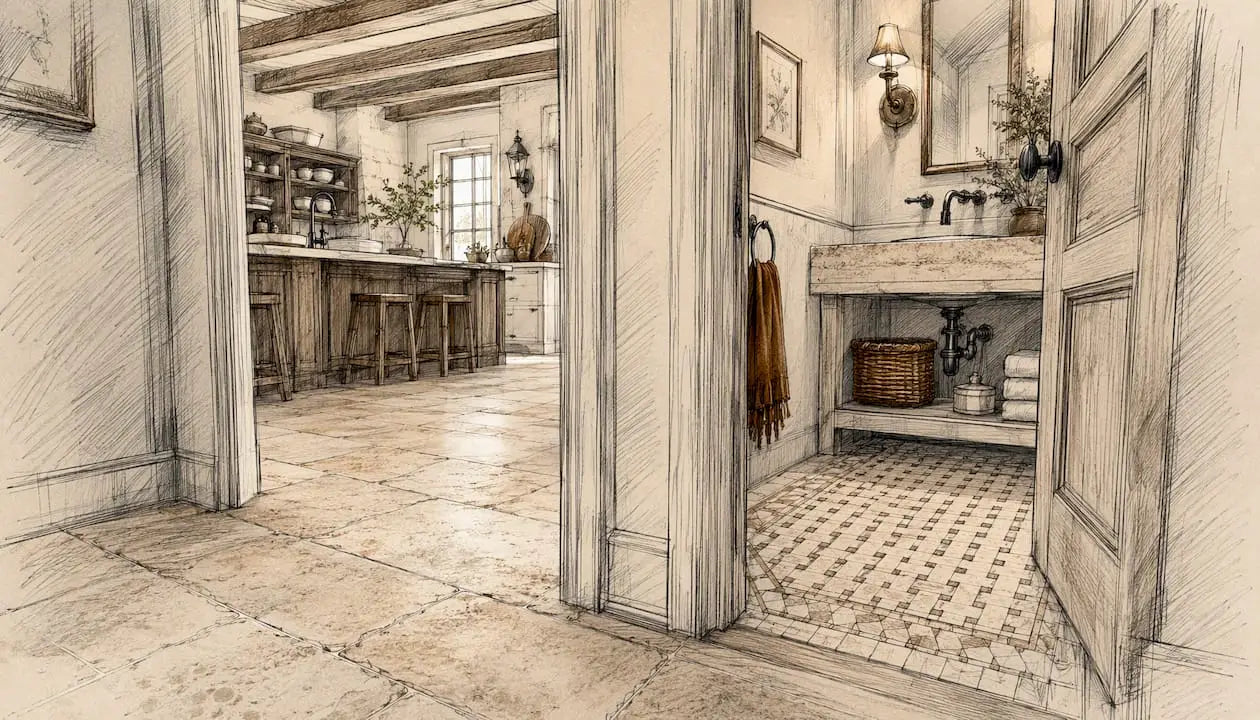
Anchor tile plus a bridging tile. Choose a statement tile for your main living space, then pick a secondary tile that pulls one color or vein tone from it for adjoining rooms. Designers commonly start with a base tile and pull a secondary tone from it to bridge spaces without repeating the exact same product everywhere.
Different tiles with a deliberate transition. Sometimes function has to win: porcelain in a kitchen next to engineered wood in a family room, or natural stone in an entry next to carpet in a bedroom hallway. This calls for a threshold or metal profile, and it’s the strategy that needs the most careful height planning.
Pattern-orientation zoning. Keep the same material everywhere but change the laying direction or pattern to signal a shift in use, herringbone in an entry that opens into a straight-lay living room, for instance. You get material continuity with a visual cue that says “this is a different zone.”
| Strategy | Best for | Installation complexity |
|---|---|---|
| Single-tile run | Open-plan kitchen, dining, living areas | Low, once substrate is leveled |
| Same family, different formats | Rooms with different traffic or moisture needs | Moderate |
| Anchor + bridging tile | Feature areas that need contrast without clashing | Moderate |
| Different tiles, designed transition | Mixed flooring materials, budget-driven zones | Higher, needs profiles |
| Pattern-orientation zoning | Defining zones without changing material | Moderate |
Which Tile Patterns Work Best Across Adjoining Rooms?
Pattern choice affects continuity as much as material choice does, and some patterns are built to be a background while others demand to be the star.
- Herringbone. A strong directional pattern that reads as a feature. Works well as an entry or hallway statement that hands off to a calmer straight-lay pattern in the next room.
- Chevron. Similar energy to herringbone but with a sharper, more formal point. Good for a single accent room rather than a full-home treatment.
- Subway (brick). A classic running-bond layout that reads as background in most spaces. Pairs easily with almost anything in the next room because it doesn’t compete for attention.
- Versailles / Modular Versailles. A mix of different-sized rectangles and squares laid in a repeating module. Suits traditional homes and larger rooms, since the pattern needs space to repeat properly.
- Checkerboard. High contrast, high personality. Best contained to one zone, like a foyer or a powder room, rather than run wall-to-wall through multiple living spaces.
- Large-format straight lay. The default for open-plan main levels. Minimal grout lines, maximum flow, and the easiest pattern to match between two adjoining rooms.
Scale matters as much as pattern choice. A large-format straight lay in your kitchen paired with an identical scale in an adjoining dining nook can feel monolithic unless that’s the look you’re after. Dropping to a slightly smaller format, or shifting to herringbone at the transition point, gives the eye a cue that it’s entered a new area without breaking the material story.
Some room pairings tend to work reliably: kitchen into dining with the same large-format tile in a straight lay, a hallway into a living room where herringbone in the hall gives way to a calmer field pattern, or a bathroom into a hallway where a patterned tile stays contained to the wet room while the hall carries a solid neighbor tone. Reserve high-drama patterns like checkerboard or bold chevron for a single accent space. Save the quieter patterns for the square footage that has to do the most work.
Porcelain, Ceramic, or Natural Stone: Which Material Fits Multiple Rooms?
Material choice determines how forgiving your multi-room plan will be over the next decade, not just how it looks on day one.
| Material | Best for | Maintenance & durability | Seamlessness |
|---|---|---|---|
| Porcelain (large-format, rectified) | Kitchens, bathrooms, high-traffic hallways | Very durable, low maintenance, minimal sealing | Rectified edges allow tight grout joints for near-seamless runs |
| Ceramic | Lower-traffic rooms, walls, accent areas | Durable but softer than porcelain, easy to clean | Standard grout joints, good for budget-conscious zoning |
| Marble | Entries, formal living rooms, feature floors | Elegant but porous, needs periodic sealing | Bookmatched veining creates dramatic continuity |
| Limestone | Living areas, transitional spaces | Durable with sealing, softer patina over time | Consistent tone helps blend adjoining rooms |
| Travertine | Kitchens, hallways, Mediterranean-style homes | Durable, needs sealing, handles traffic well | Filled and honed finishes read cleanly across rooms |
Large-format rectified porcelain is often the easiest path to a seamless look, since tight rectified edges and careful placement of full tiles in visible areas minimize the appearance of seams. Natural stone earns its place where the goal is character rather than uniformity. Marble’s veining and travertine’s warm tone give adjoining rooms a shared identity that manufactured tile struggles to replicate, which is why Surfacesgalore stocks marble, limestone, and travertine sourced specifically to support that kind of vein-to-vein continuity from one room to the next.

Pro Tip: Honed and matte finishes generally read more consistently across large multi-room runs than high-polish finishes, since gloss variation between batches becomes obvious under different room lighting.
How Do You Transition Tiles Between Rooms?
A flush transition, where tile in one room meets another floor at exactly the same height, only works when every layer underneath is planned to match: tile thickness, mortar bed, underlayment, and substrate. When those finished heights don’t align, you need a transition strip, whether that’s a reducer, threshold, or a metal profile.
Plan the transition before you order a single tile:
- Document the existing finished height of every adjacent surface, floor, subfloor, and any flooring that’s staying in place.
- Choose your tile thickness and underlayment together. A thicker tile with a thin-set mortar behaves very differently than a thin tile over a heated floor system.
- Specify movement joints anywhere the tile field crosses a doorway or exceeds a common recommended length for expansion joints, per general TCNA guidance on crack isolation.
- Dry-lay the full run and measure against the doorway before you mix a single bag of mortar.
Reducers handle moderate height drops between tile and a lower floor. T-molding works when two floors meet at close to the same height but need a clean seam. Thresholds, often stone or metal, bridge wet-room edges like shower entries. Schluter®-style profiles give you a thin, protective metal edge that also functions as an expansion joint, which matters more than most homeowners expect on longer runs.
Before setting anything, confirm door clearance under the new finished height, check appliance placement against the tile line, and center any visible transition either directly under a closed door or squarely in the middle of an open passage, never off to one side. Contractors plan transitions by comparing finished heights, movement needs, and edge conditions for both flooring systems before installation starts, and that sequencing is what prevents a $40 transition strip from becoming a $4,000 change order.
Pro Tip: Put the visible seam under a closed door whenever you can. A transition centered in an open, doorless passage draws the eye every time someone walks through; hidden behind a door, nobody notices it at all.
Should Grout Color Match or Contrast Between Rooms?
Matching grout across adjoining rooms is the fastest, cheapest way to make two different tiles feel like one surface, since consistent grout color provides a visual through-line that ties spaces together, while contrasting grout does the opposite: it emphasizes every joint and highlights the tile’s geometry.
- Use a single grout color across rooms you want to read as one continuous surface, even if the tile format changes.
- Reserve a contrasting grout for a contained feature zone, like a checkerboard powder room floor, where you want the pattern itself to be the point.
- Wider joints (3/16 inch or more) suit rustic or handmade-look tile; narrower joints (1/16 inch) suit rectified porcelain and reinforce a seamless look.
- Test grout in place in both rooms before committing. Lighting shifts grout color more than most people expect, and a sample that looks right under a showroom’s fluorescent light can look completely different under a north-facing window.
Pro Tip: Grab two grout samples and lay them dry against tile in both rooms at the same time of day you’ll actually use the space. Morning light in a kitchen reads warmer than the afternoon light in an adjoining den, and that difference changes which gray or beige grout actually matches.
What Should You Check Before Tiling Multiple Rooms?
Run through this before a single tile gets set in mortar:
- Dry-lay the full run across every threshold, aligning key sightlines and setting a center reference point before any cuts are made.
- Check subfloor flatness against your tile manufacturer’s tolerance (commonly 1/8 inch over 10 feet for larger format tile) and flag any spots needing self-leveling compound.
- Confirm where crack isolation membrane is needed, especially over concrete slabs with visible hairline cracks or where tile spans a room addition joint.
- Measure and record: tile size and thickness, mortar bed depth, underlayment thickness, door undercuts, and where appliances or baseboards will meet the finished edge. Getting these measurements wrong is one of the most common causes of unplanned reducers and clearance problems discovered mid-install.
- Confirm with your installer where transitions will sit, which profile they’re using, who’s supplying it, and who owns finish-height coordination between trades.
- Treat the dry-lay as your go/no-go moment. If sightlines don’t align or a doorway clearance looks tight, fix it now, not after the mortar sets.
Which Room Pairings Work Best for Coordinated Tile?
A few pairings come up again and again in renovation plans, and for good reason:
- Kitchen into dining room. Large-format porcelain or a durable travertine in a straight lay carries the eye through without a single interruption, ideal for open-concept homes built around one great room.
- Marble entry into a formal living room. A bookmatched marble threshold sets a tone the living room can pick up in a quieter, honed finish of the same stone, or a coordinated neutral porcelain.
- Bathroom into hallway. Keep a patterned or high-contrast tile contained to the wet room, then run a calmer neutral in the connecting corridor with matching grout to tie the two together.
- Powder room into a main-level hall. An encaustic-style pattern in the small room reads as a jewel box, while the hallway stays understated so the pattern doesn’t overwhelm the whole floor plan.
Natural stone earns its place in the entry-to-living-room pairing because veining and tone carry a sense of continuity that manufactured tile can only approximate. Porcelain generally wins in kitchens, bathrooms, and mudrooms, anywhere moisture and traffic are constant, since it needs no sealing and shrugs off spills.
Which Tile Approach Fits Your Home?
Run through these quick questions before you commit to a plan.
- Is it an open floor plan with no doors between rooms? If yes, lean toward a single-tile run. If no, a coordinated family or a designed transition usually fits better.
- Do all adjoining rooms have similar moisture exposure? If yes, one material can usually work everywhere. If no (a bathroom next to a bedroom), plan a transition.
- Is your budget tight for one premium material across every room? If yes, use an anchor tile in the main space and a complementary, less expensive tile elsewhere.
- Are your door clearances already tight? If yes, treat that as a red flag. Get a contractor to confirm finished heights before you order tile, not after.
Watch for structural deflection beyond your tile’s rated tolerance, and don’t skip crack isolation membrane on any run that spans a slab joint or crosses between an addition and the original structure. Skipping that step is how hairline cracks in a foundation slab end up as cracked tile a year later.
A Note From the Field on Multi-Room Tile Planning
The costliest mistake I’ve seen homeowners make isn’t picking the wrong tile. It’s ordering tile before dry-laying the full run across every threshold in the project. On one job, a beautiful large-format porcelain got ordered for a kitchen-to-dining run, and nobody checked the swing clearance on a pantry door until the tile arrived. The fix cost a day of labor and a returned pallet that should never have shipped.
Communication between the person choosing the tile, the person living in the house, and the person setting it is where these plans succeed or fail. A designer can spec the perfect anchor-and-bridge combination, but if the installer doesn’t know where the transition needs to land relative to a door slab, the plan falls apart at the threshold. Dry-lay first. Measure twice. Order once.
Explore Natural Stone Options for Your Multi-Room Project
Once you know which strategy fits your layout, the next step is seeing the material in person, and that’s where Surfacesgalore comes in. As a direct importer of marble, limestone, and travertine, Surfacesgalore skips the markup layers that come with buying through a middleman, so you get authentic stone at prices that make an anchor-and-bridge plan across three or four rooms actually affordable.

Order samples before you commit to a full-room quantity. Comparing a real slab of travertine against your kitchen cabinets under your own lighting tells you more in five minutes than any photo online. Surfaces Galore also handles bulk quoting for renovation projects spanning multiple rooms, so a contractor or homeowner coordinating a whole-floor tile plan can get one quote instead of piecing it together room by room. Shop natural stone tiles today or request a bulk quote to get exact material sourced for your specific room pairings.
Sources
- Tile-to-carpet transition options
- Mix and match tile patterns: kitchen & bath design guide
- Using tile in open-concept homes: how to create flow and define spaces
FAQ
How do you transition tiles between rooms?
Use a flush transition only if the tile, mortar bed, and substrate on both sides finish at exactly the same height; otherwise, bridge the gap with a reducer, threshold, or a metal profile such as a Schluter® system to protect the tile edge and prevent a trip hazard.
Should I use the same tile in every room?
For open-plan spaces, yes. A single tile run is the most cohesive option and makes rooms feel larger, but separate rooms with different moisture or traffic needs often do better with a coordinated tile family instead.
What’s the best tile for a kitchen that flows into a dining room?
Large-format rectified porcelain or a durable travertine in a straight lay works well, since minimal grout lines keep the sightline uninterrupted between the two spaces.
Does grout color really matter for multi-room flow?
Yes. Matching grout color across two different tiles is one of the simplest ways to make them read as a single connected surface, while contrasting grout draws attention to every joint.
Is natural stone practical for a multi-room installation?
Marble, limestone, and travertine work well for entries and living areas where you want a consistent tone or veining across rooms, though they need periodic sealing that porcelain does not require in wetter zones like kitchens and bathrooms.


Leave a comment