
How to Match Grout Color for Flawless Tile Results

TL;DR:
- Matching grout color involves testing cured samples in your room’s actual lighting to account for fading and light shifts.
- Choosing between blending or contrasting grout depends on your tile type and desired visual effect, especially with natural stone.
Grout color matching is the process of selecting or blending grout hues to complement your tile’s tone, texture, and finish. Done well, it unifies a tiled surface and makes the room feel intentional. Done poorly, it draws the eye to every joint instead of the tile itself. Knowing how to match grout color requires understanding three variables: your tile’s undertones, the type of grout you’re using, and how your room’s lighting shifts color perception throughout the day. Brands like Mapei, Polyblend, and Laticrete each publish color charts with dozens of options, but the chart alone won’t save you. Testing will.
How to match grout color: the core method
Grout color selection, the industry term for this process, starts with your tile, not your wall paint or cabinetry. The tile is the permanent element. Everything else changes. Your first decision is whether you want the grout to blend with the tile or contrast against it. Blending creates a monolithic look that minimizes visible joints and makes a room feel larger. Contrasting draws attention to the tile pattern and works well with geometric or graphic layouts.
Natural stone tiles, including marble, travertine, and limestone, almost always benefit from a blended approach. The variation in stone veining already provides visual interest. A contrasting grout color competes with that natural movement rather than supporting it. For a Calacatta marble floor, a warm white or soft gray grout reads as part of the stone. A charcoal grout on the same tile turns every joint into a grid line.
The second decision is grout type. Sanded and unsanded versions of the same color name look visually different after curing because the sand particles scatter light differently. This matters when you’re repairing existing grout. If the original installation used sanded grout, matching with unsanded will produce a visible difference even if the color code is identical.
How does lighting affect grout color perception and testing?
Lighting is the most underestimated factor in grout color selection. Lighting conditions can shift grout color perception by as much as 70%. That number is not a rounding error. It means a grout that looks warm beige under incandescent light can read as cool gray under LED daylight bulbs.
Three lighting types affect grout color in distinct ways:
- Natural daylight renders colors most accurately but changes from morning to afternoon. North-facing rooms receive cooler, bluer light all day. South-facing rooms get warm, golden light by midday.
- Incandescent and warm LED bulbs push grout toward yellow and amber tones. A cool gray grout can appear tan under these conditions.
- Cool white or daylight LED bulbs strip warmth from grout and emphasize blue and green undertones. A warm ivory grout can look almost white.
- Evening lighting in bathrooms, often a mix of vanity strips and overhead fixtures, creates a layered effect that changes the grout’s apparent depth.
Pro Tip: Apply a small grout sample to a spare tile or a piece of cardboard and observe it in your actual room at three different times: morning, midday, and evening with lights on. This single step prevents the most common grout color regrets.
The practical takeaway is that you should never select grout color from a store display under fluorescent retail lighting. Bring the color chart home. Better yet, buy small sample quantities of your top two or three choices and test them in place. Testing under project lighting at different times of day is the only reliable method.
What tools and materials do you need to match grout color accurately?
Accurate grout color matching requires the right materials before you mix a single batch. Skipping preparation leads to guesswork, and guesswork leads to visible mismatches.
Essential tools and materials
- Grout color charts from Mapei, Custom Building Products, or Laticrete. These brands publish physical fan decks and digital swatches. Physical fan decks are more reliable because screen calibration varies.
- Sample grout quantities in your top two or three color candidates. Most tile suppliers sell small bags or sample packs.
- Grout colorant products like Polyblend Grout Renew, which tints existing grout without full removal. These are useful for repairs and color unification.
- A grout float and mixing bucket for preparing test batches.
- Cleaning tools including a stiff brush, grout cleaner, and water. Existing grout must be clean before any color comparison. Dirt and staining shift the apparent color by one or two shades.
- Spare tiles or sample boards for testing mixed grout outside the installation area.
Grout types and their visual effects
| Grout type | Best use | Visual effect |
|---|---|---|
| Sanded grout | Joints wider than 1/8 inch | Slightly matte, textured surface |
| Unsanded grout | Joints narrower than 1/8 inch | Smoother, slightly shinier finish |
| Epoxy grout | Wet areas, high-traffic floors | Dense, consistent color with low fade |
| Grout colorant | Existing grout repair or refresh | Uniform color over old grout |
Nearly 70% of DIYers choose cementitious grout for its affordability and ease of use. The trade-off is that cementitious grout fades over time, which means any repair work must account for the aged color of the surrounding grout rather than the original shade on the bag.
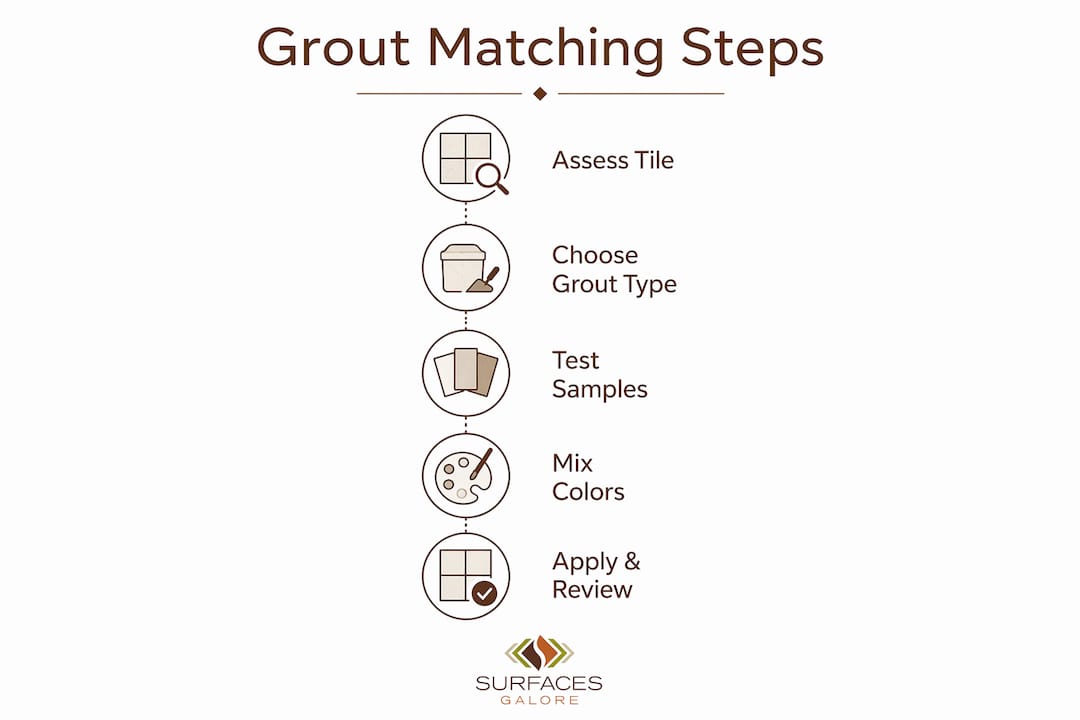
How to test and mix grout colors for the best match
Testing is not optional. It is the step that separates a professional result from a visible patch job. Follow this process for any repair or new installation where color accuracy matters.
Step-by-step grout color testing process
- Clean the existing grout thoroughly. Use a grout cleaner and stiff brush to remove dirt, soap scum, and mineral deposits. Evaluate the true color only after the grout is fully clean and dry.
- Chip out a small sample of old grout. Take this chip to a tile supplier and hold it against color charts from Mapei or Custom Building Products. This gives you a physical reference point.
- Select two or three candidate colors. Choose one that matches the chip directly, one that is a half-shade lighter, and one that is a half-shade darker. Aged grout is almost always lighter than the original color due to fading.
- Mix small test batches. Follow the manufacturer’s water ratio exactly. Inconsistent mixing changes the final color.
- Apply samples to a spare tile or a hidden area. Let each sample cure completely before judging. Wet grout appears 2–3 shades darker than the final cured color. Judging wet grout is the single most common mistake in color matching.
- Observe cured samples under your room’s lighting. Check at multiple times of day as described in the lighting section.
- Select the closest match and proceed with the full repair or installation.
Pro Tip: If no single color matches perfectly, mix two grout colors together in small increments to create an intermediate shade. Document your ratio so you can replicate it for the full batch.
Mixing vs. colorant: which approach works better?
| Approach | Best for | Limitations |
|---|---|---|
| Mixing two grout colors | New installations or full regrout | Requires consistent ratios across batches |
| Grout colorant (e.g., Polyblend Grout Renew) | Repairs, faded grout, color unification | Works only on clean, structurally sound grout |
| New grout in matching color | Small repairs with close color match | Faded surrounding grout may still show contrast |
| Tinted epoxy grout | High-moisture areas needing color stability | Higher cost, harder to work with |
Grout colorants are underused by DIYers. Products like Polyblend Grout Renew penetrate the grout surface and seal it with a uniform color coat. They work best when the existing grout is structurally intact but visually inconsistent due to staining or fading. For marble and travertine tile installations, colorants also provide a sealing benefit that extends the grout’s lifespan.
What common challenges arise in grout color matching?
Even careful preparation runs into problems. Knowing the most common issues in advance lets you correct them before they become permanent.
Fading and sunlight exposure
Sunlight can lighten existing grout by up to 25% over several years. This is the primary reason new grout almost never matches old grout directly from the bag. A kitchen backsplash near a south-facing window will fade significantly faster than a bathroom floor with no direct sun exposure. When matching grout for a repair in a sun-exposed area, select a color one shade lighter than what looks correct indoors. The new grout will fade toward the surrounding color over time.
Visual disturbance from mismatched shades
Approximately 75% of homeowners report feeling visually disturbed by mismatched grout. That reaction is immediate and hard to ignore. The practical rule is to keep new grout within one to two shades of the surrounding grout. Going beyond two shades creates a visible patch that draws the eye every time someone enters the room.
Common mistakes to avoid
- Judging color on wet grout. Always wait for full cure. Wet grout reads 2–3 shades darker than the final result.
- Matching grout to cabinetry or paint. Grout should match the tile, not the surrounding finishes. Cabinets get repainted. Tile stays for decades.
- Ignoring grout type differences. Sanded and unsanded grout reflect light differently. Using the wrong type creates a texture mismatch even when the color code is identical.
- Skipping the cleaning step. Dirty grout looks darker. Comparing new grout to uncleaned old grout produces a false color reference.
- Buying only one color candidate. Always test at least two options side by side before committing to a full batch.
Grout color matching for repairs is not about finding a perfect factory match. It is about finding the closest blend to what the original grout looks like today, after years of use, light exposure, and cleaning.
The texture issue deserves extra attention for natural stone projects. Travertine and limestone tiles have naturally porous surfaces that absorb grout pigment at the edges. This creates a soft halo effect around each joint. A grout color that looks neutral on a ceramic tile sample can appear warmer or cooler against a travertine surface because the stone’s undertones interact with the grout pigment. Always test on the actual tile material you are installing.
For mosaic tile projects, the challenge multiplies because the grout joint covers a higher percentage of the visible surface area. A small color shift in the grout reads much more dramatically on a mosaic than on a large-format tile. Test mosaic grout samples on a full sheet, not a single tile.
Key takeaways
Grout color matching requires testing cured samples under your room’s actual lighting, accounting for grout type, and adjusting for fading in existing installations.
| Point | Details |
|---|---|
| Test under real lighting | Lighting shifts grout color perception by up to 70%; always test samples in your actual room. |
| Wait for full cure | Wet grout appears 2–3 shades darker; judge color only after samples are completely dry. |
| Account for fading | Sunlight lightens grout up to 25% over years; choose a shade lighter for sun-exposed repairs. |
| Match grout to tile | Grout should complement the tile, not the cabinetry or wall paint, for lasting design results. |
| Use colorants for repairs | Products like Polyblend Grout Renew unify faded or stained grout without full removal. |
What I’ve learned from working with natural stone tile projects
Working with marble, travertine, and limestone installations over the years has changed how I think about grout color. Most homeowners focus on the tile and treat grout as an afterthought. That order is backwards.
Grout defines the geometry of a tiled surface. A tight, tone-matched grout on a large-format marble floor makes the room feel like one continuous stone slab. The same floor with a contrasting grout becomes a grid. Neither is wrong, but the choice is irreversible once the grout cures. I have seen beautiful marble installations undermined by grout that was chosen in five minutes at the store checkout. I have also seen modest ceramic tile transformed by a grout color that was tested carefully and matched with intention.
My honest recommendation for natural stone: match the grout to the tile’s dominant tone and go one shade lighter than you think you need. Stone surfaces read darker in person than they do on a sample chip. A slightly lighter grout prevents the joints from disappearing entirely while still creating that monolithic effect that makes luxury stone installations look so clean.
On the question of colorant versus replacement: if the existing grout is structurally sound, use a colorant. Full regrout is labor-intensive and creates dust and debris that can damage polished stone surfaces. Polyblend Grout Renew and similar products have improved significantly. For a bathroom floor or shower surround where the grout is intact but stained or faded, colorant is the right call. For cracked or crumbling grout, there is no shortcut. Remove it and start fresh, and use that opportunity to test your color selection properly before committing to the full installation.
One last thing: keep records. Photograph your grout color selection, note the brand and color code, and store a small sample bag. Future repairs become far easier when you know exactly what you used the first time.
— cihan
Explore natural stone tiles and grout options at Surfacesgalore
Surfacesgalore is a direct importer of premium marble, travertine, and limestone tiles based in Anaheim, California, shipping nationwide to homeowners, designers, and contractors.

Whether you are planning a new installation or repairing an existing one, the right tile and grout pairing starts with quality stone. Surfacesgalore carries a curated selection of natural stone tiles designed to work with the full range of grout color options from leading brands. Explore the collections to find marble, travertine, and limestone tiles that suit your project, and use the grout color guidance in this article to select a finish that lasts. Visit Surfacesgalore to browse natural stone tiles and get started on your renovation today.
FAQ
What is the best grout color for natural stone tile?
The best grout color for natural stone tile matches the tile’s dominant tone within one to two shades. This creates a monolithic look that highlights the stone’s natural variation without drawing attention to the joints.
How do I match grout color for a repair?
Clean the existing grout thoroughly, chip out a small sample, and hold it against color charts from brands like Mapei or Custom Building Products. Always test cured samples in your room’s lighting before committing to a full batch.
Why does my new grout look darker than the old grout?
New grout appears darker when wet and can look 2–3 shades darker than the final cured color. Wait for the grout to cure completely before comparing it to the surrounding grout.
Can I change grout color without removing it?
Yes. Products like Polyblend Grout Renew apply a color coat over existing grout that is structurally intact. This works well for faded or stained grout and also seals the surface against future staining.
How do I prevent grout from fading after installation?
Seal grout lines after installation and reseal every one to two years in high-traffic or sun-exposed areas. Sealing slows the fading process and makes the grout easier to clean, which preserves the original color longer. Learn more about sealing grout lines for lasting results.
Leave a comment