
How to Polish Travertine: Achieve a Natural Shine Easily

Did you know that properly polished travertine can last up to 100 years with regular care? Homeowners and professionals alike want their stone surfaces to shine with a rich, natural glow, yet many struggle with streaks and dull spots caused by improper methods. Understanding the right steps gives your travertine a polished brilliance that stands out and preserves its value through time.
Table of Contents
- Step 1: Prepare The Travertine Surface Thoroughly
- Step 2: Clean And Remove Surface Debris Carefully
- Step 3: Apply Polishing Compound Evenly
- Step 4: Buff The Travertine To Reveal Shine
- Step 5: Inspect And Repeat As Needed For Perfection
Quick Summary
| Key Point | Explanation |
|---|---|
| 1. Thoroughly prepare the surface | Inspect for contaminants and clean carefully to ensure a proper foundation for polishing. |
| 2. Use appropriate cleaning methods | Apply synthetic detergent and test in a small area to find the best cleaning technique. |
| 3. Apply polishing compound evenly | Ensure uniform application by following product guidelines and working methodically. |
| 4. Buff consistently for shine | Buff the surface with gentle pressure and consistency to avoid uneven finishing. |
| 5. Inspect and refine if necessary | Evaluate the surface in good lighting, applying additional polishing to any imperfect areas. |
Step 1: Prepare the Travertine Surface Thoroughly
Preparing your travertine surface thoroughly is the critical first step in achieving a stunning natural shine. This essential process ensures that your stone surface is clean, free from contaminants, and ready for polishing.
Begin by carefully examining the entire travertine surface for any existing substances like paint, wax, or caulking. According to the GSA preservation guidelines, removing these extraneous materials is crucial before proceeding with any polishing work. Use appropriate chemical strippers designed for natural stone to gently remove these substances, being careful to protect adjacent surfaces from potential chemical runoff.
Next, conduct a preliminary test on a small, inconspicuous area to determine the most appropriate cleaning method. Explore our travertine maintenance guide for additional insights into stone care. Wet the test area and apply a synthetic detergent solution, using stiff bristle brushes or acrylic mesh pads to scrub gently. This approach helps identify the most effective cleaning technique without risking damage to your entire surface.
Pro Tip: Always work in small sections and rinse thoroughly with clean water to prevent chemical residue buildup.
After cleaning, allow the surface to dry completely. This step is vital because any remaining moisture can interfere with the subsequent polishing process. By meticulously preparing your travertine, you set the foundation for a brilliant, natural shine that will enhance your stone’s inherent beauty.
With your surface now clean and prepped, you’re ready to move on to the next stage of polishing and restoring your travertine’s elegant appearance.
Step 2: Clean and Remove Surface Debris Carefully
Cleaning your travertine surface and removing surface debris is a critical step in preparing for a beautiful polish. This meticulous process will help you eliminate dirt, grime, and potential contaminants that could interfere with the final finish.
According to GSA preservation guidelines, start by using a synthetic detergent solution and applying it with stiff bristle brushes or acrylic mesh pads. Explore our marble and travertine maintenance guide for comprehensive cleaning techniques. For stubborn stains, you may need a more targeted approach. Professional conservationists recommend using a 5-1/4% solution of sodium hypochlorite or calcium hypochlorite, applying it carefully with bleach soaked cloths.
When dealing with tough surface contaminants like paint, wax, or caulking, select specialized strippers designed specifically for natural stone. Work methodically and protect surrounding areas from potential chemical splashes or runoff. Always test your cleaning solution on a small hidden area first to ensure it does not damage or discolor the travertine.
Pro Tip: Use soft cloths or non abrasive brushes to prevent scratching the delicate travertine surface during cleaning.
After applying your cleaning solution, rinse the surface thoroughly with clean water. This step is crucial to remove any chemical residue that could potentially harm your stone or impact the polishing process. Allow the surface to dry completely before moving forward.
With your travertine now clean and free of debris, you are ready to progress to the next stage of your polishing journey.
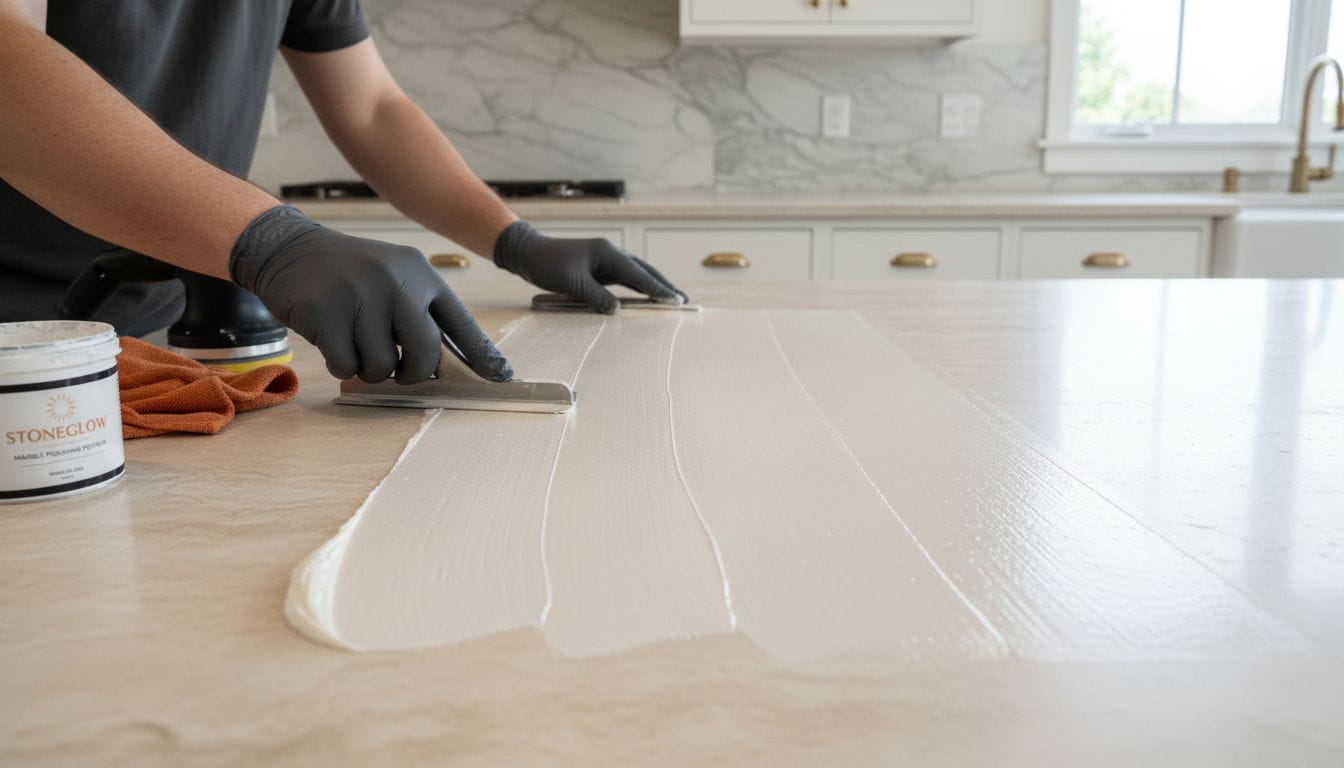
Step 3: Apply Polishing Compound Evenly
Applying the polishing compound evenly is the critical step that will transform your travertine surface from dull to brilliantly radiant. This stage requires precision, patience, and the right technique to achieve a uniform and stunning shine.
According to GSA preservation guidelines, you have two primary options for polishing. If using a marble polishing powder, begin by slightly wetting the travertine surface. Explore our comprehensive marble and travertine maintenance guide for additional insights into professional stone care. Sprinkle the powder evenly across the surface, then use damp cloths or a hand held buffing machine to work the compound into the stone.
For liquid or cream polishing agents, carefully follow the manufacturer’s specific directions. Professional conservationists recommend applying the compound in long, consistent strokes to ensure complete and even coverage. Work methodically across the entire surface, paying special attention to maintaining a uniform application to prevent uneven patches or streaking.
Pro Tip: Always test your polishing compound on a small inconspicuous area first to confirm compatibility with your specific travertine surface.
Buff the surface using consistent, gentle pressure. Your goal is to achieve a smooth, natural shine that highlights the unique characteristics of the travertine. Move your buffing tool or cloth in systematic patterns to distribute the polishing compound uniformly.
With the polishing compound now expertly applied, you are one step closer to revealing your travertine’s inherent beauty and elegance.
Step 4: Buff the Travertine to Reveal Shine
Buffing your travertine surface is the transformative final step that will bring out its natural luminosity and showcase its stunning inherent beauty. This crucial stage turns your carefully prepared stone into a gleaming masterpiece that reflects light and elegance.
According to GSA preservation guidelines, use a hand-held buffing machine or soft damp cloths to buff the surface in long, consistent strokes. Discover more about travertine care in our ultimate design guide for comprehensive insights into stone maintenance. Professional conservationists recommend maintaining uniform pressure and movement to achieve a consistent polish that respects the stone’s natural character.
Apply moderate and steady pressure while buffing, moving systematically across the entire surface. Your goal is to distribute the polishing compound evenly and create a smooth, natural sheen that highlights the unique texture and variations of the travertine. Pay special attention to maintaining a consistent motion to prevent uneven patches or accidental scratching.
Pro Tip: Work in small sections and periodically check your progress to ensure an even, beautiful finish.
As you buff, you will gradually see the travertine transform. The surface will become progressively more luminous, revealing the stone’s subtle color variations and intricate natural patterns. Continue buffing until you achieve a uniform, soft gleam that complements the stone’s inherent characteristics.
With patience and careful technique, your travertine will now showcase a beautiful, natural shine that speaks to its timeless elegance.
Step 5: Inspect and Repeat as Needed for Perfection
The final inspection is your opportunity to ensure your travertine surface achieves a flawless, professional-grade shine that meets your highest expectations. This critical evaluation will help you identify any areas that might require additional attention or refinement.
According to GSA preservation guidelines, conduct a thorough walkthrough of the entire travertine surface under good lighting conditions. Learn more about travertine maintenance in our comprehensive protection guide for ongoing care insights. Professional conservationists recommend examining the stone from multiple angles to detect any inconsistencies in shine, texture, or polish that might have been missed during initial buffing.
Carefully assess the surface for any uneven patches, dull spots, or areas that lack the desired luminosity. If you notice imperfections, do not hesitate to repeat the polishing process. Apply additional polishing compound to specific areas, using gentle circular motions to blend and restore the surface uniformity.
Pro Tip: Natural light or angled lighting can help reveal subtle variations in shine that might be invisible under standard indoor lighting.
Pay special attention to edges, corners, and areas around fixtures where buffing might have been more challenging. These regions often require extra care to achieve a consistent finish. Your goal is a smooth, uniform surface that reflects light beautifully and showcases the travertine’s natural elegance.
With patience and a meticulous approach, you will transform your travertine into a stunning feature that elevates the entire space.
Here’s a summary of each main step in the travertine polishing process:
| Step | Purpose | Key Actions |
|---|---|---|
| Prepare Surface | Remove contaminants | Inspect for paint/wax Apply chemical strippers Test cleaning method |
| Clean & Remove Debris | Eliminate dirt & residue | Use synthetic detergent Brush gently Rinse & dry |
| Apply Polishing Compound | Enhance natural shine | Even application Follow product instructions Test in small area |
| Buff to Reveal Shine | Achieve smooth finish | Buff with cloth/machine Apply steady pressure Work in sections |
| Inspect & Repeat | Ensure uniform result | Check under good lighting Spot polish if needed Assess all areas |
Bring Out the True Beauty of Your Travertine with Surfaces Galore
Polishing travertine to its natural shine requires careful preparation and quality materials as outlined in the guide. If you have faced challenges like stubborn surface debris or uneven polishing compounds disrupting your stone’s elegance, you are not alone. Achieving a consistent, luminous finish takes patience and the right products designed specifically for natural stone.
Discover premium marble and travertine tiles, mosaics, and decorative pieces at Surfaces Galore. Our authentic natural stone selections help you create lasting beauty that stands up to polishing and everyday wear. With nationwide shipping and expert support, it is easier than ever to elevate your space with stone that truly shines.
Ready to transform your travertine surfaces with confidence and quality? Visit Surfaces Galore today to explore our collections and find everything you need for a stunning finish. Let us help you bring out the timeless elegance your home deserves.
Frequently Asked Questions
How do I prepare the travertine surface for polishing?
To prepare the travertine surface, start by inspecting it for any contaminants like paint or wax. Use appropriate chemical strippers to remove these substances, and test your cleaning method in a hidden area before applying it broadly.
What cleaning solution should I use before polishing travertine?
Use a synthetic detergent solution applied with stiff bristle brushes or acrylic mesh pads to clean the surface. Gently scrub and rinse thoroughly with clean water to remove all residues before letting it dry completely.
How should I apply the polishing compound to achieve the best results?
Apply the polishing compound evenly across the damp travertine surface, using a hand-held buffing machine or damp cloths. Ensure long, consistent strokes to promote even coverage and avoid uneven patches.
What is the best technique for buffing travertine?
Use a hand-held buffing machine or soft damp cloths to buff the travertine in long, consistent strokes. Apply moderate pressure and work systematically across the surface to achieve a smooth, natural shine.
How can I check if my travertine polish looks even?
Inspect the travertine surface under good lighting conditions to identify any dull spots or inconsistencies in shine. If you find uneven areas, spot polish those places, blending the compound until the surface looks uniformly shiny.
How do I maintain the shine after polishing travertine?
Maintain the shine by regularly cleaning the surface with a pH-neutral cleaner and avoiding harsh chemicals. Consider reapplying polishing compound every 6 to 12 months for optimal results.
Leave a comment