
What Is Rectified Tile? Benefits, Uses, and Installation

TL;DR:
- Rectified tiles are precisely cut ceramic or natural stone tiles that allow for narrow grout joints and seamless patterns. They require a very flat substrate and skilled installation to prevent lippage and ensure long-lasting results. These tiles are best suited for large-format, modern designs where a seamless, high-end finish is desired.
Rectified tile is ceramic or porcelain tile whose edges are mechanically trimmed after firing to produce precise, uniform, and perfectly square dimensions. This finishing process, called rectification, is what separates these tiles from standard pressed tiles that come out of the kiln with naturally uneven edges. Because every tile ends up the same exact size, you can lay them with grout joints as narrow as 1/16 inch, creating a surface that reads almost seamlessly. Whether you are planning a bathroom renovation, a kitchen floor, or a large-format living room installation, understanding rectified tiles helps you make smarter choices about materials, installation, and design outcomes. Surfacesgalore carries a curated selection of natural stone tiles, including rectified options in marble, travertine, and limestone.
What is rectified tile and how is it made?
Rectified tile is defined as ceramic or porcelain tile whose edges are mechanically ground after the kiln firing process to achieve exact facial dimensions and straight, sharp corners. The firing process itself causes slight dimensional variation in every tile. Rectification corrects that variation by running each tile through precision cutting equipment that grinds all four edges to a consistent size.
The rectification process step by step
The process starts with standard tile production. Clay or porcelain body material is pressed into shape, glazed, and fired at high temperatures. After firing, tiles shrink and warp slightly, which is normal. Rectification then uses diamond-blade grinding equipment to cut each edge to a precise measurement. The result is a tile with exact facial dimensions and 90-degree corners that stack and align with near-perfect consistency.
Natural stone tiles like marble and granite can also be rectified, but the process requires more care. Rectified stone tiles require hardness and structural consistency to avoid micro-chipping during mechanical cutting. Porcelain bodies are easier to rectify because of their density. Natural stones like marble need quality supplier processes to achieve clean edges without surface damage, which is why sourcing from a trusted importer like Surfacesgalore matters.
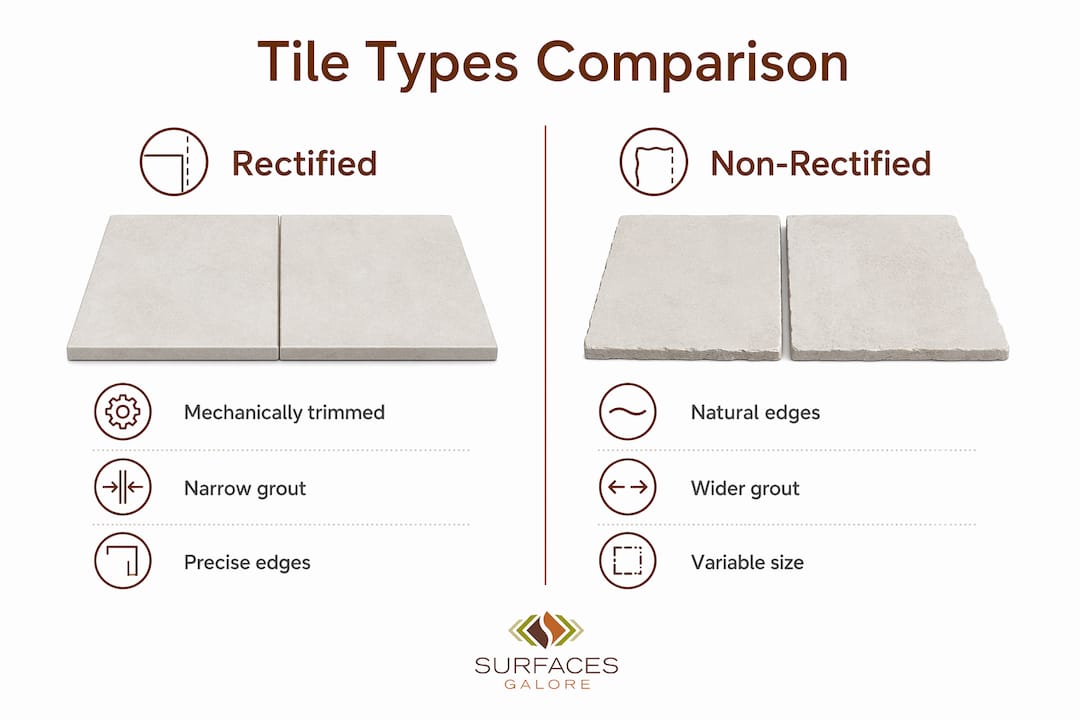
Rectified vs. calibrated vs. non-rectified tiles
These three terms describe different levels of edge finishing, and they directly affect how you install the tile and how wide your grout joints need to be.
| Tile Type | Edge Finishing | Typical Grout Joint | Best Use |
|---|---|---|---|
| Non-rectified | Natural kiln edge, no trimming | 3/16 inch or wider | Traditional patterns, rustic looks |
| Calibrated | Sorted by size, minor trimming | 1/8 inch | Mid-range residential projects |
| Rectified | Mechanically ground to exact size | 1/16–1/8 inch | Modern, large-format, seamless designs |
ANSI A137.1 defines rectified tiles as having mechanically finished edges to achieve precise facial dimensions, which is a distinct category from calibrated tiles. Calibrated tiles are sorted into size groups but not ground to the same tolerance. Rectified tiles go further, with tighter dimensional control that allows smaller grout joints and more complex pattern installations. For a deeper look at how calibration works with natural stone, Surfacesgalore’s guide on marble tile calibration explains the differences clearly.
Key differences between the three types:
- Non-rectified tiles have natural kiln edges with visible size variation. They require wider grout joints to absorb that variation.
- Calibrated tiles are sorted by size group but not precision-cut. They offer more consistency than non-rectified but less than rectified.
- Rectified tiles are ground to exact dimensions. They allow the tightest grout joints and the most uniform appearance.
What are the benefits of rectified tiles for design?
The primary benefit of rectified tiles is the ability to use minimal grout lines, commonly 1/16 to 1/8 inch wide, which creates a near-seamless surface that reads as one continuous material. This is the look that defines modern, high-end residential and commercial interiors in 2026. Wider grout joints break up the visual field and draw attention to the grid. Tight joints let the tile material itself take center stage.
The seamless look and luxury finish
Rectified tiles are favored for their ability to mimic natural materials like wood and marble without the visual interruption of wide grout lines. A large-format marble-look porcelain tile laid with 1/16-inch joints on a bathroom floor reads almost like a slab of stone. That effect is impossible with non-rectified tiles, which require joints wide enough to visually compete with the tile surface itself.
The sharp, exact edges of rectified tiles also improve pattern alignment. Herringbone, large-format offset, and continuous linear patterns all depend on consistent tile sizing to line up correctly across a room. Any size variation causes the pattern to drift, which becomes obvious over a long run of tiles.
Design benefits at a glance
- Tight grout joints (1/16–1/8 inch) reduce visual interruption and create a cleaner surface
- Large-format compatibility makes rectified tiles the standard choice for tiles 24 inches and larger
- Wood-look and marble-look tiles read more realistically with minimal grout visibility
- Pattern precision is easier to maintain across long runs because every tile is the same size
- Higher perceived quality comes from the uniformity and sharpness of the finished surface
Pro Tip: When using large-format rectified tiles in a bathroom, orient the longer tile dimension parallel to the longest wall. This reduces the number of cuts and makes the room feel larger.
What installation considerations come with rectified tiles?
Rectified tile installation is more demanding than standard tile work. The tight grout joints that make rectified tiles look so good also make every substrate imperfection visible. Installer skill and substrate preparation are often the deciding factors for a successful rectified tile finish, more so than the tile itself.
Substrate flatness requirements
The substrate must be flat before you lay a single tile. Industry practice requires under 1/8 inch flatness over 10 feet for standard rectified tile installations. For zero-grout-line or near-zero applications on large tiles, that tolerance tightens to 1/16 inch over 10 feet. Most residential subfloors do not meet this standard without preparation work.
Self-leveling underlayments are the standard solution. Products like Mapei Ultraplan or Ardex K-15 are poured over the substrate and self-level to a flat plane. Proper substrate preparation is the foundation of any long-lasting tile installation, and it matters even more with rectified tiles because there is no wide grout joint to absorb height differences between adjacent tiles.
Step-by-step installation priorities
- Assess and flatten the substrate. Use a long straightedge to identify high and low spots. Fill low areas with floor-leveling compound and grind down high spots before any tile work begins.
- Plan your layout carefully. Dry-lay a section of tiles to confirm your joint spacing and pattern alignment before committing to mortar. Surfacesgalore’s guide on tile layout planning walks through this process in detail.
- Use the right mortar. Large-format rectified tiles require a large-format tile mortar with a non-slump formula. Apply mortar with a notched trowel and back-butter each tile to achieve full coverage.
- Set grout joint width consistently. Use plastic tile spacers or a leveling clip system to hold joints at your target width throughout the installation.
- Install a tile leveling system. Products like Raimondi or Tuscan Leveling System use clips and wedges to keep adjacent tiles flush during the mortar set, which prevents lippage.
- Choose the right grout. For joints under 1/8 inch, use an unsanded grout or a urethane grout like Laticrete PermaColor Select. Sanded grout particles are too large for tight joints and will scratch tile surfaces.
- Plan movement joints. Place movement joints at all changes in plane, at perimeter walls, and at intervals across large floor areas.
Critical reminder: Grout is not a substitute for expansion joints. Movement joints are mandatory in rectified tile installations to manage thermal and structural expansion. Skipping them leads to cracked grout and, eventually, cracked tiles.
Pro Tip: Even with rectified tiles, grout width must account for tile warpage. Grout width must account for any residual warpage in the tile body. Measure your tiles before setting your joint width, not after.
Maintenance of tight grout lines
Narrow grout joints are easier to keep clean than wide ones because there is less surface area for dirt and mold to accumulate. Sealing the grout after installation is still necessary, especially in wet areas like showers and kitchen backsplashes. Use a penetrating grout sealer annually to protect the joint from staining.
Rectified vs. non-rectified tiles: which should you choose?
The choice between rectified and non-rectified tiles comes down to the look you want, the skill of your installer, and your budget for substrate preparation.
| Factor | Rectified tiles | Non-rectified tiles |
|---|---|---|
| Grout joint width | 1/16–1/8 inch | 3/16 inch or wider |
| Substrate requirement | Very flat, 1/8 inch over 10 feet | Standard flatness |
| Installation complexity | Higher, requires experienced installer | Lower, more forgiving |
| Visual result | Near-seamless, modern | Traditional, more textured look |
| Cost | Typically higher for tile and labor | Lower overall cost |
| Best for | Large-format, modern, luxury projects | Rustic, traditional, DIY-friendly projects |
Rectified tiles cost more, both for the material and for the labor required to install them correctly. That cost is justified when the design calls for a seamless, high-end finish. For a farmhouse kitchen with handmade-look ceramic tiles, non-rectified tiles are the better choice because the natural variation in their edges contributes to the aesthetic rather than working against it.
Rectified and calibrated tiles differ in that rectified tiles allow smaller grout joints and more complex pattern installations than calibrated tiles. If you are working with a designer or architect on a large residential project, rectified tiles are almost always the specification of choice for floors and feature walls.
Where are rectified tiles used in home design?
Rectified tiles appear in virtually every room of the modern home, but they deliver the most impact in spaces where the seamless look is the design goal.
High-impact applications
- Bathroom floors and walls: Large-format rectified porcelain or marble tiles on bathroom floors create a spa-like finish. Carried up the wall in the same tile, they make the space feel taller and more unified.
- Shower surrounds: Rectified tiles in showers minimize grout lines, which reduces the surface area where mold and mildew can grow. This is both a design and a maintenance advantage.
- Kitchen floors: Wood-look rectified porcelain tiles in 6x36-inch or 8x48-inch formats are a top choice for kitchen floors in 2026. The tight joints make the wood grain pattern read continuously across the floor.
- Living room floors: Large-format rectified marble-look porcelain tiles in 24x48-inch or 32x32-inch formats are the dominant trend in open-plan living spaces this year.
- Backsplashes: Rectified subway tiles in a stacked or offset pattern read cleaner and sharper than non-rectified versions because the edges align precisely.
Surfacesgalore carries rectified natural stone tiles in marble, travertine, and limestone that work across all of these applications. Travertine tiles, for example, are available in rectified formats that preserve the stone’s natural character while delivering the dimensional precision needed for tight-joint installations. The Surfacesgalore guide on travertine tiling covers installation specifics for this material in detail.
Pattern alignment is another reason designers specify rectified tiles for feature walls and accent applications. When you are running a continuous linear pattern or a large-scale geometric design, consistent tile sizing is the only way to keep the pattern true across the entire surface. Surfacesgalore’s resource on matching tile patterns is a practical reference for getting this right.
Key Takeaways
Rectified tiles deliver a near-seamless finish because mechanically ground edges produce exact dimensions, enabling grout joints as narrow as 1/16 inch and precise pattern alignment across any surface.
| Point | Details |
|---|---|
| Rectified tile definition | Ceramic or porcelain tile with mechanically ground edges for exact, uniform dimensions after firing. |
| Grout joint advantage | Tight joints of 1/16–1/8 inch reduce visual interruption and create a cleaner, more luxurious surface. |
| Substrate is critical | Substrate must be flat to within 1/8 inch over 10 feet; self-leveling compounds are often required. |
| Movement joints are mandatory | Expansion joints must be installed despite tight grout lines to prevent cracking from thermal movement. |
| Best applications | Large-format floors, bathroom walls, shower surrounds, and wood-look or marble-look feature installations. |
Why I think most homeowners underestimate what rectified tiles demand
The most common mistake I see is treating rectified tiles as a drop-in upgrade. A homeowner sees the tight grout lines in a showroom, decides that is the look they want, and assumes any competent tile installer can deliver it. That assumption is where projects go wrong.
Rectified tiles expose everything. A substrate that is 1/4 inch out of flat over 10 feet is invisible under a standard tile job with 3/16-inch joints. Under a rectified tile with 1/16-inch joints, that same variation creates lippage you can feel with your foot and see from across the room. The tile did not fail. The preparation failed.
My honest recommendation is this: before you commit to rectified tiles, have a conversation with your installer specifically about substrate preparation. Ask them what flatness tolerance they are targeting and how they plan to achieve it. If they cannot answer that question in specific terms, find a different installer.
The other thing I tell designers and homeowners is to think carefully about where rectified tiles actually add value. In a large open-plan living space or a master bathroom with a spa concept, the seamless look justifies the extra cost and preparation. In a small powder room or a utility mudroom, the visual payoff is smaller and the cost difference is harder to justify.
Natural stone rectified tiles from Surfacesgalore, particularly marble and travertine in large formats, are where I think the investment makes the most sense. The material itself has inherent beauty. Rectification just removes the visual noise that would otherwise compete with it.
— cihan
Explore rectified natural stone tiles at Surfacesgalore
If you are planning a renovation that calls for the clean, seamless look that rectified tiles deliver, Surfacesgalore is the place to start your search.
Surfacesgalore is a direct importer of premium natural stone based in Anaheim, California, shipping nationwide to homeowners, designers, and contractors. The collection includes rectified marble, travertine, and limestone tiles in large-format sizes suited for floors, walls, and shower applications. Every piece is sourced for quality and dimensional consistency, which matters especially when you are specifying tight-joint installations. Browse the full natural stone tile collection to find the right material for your 2026 project, and shop with confidence knowing the stone is authentic, durable, and ready to install.
FAQ
What is the rectified tile definition in simple terms?
Rectified tile is ceramic or porcelain tile that has been mechanically cut on all four edges after firing to produce exact, uniform dimensions. The process allows tiles to be laid with grout joints as narrow as 1/16 inch.
Are rectified tiles harder to install than regular tiles?
Yes. Rectified tiles require a flatter substrate, more precise mortar application, and an experienced installer to avoid lippage. The substrate must be flat to within 1/8 inch over 10 feet for standard installations.
What grout should I use with rectified tiles?
Use unsanded grout or a urethane grout like Laticrete PermaColor Select for joints under 1/8 inch. Sanded grout particles are too large for tight joints and can scratch the tile surface during application.
Can natural stone tiles be rectified?
Yes. Marble, travertine, and limestone can all be rectified, but the process requires structural consistency in the stone to avoid micro-chipping during mechanical cutting. Sourcing from a quality importer like Surfacesgalore ensures the stone meets the standards needed for clean rectification.
Do rectified tiles still need expansion joints?
Yes. Movement joints are mandatory in rectified tile installations regardless of how tight the grout joints are. Grout does not substitute for expansion joints, and skipping them leads to cracked grout and tile damage over time.
Leave a comment