
What Is Stacked Stone? A Guide for Homeowners

TL;DR:
- Stacked stone is a decorative veneer composed of thin, horizontally arranged stone strips that imitate natural layered rock walls. It is a finish material, not a structural element, providing texture and depth without the weight or cost of full masonry. Proper substrate preparation, moisture management, and material selection are key to ensuring longevity and aesthetic appeal.
Stacked stone is defined as a decorative veneer made from thin strips of natural or manufactured stone, arranged in tight horizontal courses to replicate the look of a layered natural rock wall. The industry term for this product is stone veneer, and the stacked style is one of its most popular formats. Understanding what is stacked stone means recognizing it as a finish material, not a structural one. It adds texture, depth, and a raw natural quality to surfaces without the weight or cost of full masonry. This guide covers material types, installation methods, performance expectations, and design applications to help you make a confident choice for your next project.
What is stacked stone and how is it different from other veneers?
Stacked stone is a decorative stone veneer style that uses thin stone strips arranged in tight horizontal courses to replicate natural layered rock walls. The defining characteristic is the dry-stack appearance: tight joints, minimal grout lines, and a strong sense of horizontal layering. That look is purely aesthetic. Most installations still use mortar and waterproofing behind the veneer.
The stacked stone definition separates it from other stone veneers primarily by its profile and joint style. A traditional fieldstone veneer uses irregular shapes and visible mortar joints. A ledgestone or stacked stone veneer uses flat, linear pieces with almost no visible joint. The result reads as a clean, modern version of a natural stone wall.
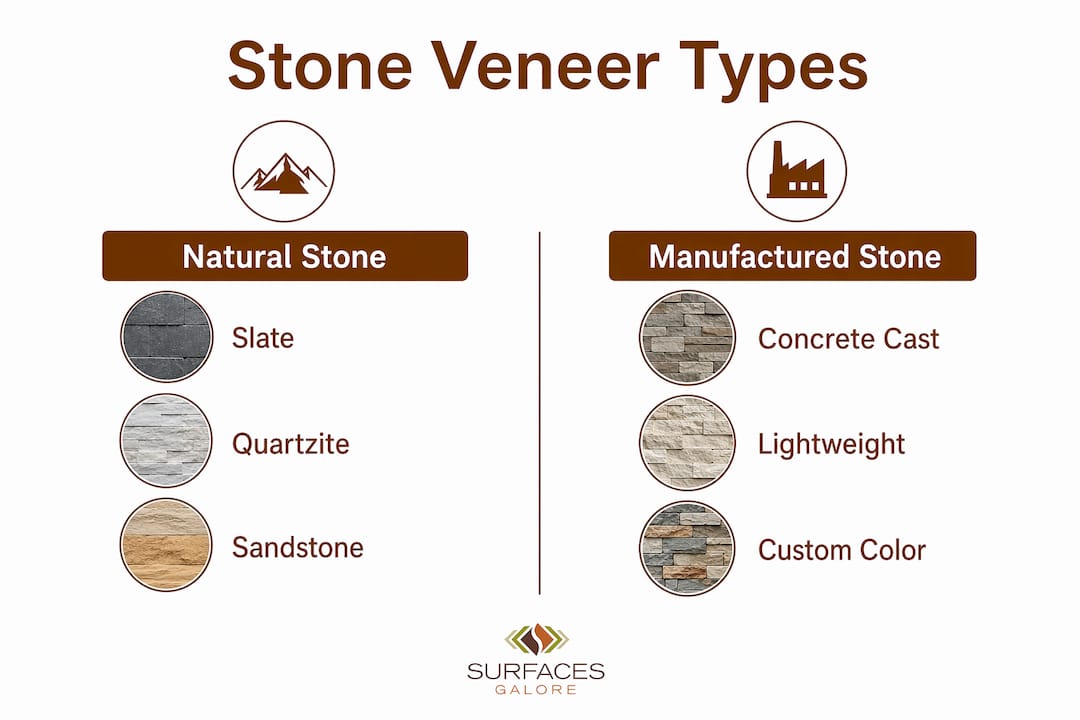
Two broad product categories exist. Natural stone veneer is quarried stone cut thin, typically from slate, quartzite, sandstone, or limestone. Manufactured stone veneer uses a concrete mix with coloring and texture to mimic real stone. Both categories fall under the stacked stone umbrella, and both are available as natural and manufactured veneers in the same panel formats.
For a broader understanding of how stacked stone fits within the full spectrum of stone products, the Surfacesgalore guide on types of decorative stone provides useful context for designers and homeowners alike.
What materials and formats are used in stacked stone products?
The most common retail format for stacked stone is the modular ledger panel. These panels are roughly 6x24 inches and are sold as interlocking units that cover wall surfaces quickly. They behave like wall cladding, not tile. That distinction matters for how you cut, set, and seal them.
Natural stone vs. manufactured stone
Natural stone veneer is quarried and cut to a consistent thickness, typically 3/4 inch to 1.5 inches. Each piece carries genuine color variation, fossil detail, and surface texture that manufactured products cannot fully replicate. Manufactured stone veneer is cast from concrete with pigments and molds. It offers more color consistency and lighter weight, which simplifies shipping and handling.
The table below compares the two main material types across the factors that matter most to buyers:
| Factor | Natural Stone Veneer | Manufactured Stone Veneer |
|---|---|---|
| Weight per sq. ft. | 8–12 lbs | 6–10 lbs |
| Full bed stone weight | 35–45 lbs per sq. ft. | N/A |
| Color consistency | Variable, natural | High, controlled |
| Freeze-thaw resistance | High (dense stone) | Moderate (varies by mix) |
| Cost range | Higher | Lower to mid |
| Longevity | Decades with proper install | 20–30 years typical |
The weight difference between thin veneer and full bed stone is significant. Thin veneer at 8–12 lbs per square foot can be applied to wood-framed walls with standard substrate preparation. Full bed stone at 35–45 lbs per square foot requires engineered structural support. That weight reduction is one of the primary reasons stacked stone veneer became the standard for residential and commercial cladding projects.
Panel formats and loose stone
Beyond modular ledger panels, some suppliers offer loose stone pieces for custom installations. Loose stone gives you more control over joint width and pattern variation. Panelized ledger stones install faster but require a flat substrate and strict joint spacing. Loose stone is slower but more forgiving on irregular surfaces.
Corner pieces are a third format worth knowing. Purpose-made corner units create a clean 90-degree return without exposing the thin edge of a panel. Skipping corner units and mitering panels instead is a common DIY mistake that leads to visible seams and moisture entry points.
Pro Tip: When ordering stacked stone tile or panels, add 10–15% overage for cuts, corners, and pattern matching. Running short mid-project and ordering a second batch risks color variation between production lots.
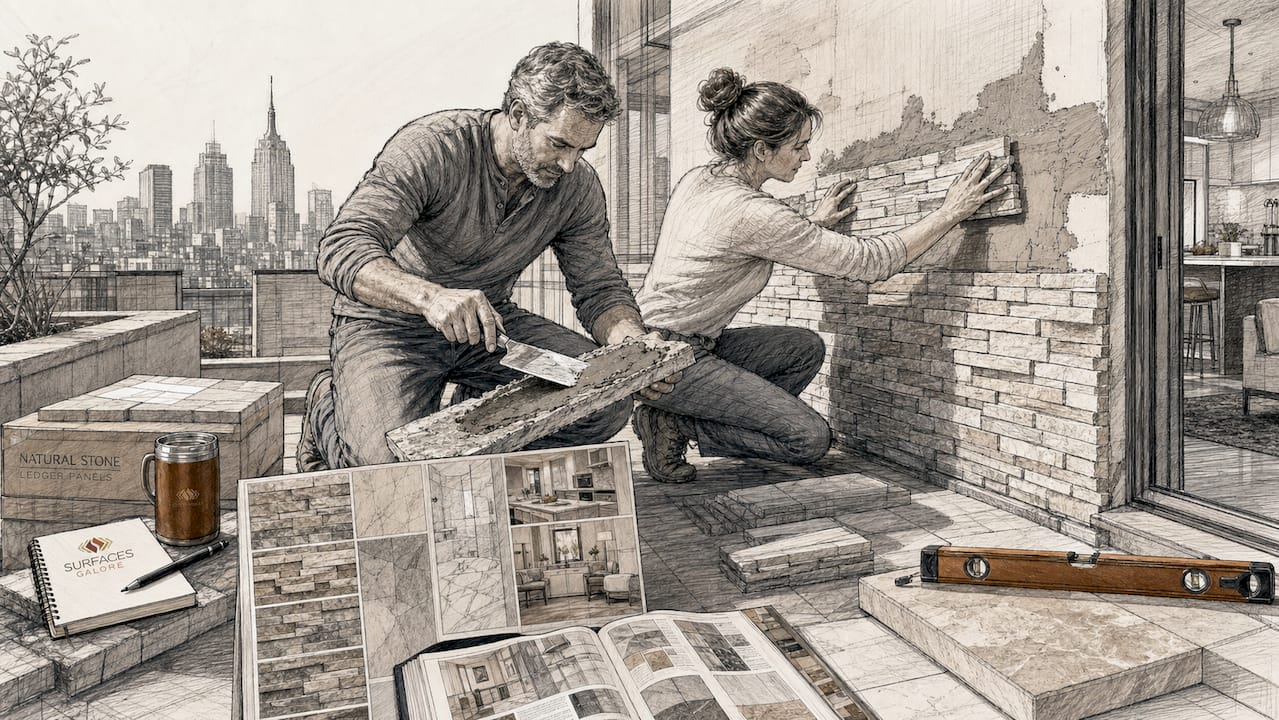
How is stacked stone installed correctly?
Stacked stone installation follows a specific sequence. Skipping steps, especially substrate preparation and moisture management, causes failures that are expensive to fix after the fact. The process differs for interior and exterior applications, but the core principles are the same.
Substrate preparation
The substrate must be flat, structurally sound, and compatible with mortar or adhesive bonding. Acceptable substrates include cement board, concrete masonry units, and poured concrete walls. Drywall alone is never an acceptable substrate for stacked stone, even indoors. For interior fireplace surrounds or accent walls, cement board screwed to studs is the standard starting point.
Flatness matters more than most installers expect. Ledger panel systems are unforgiving on wavy or uneven walls. A panel that rocks on a high spot will not bond fully, and partial bonding leads to cracking and delamination over time. Check flatness with a 10-foot straightedge and correct any deviation greater than 1/4 inch before setting a single piece.
Mortar application and bonding
Use a polymer-modified mortar rated for stone veneer. Apply mortar to both the substrate and the back of each panel for full coverage. Voids behind panels trap moisture and reduce bond strength. The installation guides from Stoneyard.com emphasize full mortar coverage as a non-negotiable step, not an optional upgrade.
Work from the bottom up. Set a level ledger board at the base course to keep the first row straight. Stagger panel joints by at least 6 inches between courses, similar to a running bond pattern. Avoid stacking joints vertically, which creates a visible grid pattern that undermines the natural look.
Exterior moisture management
Exterior stacked stone wall tile requires a weather-resistive barrier (WRB) and a drainage plane behind the veneer. Proper exterior installations require a WRB, drainage space, and appropriate flashing at all transitions. The drainage plane should be at least 3/16 inch to allow water that penetrates the veneer face to exit at the base rather than accumulate behind the cladding.
This is the most misunderstood aspect of stacked stone installation. The veneer itself is not waterproof. Water moves through mortar joints, especially on north-facing or rain-exposed walls. Without a drainage plane and proper flashing at windows, doors, and the base, that water has nowhere to go except into the wall assembly. The result is rot, mold, and eventually structural damage.
Pro Tip: Before committing to a full exterior installation, build a 3x3 foot mockup using actual mortar and stone from your order. This confirms color blending, joint style, and mortar color before you cover hundreds of square feet.
Mockups and color blending
Blending multiple pallets before installation is the single most effective way to achieve a natural, varied appearance. Stone from a single pallet tends to cluster similar colors together. Opening three or four boxes at once and pulling pieces from each creates the random color distribution that makes stacked stone look genuinely organic rather than repetitive.
The numbered installation steps for a standard interior accent wall are:
- Mark stud locations and attach cement board with corrosion-resistant screws.
- Apply a waterproof membrane or vapor barrier where moisture exposure is possible.
- Mix polymer-modified mortar to a peanut butter consistency.
- Set a level ledger board at the base course height.
- Back-butter each panel and press firmly with a slight twisting motion to collapse air pockets.
- Check alignment every three courses with a level.
- Cut panels with an angle grinder or wet saw for edges and outlets.
- Install purpose-made corner pieces at all 90-degree returns.
- Allow mortar to cure fully before applying sealer.
What performance and maintenance should you expect?
Stacked stone is a decorative veneer, not a load-bearing wall component. That distinction defines every performance expectation. The stone carries no structural load. Its job is to protect the substrate from weather and UV exposure while delivering the visual character of natural stone.
Durability and weather resistance
Natural stone veneer from dense materials like quartzite or slate handles freeze-thaw cycles well. The stone itself expands and contracts minimally. The risk in cold climates is moisture that enters through joints, freezes, and forces panels off the wall. Proper mortar coverage and a functional drainage plane eliminate that risk almost entirely.
Manufactured stone veneer is more vulnerable to freeze-thaw damage because its concrete matrix is more porous than dense natural stone. In USDA hardiness zones 5 and colder, natural stone veneer is the more reliable long-term choice for exterior applications.
Sealing stacked stone
- Seal natural stone veneer with a breathable, penetrating sealer rather than a film-forming product. Film-forming sealers trap moisture inside the stone and cause spalling.
- Apply sealer after mortar has cured fully, typically 28 days for full cure.
- Reapply sealer every 3–5 years on exterior surfaces and every 5–7 years on interior surfaces.
- Test sealer on a sample piece first. Some dark stones lighten slightly when sealed with certain products.
- For kitchen backsplashes and fireplace surrounds, choose a sealer rated for heat and food contact.
Pro Tip: Water-based penetrating sealers from brands like Miracle Sealants or Aqua Mix work well on most natural stone veneers. Avoid solvent-based sealers on manufactured stone, as they can react with the concrete binder.
Cleaning and upkeep
Clean stacked stone wall tile with a pH-neutral stone cleaner and a soft brush. Avoid acidic cleaners like vinegar or citrus-based products, which etch stone surfaces and degrade mortar joints over time. For exterior walls, a low-pressure rinse with water removes most dirt and biological growth. High-pressure washing can dislodge mortar from joints, so keep pressure below 1,000 PSI.
Inspect mortar joints annually on exterior installations. Hairline cracks in joints are normal as buildings settle. Repoint any joint where mortar has pulled away from the stone face to prevent water entry.
Where is stacked stone used in interior and exterior design?
Stacked stone applications span a wide range of residential and commercial settings. The format works wherever you want the visual weight of natural stone without the structural complexity of full masonry. For a deeper look at how natural stone finishes interact with different design styles, Surfacesgalore covers the topic in detail for homeowners.
Interior applications
- Fireplace surrounds and mantels: The most popular interior use. Stacked stone adds warmth and texture to a focal wall without requiring a structural stone hearth.
- Accent walls in living rooms and bedrooms: A single stacked stone wall behind a sofa or bed creates depth and contrast against drywall or paint.
- Kitchen backsplashes: Stacked stone tile in a kitchen adds organic texture between upper and lower cabinets. Use a tighter joint and a food-safe sealer in this application.
- Columns and pilasters: Wrapping interior columns with stacked stone veneer creates an architectural detail that reads as custom millwork.
- Wine cellars and bar areas: The natural cave-like quality of stacked stone suits these spaces perfectly.
Exterior applications
Typical stacked stone applications include fireplaces, interior and exterior walls, columns, and architectural accents. Outdoors, the most common uses are:
- Facade cladding on the lower third of a home’s exterior, often combined with siding above.
- Garden retaining walls and planter boxes where the veneer wraps a concrete block core.
- Pool surrounds and outdoor kitchen bases, where the stone’s texture contrasts with smooth concrete decking.
- Entry columns and gate pillars that frame a driveway or front walkway.
Design considerations
The table below shows how different stacked stone styles suit different design directions:
| Style Direction | Stone Type | Joint Style | Color Range |
|---|---|---|---|
| Modern farmhouse | Quartzite ledger | Tight, dry-stack | Warm gray, cream |
| Industrial loft | Slate panel | Minimal grout | Charcoal, black |
| Mediterranean | Limestone veneer | Slightly open | Beige, gold, tan |
| Rustic cabin | Sandstone loose | Irregular, wide | Brown, rust, amber |
| Contemporary | Manufactured veneer | Tight, uniform | Cool gray, white |
Color blending is the most underrated design decision in a stacked stone project. Pulling pieces from multiple boxes and arranging them by value (light to dark) before setting creates a gradient effect that reads as genuinely natural. Clustering all the dark pieces in one area and all the light pieces in another is the most common pattern mistake, and it makes the wall look manufactured regardless of the stone type.
Key takeaways
Stacked stone succeeds or fails based on substrate quality, moisture management, and material selection, not on the stone’s appearance alone.
| Point | Details |
|---|---|
| Stacked stone is a veneer | It is a decorative finish layer, not a structural wall component, applied over a prepared substrate. |
| Weight advantage is real | Thin veneer at 8–12 lbs per sq. ft. is far lighter than full bed stone at 35–45 lbs, enabling wood-frame installation. |
| Exterior moisture control is critical | A weather-resistive barrier and drainage plane are required outdoors; the veneer itself does not waterproof the wall. |
| Mockups prevent costly mistakes | Blending multiple pallets in a 3x3 foot sample confirms color variation and mortar color before full installation. |
| Sealing extends lifespan | Use a breathable penetrating sealer and reapply every 3–5 years on exterior surfaces to protect against moisture and staining. |
Why substrate prep matters more than the stone you choose
I have reviewed hundreds of stacked stone projects over the years, and the failures almost never come from choosing the wrong stone. They come from skipping substrate prep or ignoring moisture management. A beautiful quartzite ledger panel installed over a wavy, unprepared wall will crack within two winters. The same panel installed correctly over flat cement board with a proper WRB will outlast the house.
The other mistake I see constantly is treating stacked stone like large-format tile. Tile setters are trained to work with consistent, flat products. Stacked stone panels have irregular faces, variable thickness, and different bonding requirements. Treating panels like tile leads to joint spacing errors, inadequate mortar coverage, and corner failures that show up within the first year.
My honest advice for DIY enthusiasts: do the mockup. Build a 3x3 foot sample on a piece of cement board before you touch the actual wall. Mix your mortar, set actual pieces from your order, and let it cure. You will learn more from that exercise than from any video tutorial, and you will catch color or pattern problems before they become permanent.
For designers specifying stacked stone on exterior facades, always require a written moisture management plan from the installer. Ask specifically about the WRB product, the drainage plane dimension, and flashing details at all penetrations. If the installer cannot answer those questions clearly, find someone who can. The stone is the easy part. The wall assembly behind it is where the project either succeeds or fails.
— cihan
Explore natural stone veneers at Surfacesgalore
Surfacesgalore is a direct importer of premium natural stone based in Anaheim, California, shipping nationwide to homeowners, designers, and contractors. The collection includes marble, limestone, travertine, and specialty stone products suited to both interior and exterior stacked stone projects.
Whether you are planning a fireplace surround, an exterior facade, or a kitchen backsplash, Surfacesgalore carries natural stone tiles and veneers that meet the quality standards your project deserves. Browse the full collection online and find the right stone for your space, at a price that makes quality accessible.
FAQ
What is the stacked stone definition in construction?
Stacked stone is a decorative stone veneer style using thin stone strips arranged in horizontal courses to replicate a natural layered rock wall. It is a finish material applied over a structural substrate, not a load-bearing wall system.
How does stacked stone differ from regular stone veneer?
Stacked stone refers specifically to the tight, horizontal, dry-stack appearance with minimal joint lines. Standard stone veneer is a broader category that includes fieldstone, ashlar, and other patterns with visible mortar joints.
Can stacked stone be installed outdoors in cold climates?
Yes, but exterior installations require a weather-resistive barrier and drainage plane to manage moisture. Natural stone veneer from dense materials like quartzite or slate handles freeze-thaw cycles better than manufactured stone veneer.
Do you need to seal stacked stone wall tile?
Sealing is strongly recommended for both interior and exterior stacked stone. Use a breathable, penetrating sealer and reapply every 3–5 years outdoors. Avoid film-forming sealers, which trap moisture and cause surface damage over time.
What substrate works best for stacked stone installation?
Cement board, concrete masonry units, and poured concrete are the accepted substrates for stacked stone. Drywall alone is never acceptable. The substrate must be flat to within 1/4 inch over 10 feet to prevent panel rocking and bonding failures.
Leave a comment