
Step-by-step living room tile workflow for lasting results

TL;DR:
- Porcelain tiles are ideal for living rooms due to their durability and water resistance.
- Proper subfloor prep and the use of leveling clips prevent uneven tiles and lippage.
- Adding area rugs or radiant heating improves tile comfort and creates a warmer, more inviting space.
Your living room floor takes more abuse than almost any other surface in your home. Pets, kids, spilled drinks, and daily foot traffic all add up fast. If your current flooring looks tired, scratched, or just plain outdated, you’re not alone. Many homeowners put off renovations because the process feels overwhelming. Where do you start? What tiles work best? How do you avoid costly mistakes? This guide walks you through every stage of a smart tile workflow, from picking the right material to grouting the last joint, so you can get a beautiful, durable floor without the guesswork.
Table of Contents
- Choosing the best tiles for your living room
- Essential tools, materials, and prep for tile installation
- Installing your living room tile: Step-by-step workflow
- Troubleshooting, edge cases, and expert tips for flawless results
- Why the standard tile workflow might not deliver comfort — and how to fix it
- Connect with trusted tile experts for your project
- Frequently asked questions
Key Takeaways
| Point | Details |
|---|---|
| Porcelain recommended | Porcelain tiles provide durability and style, making them ideal for busy living rooms. |
| Preparation is vital | Thorough subfloor prep and dry-laying are essential for a smooth installation and lasting results. |
| Layout prevents mistakes | Chalk lines and center layouts minimize narrow cuts and assure a polished finish. |
| Comfort strategies | Area rugs and radiant heating can balance the hardness and cold of tile floors. |
Choosing the best tiles for your living room
With your renovation goals in mind, it’s crucial to understand which types of tiles work best for living rooms before starting installation. The market offers dozens of options, and not all of them hold up equally well under real-life conditions.
Porcelain vs. other tile types
Porcelain is the clear frontrunner for living room floors. It is denser, more water and scratch resistant than ceramic or natural stone, which matters when you have a dog skidding across the floor or kids dragging toys around. Porcelain also handles temperature changes better, making it a reliable choice across climates. A porcelain tile lifespan of 50 to 100 years with a PEI rating of 3 to 4 is standard for residential use, which means you are investing in something that will likely outlast the mortgage.
For a deeper look at how to narrow down your options, our guide on floor tile selection covers the key factors that apply across rooms.
Size and surface finish matter more than you think
Large-format tiles, those measuring 24x24 inches or bigger, have taken over modern living room design for good reason. Fewer grout lines mean a cleaner look and less maintenance. They also make smaller rooms feel more open. Matte and lightly textured finishes add slip resistance without sacrificing style, which is a smart move if you have young children or elderly family members at home.
Lighter, neutral colors like warm beige, soft gray, and off-white visually expand the space. Darker tiles can anchor a room but may show dust more readily. When you compare tile vs carpet and hardwood, tile wins on durability and allergen control, though it does require thoughtful layering for comfort.
| Tile type | Durability | Water resistance | Best for |
|---|---|---|---|
| Porcelain | Excellent | Excellent | High-traffic living rooms |
| Ceramic | Good | Moderate | Low-traffic areas |
| Natural stone | Variable | Low to moderate | Accent zones |
| Travertine | Good | Moderate (sealed) | Classic or rustic styles |
- Choose a PEI rating of 3 or 4 for residential living rooms
- Opt for 24x24 inch tiles or larger for a modern, spacious feel
- Select matte or textured finishes for better grip
- Use light neutrals to visually open up the room
- Layer with area rugs for warmth and acoustic comfort
Pro Tip: Before committing to a tile, bring home a sample and live with it for a day or two. Light conditions in showrooms are very different from your actual living room, and what looks perfect in the store can read differently at home.
Exploring stone tile layout patterns early in the planning stage can also help you visualize how your chosen tile will look across the full floor.
Essential tools, materials, and prep for tile installation
Once you’ve chosen your tile style, proper preparation will set the stage for successful installation. Rushing this phase is the number one reason DIY tile jobs fail.
What you need before you start
Gather your tools first. You will need a notched trowel, tile spacers, a tile cutter or wet saw, leveling clips, a rubber mallet, a bucket, and a sponge. On the materials side, pick up thinset mortar, cement backer board, grout, and a penetrating sealer. Skipping any of these is asking for problems later.

For accurate planning, our guide on measuring for tile walks you through calculating square footage with the right waste factor built in.
Subfloor prep is non-negotiable
The subfloor must be flat, with no more than 1/8 inch variation over a 10-foot span. Even small dips or bumps will cause tiles to crack or rock over time. Sweep, vacuum, and check for squeaky boards or soft spots. Fix them before anything else.
If your subfloor is wood, backer board is necessary to prevent flex and moisture damage. Concrete subfloors are more forgiving but still need to be clean and free of any old adhesive residue.
A level subfloor is the single biggest factor in how long your tile job lasts. Spend an extra hour here and you will save yourself from cracked tiles and costly repairs down the road.
- Notched trowel (size depends on tile format)
- Tile spacers (1/8 or 3/16 inch for living rooms)
- Wet saw or manual tile cutter
- Leveling clips and wedges
- Thinset mortar and mixing paddle
- Cement backer board for wood subfloors
- Grout and grout float
- Penetrating sealer
Pro Tip: Always dry-lay a section of tiles across the room before mixing any mortar. This lets you spot awkward cuts, adjust your starting point, and confirm your layout looks balanced from the main entry point.
If you are working with natural stone, our travertine tiling DIY guide covers stone-specific prep steps that differ from standard porcelain installation.
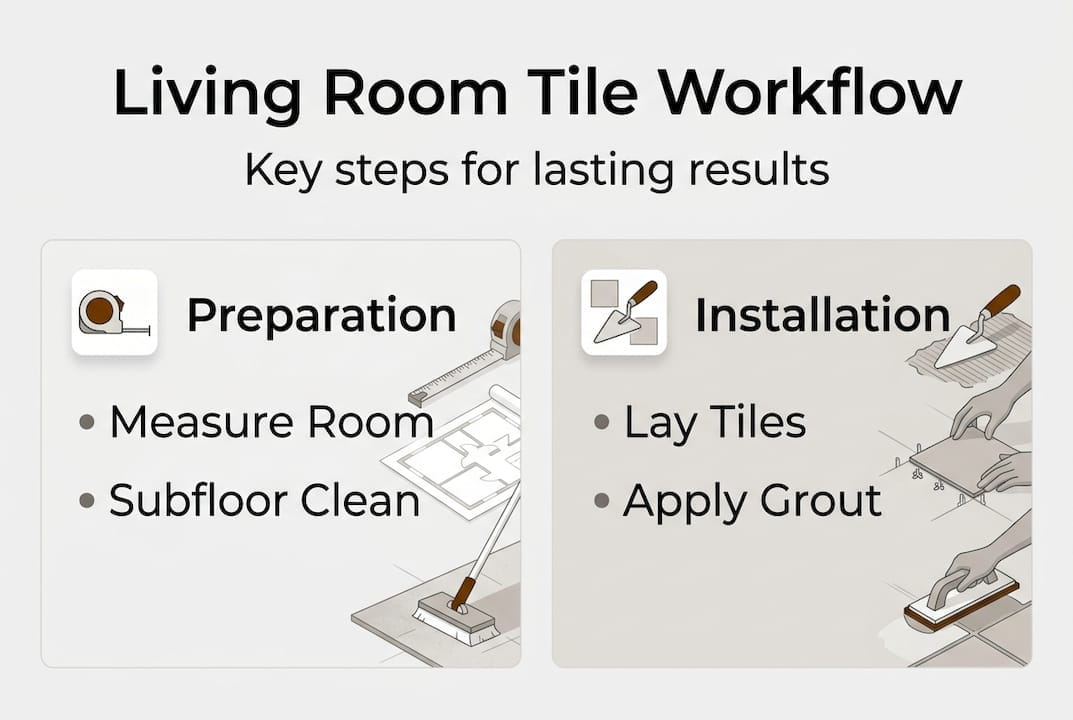
Installing your living room tile: Step-by-step workflow
With your tools and prep complete, it’s time to tackle the main installation process in manageable steps.
- Clean and dry the subfloor completely. Any dust or debris will weaken the mortar bond.
- Snap chalk lines from the center of the room outward. This keeps your layout square and prevents tiles from drifting off-axis.
- Dry-fit tiles from the room center using your chalk lines as a guide. Avoid narrow cuts at walls and doorways by adjusting your starting point.
- Mix thinset mortar to a peanut butter consistency. Work in small batches so it does not dry out before you lay the tile.
- Spread mortar with the notched trowel and back-butter each tile for better adhesion, especially with large-format tiles.
- Press tiles firmly and twist slightly to set them. Insert spacers at each corner.
- Use leveling clips to prevent lippage on large tiles. Lippage is when one tile sits higher than its neighbor, creating an uneven surface that is both ugly and a tripping hazard.
- Cut edge tiles with a wet saw. Leave a 1/4 inch expansion gap at all walls to allow for natural movement.
- Allow 24 to 48 hours for the mortar to cure before walking on the tiles or applying grout.
- Apply grout with a grout float, pressing it into the joints at a 45-degree angle. Wipe excess with a damp sponge.
- Seal the grout and tile once fully cured to protect against stains and moisture.
| Step | Time required | Common mistake |
|---|---|---|
| Subfloor prep | 2 to 4 hours | Skipping leveling |
| Dry-fitting | 1 to 2 hours | Starting from a wall |
| Mortar and laying | 4 to 8 hours | Letting mortar skin over |
| Curing | 24 to 48 hours | Walking on tiles too soon |
| Grouting and sealing | 2 to 3 hours | Skipping the sealer |
For inspiration on layout direction and pattern choices, our article on choosing tile patterns gives you a solid visual framework. If you want to see how a similar workflow applies in another room, the bathroom tile workflow guide translates well to living room projects.
Troubleshooting, edge cases, and expert tips for flawless results
Even the best-planned installations can face tricky situations, so let’s cover troubleshooting and special scenarios.
Uneven tiles and lippage
Lippage is the most common complaint after a DIY tile job. The fix is prevention. Leveling clips, dry-laying, and backer board on wood subfloors are the three things that matter most. If you notice a tile sitting high after the mortar sets, you have a narrow window to pull it up and re-set it before the mortar cures fully.
Awkward room shapes and L-shaped layouts
L-shaped rooms are notoriously tricky. The key is to start from the center and flow the pattern around the corner, avoiding tile slivers in visible spots. A sliver is any cut tile narrower than half a full tile. They look unfinished and are more likely to crack or pop loose over time.
Grout selection and stain resistance
Standard cement grout works fine in most living rooms, but if you have pets or kids, consider epoxy grout. It resists stains, does not require sealing, and holds up far better in high-traffic zones. The tradeoff is that it is harder to work with and sets faster, so you need to move efficiently.
- Use leveling clips on any tile larger than 12x12 inches
- Leave 1/4 inch expansion gaps at every wall and fixed object
- Choose epoxy grout for high-traffic or pet-friendly living rooms
- Avoid tile slivers by adjusting your layout during the dry-fit stage
- Call a professional installer if your subfloor has significant structural issues
Pro Tip: Keep 10 to 15 percent extra tile from your original batch. Dye lots change between production runs, and if you need to replace a cracked tile years later, matching it from a different batch can be nearly impossible.
If your room has multiple doorways, radiant heating, or significant furniture obstacles, a professional tile setter will save you more money than they cost.
For design-focused troubleshooting, our guides on bathroom tile design workflow and matching tile patterns offer practical solutions that apply directly to living room projects.
Why the standard tile workflow might not deliver comfort — and how to fix it
Here is something most tile guides skip entirely: a perfectly installed tile floor can still feel wrong to live on. Tile is durable and low-maintenance but cold and noisy compared to carpet or hardwood. That is not a flaw, it is a tradeoff. The problem is when homeowners optimize entirely for durability and forget about daily livability.
We have seen beautifully tiled living rooms that feel sterile and echo-prone because no one thought about acoustics or underfoot warmth. The fix is not complicated. A well-placed area rug absorbs sound and adds softness. Radiant floor heating transforms a cold tile surface into one of the most comfortable floors you can own. Thoughtful layout patterns, like a herringbone or diagonal run, add visual warmth that makes a room feel lived-in rather than clinical.
The deeper point is this: your flooring choice should reflect how you actually live, not just what looks good in a design magazine. Exploring matching tile patterns with comfort and lifestyle in mind leads to rooms that feel as good as they look.
Connect with trusted tile experts for your project
If you’re ready to make your living room shine, there’s expert help and resources just a click away.
At Surfaces Galore, we work with homeowners every day who are navigating exactly the decisions covered in this guide. From selecting the right porcelain or travertine tile to understanding layout patterns and grout options, our team is here to make the process straightforward. We ship premium natural stone nationwide from our Anaheim, California warehouse, so you get authentic quality without the showroom markup. Browse our full range of living room tile solutions and connect with our experts to get personalized guidance for your specific space, budget, and style.
Frequently asked questions
What are the best tiles for living room floors?
Porcelain tiles are the top choice for living rooms because of their high durability and scratch resistance, along with a wide range of colors and finishes that suit almost any design style.
How much does living room tile installation cost in 2026?
Most homeowners pay between $10 and $25 per square foot for materials and labor, putting a 200 square foot living room in the $2,000 to $5,000 range depending on tile choice and local labor rates.
How do I prevent tile lippage and uneven floors?
Leveling clips and dry-laying before setting tiles are the most effective prevention methods, along with ensuring your subfloor meets the flatness standard of 1/8 inch over 10 feet.
Are tiles cold and hard underfoot? How can I fix this?
Tile does feel colder and harder than carpet or hardwood, but pairing it with area rugs or underfloor heating adds comfort and warmth without sacrificing the durability benefits.
How long does tiled living room flooring last?
With proper installation and routine care, porcelain tile floors last 50 to 100 years, making them one of the most cost-effective long-term flooring investments available.
Leave a comment