
Decorative Marble Strip Installation for Tile Framing

The appeal of custom tile framing continues to grow among american homeowners who want to elevate their spaces. Professional-looking marble strip borders can increase a home’s resale value by up to 10 percent, making every step in the installation process crucial. From choosing the right tools to precision layout and sealing, this guide shows you how to achieve a seamless and striking marble strip frame that looks expertly crafted in any american home.
Table of Contents
- Step 1: Gather Essential Tools And Marble Strips
- Step 2: Prepare The Tile Surface For Framing
- Step 3: Measure And Mark Layout For Marble Strips
- Step 4: Cut Marble Strips For Precise Fit
- Step 5: Install Marble Strips As A Border Or Frame
- Step 6: Inspect Edges And Finish With Sealing
Quick Summary
| Main Insight | Detailed Explanation |
|---|---|
| 1. Gather essential installation tools | Equip yourself with a wet saw, trowel, thinset mortar, and spacers for an effective installation process. |
| 2. Prepare the tile surface thoroughly | Ensure the area is clean, flat, and level to enhance mortar adhesion and achieve a professional appearance. |
| 3. Precisely measure and mark layout | Create reference lines and verify symmetry to ensure a seamless and aligned marble strip installation. |
| 4. Cut marble strips accurately | Use appropriate cutting tools and techniques for clean edges, ensuring accurate dimensions to avoid damage during installation. |
| 5. Seal marble strips after installation | Apply two coats of marble sealer to protect against moisture and enhance durability, preventing darkened edges over time. |
Step 1: Gather essential tools and marble strips
Installing decorative marble strips requires careful preparation and the right equipment. According to Rubi, you will need specific tools to ensure a professional and precise marble strip installation for your tile framing project.
Prepare your workspace by collecting these essential tools and materials:
- Wet saw with diamond blade for precise marble cutting
- Notched trowel for even adhesive application
- White thinset mortar to prevent marble staining
- Tile spacers to maintain consistent spacing
- Tape measure and T-square for accurate measurements
- Rubber mallet for gentle placement
- Work gloves to protect your hands
- Marble sealer for protecting the installed strips
- Grout and grout float for finishing
When selecting marble strips, choose pieces with consistent color and minimal variations to create a seamless decorative border. Measure your intended framing area carefully and purchase 10% extra material to account for potential cuts or breakage during installation.
Pro tip: Always handle marble strips with care and wear protective gloves to prevent potential scratches or chips during the installation process. Your precise preparation will set the foundation for a stunning marble strip frame that elevates your tile design.
Ready to proceed? Let’s move on to preparing your installation surface and making precise measurements for your marble strip frame.
Step 2: Prepare the tile surface for framing
Before installing your decorative marble strips, proper surface preparation is crucial. According to HGTV, the initial step involves carefully sanding the surface to smooth out any high spots and create an ideal texture for mortar adhesion.
As recommended by Rubi, ensure your surface meets these critical preparation requirements:
- Confirm the surface is completely flat and level
- Remove any existing moldings or trim that might obstruct installation
- Clean the area thoroughly to eliminate dust and debris
- Check for and repair any damaged or uneven sections
- Trim door jambs if necessary to accommodate the new tile framing
Pay special attention to creating a clean and smooth substrate. Use a level to identify and address any irregularities that could compromise the marble strip installation. A perfectly prepared surface will not only improve adhesion but also ensure a professional looking result.
Pro tip: Take your time during surface preparation. Rushing this step can lead to uneven tile placement or potential future issues with your marble strip framing. Thorough preparation is the foundation of a stunning tile design.
With your surface now primed and ready, you are set to move forward with positioning and securing your decorative marble strips.
Step 3: Measure and mark layout for marble strips
Precision is key when preparing to install decorative marble strips. According to Rubi, the first critical step is marking the center of your wall with a vertical line to ensure a symmetrical and professional installation.
Follow these strategic layout marking techniques:
- Use a long spirit level to draw perfectly straight reference lines
- Locate the center point of your installation area
- Create a vertical centerline using a plumb bob or laser level
- Measure and mark horizontal guidelines for consistent strip placement
- Dry fit marble strips before permanent installation to verify alignment
As recommended by HGTV, protect surrounding surfaces by covering your marked lines with painter’s tape. This prevents accidental scratches or paint damage during the installation process.
Pro tip: Take multiple measurements and double check your markings before cutting or placing any marble strips. A difference of even a few millimeters can disrupt the entire visual harmony of your decorative framing.
With your layout carefully marked and verified, you are now prepared to move forward with cutting and positioning your marble strips for a stunning tile frame.
Step 4: Cut marble strips for precise fit
Precision cutting is essential for creating a professional marble strip frame. According to Rubi, using the right tools and techniques will ensure clean and accurate cuts without damaging your delicate marble materials.
Select the appropriate cutting method based on your specific marble strip requirements:
- Wet saw with diamond blade for straight and clean cuts
- Tile cutter for simple straight line cuts
- Tile nippers for intricate curve and detail work
- Rod saw for complex cutting patterns
- Carborundum stone for smoothing rough edges after cutting
As recommended by Claybrook Studio, always cut marble tiles face side up using a water cooled tile cutter with a diamond edged blade. Avoid making cuts smaller than 15 millimeters to prevent potential cracking or structural weakness in your marble strips.
Pro tip: Wear safety glasses and work gloves during cutting. Marble can create sharp fragments, and protecting yourself is just as important as protecting your beautiful stone materials.
With your marble strips now precisely cut, you are ready to move forward with positioning and securing them into your elegant tile frame.
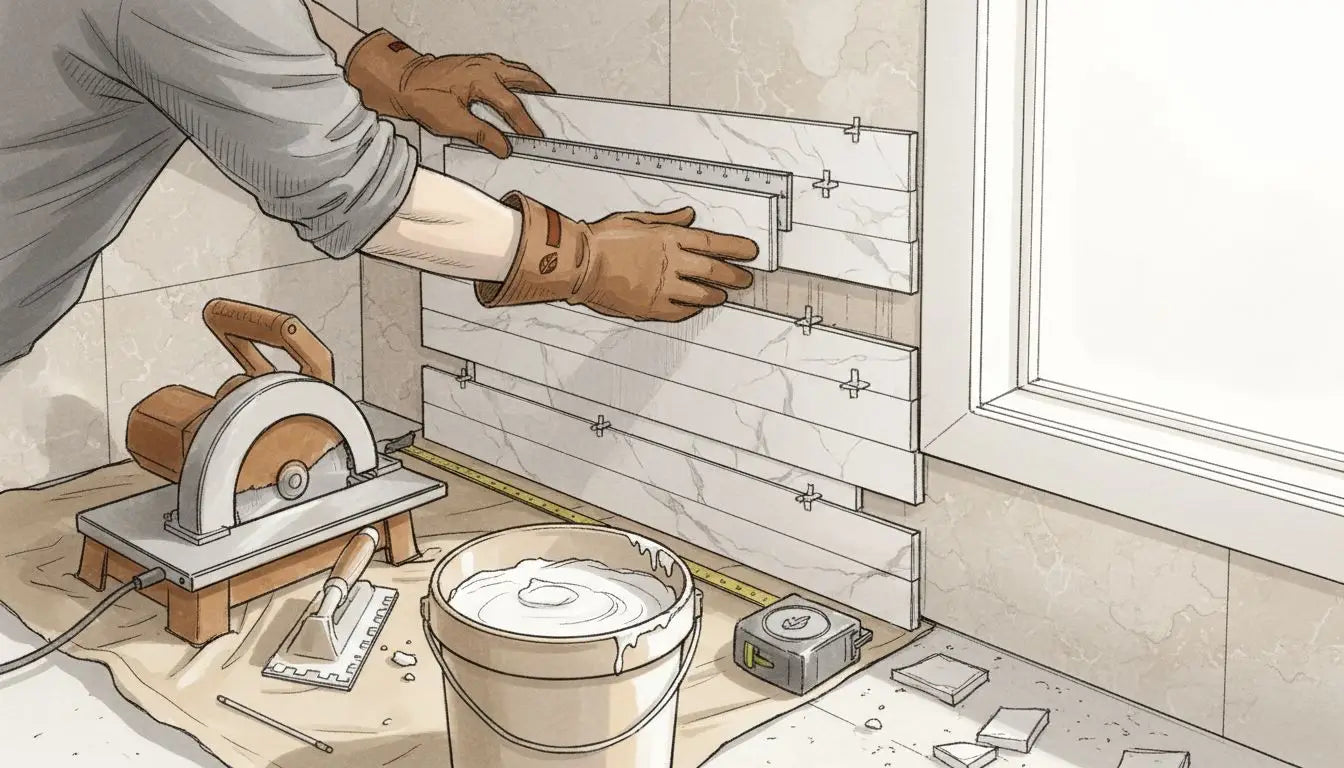
Step 5: Install marble strips as a border or frame
The final stage of creating your decorative marble strip frame requires precision and patience. According to Rubi, you should start tiling from the center and work your way outward, fully completing each section before moving to the next area.
Follow these critical installation techniques:
- Apply a thin layer of white thinset mortar evenly with a notched trowel
- Place marble strips with a gentle twisting motion to ensure proper adhesion
- Use tile spacers to maintain consistent gaps between strips
- Press each strip firmly and level with a rubber mallet
- Leave a 1/4 inch gap around perimeter edges for potential expansion
As recommended by Support Zia Tile, consider mitering exposed edges by cutting marble pieces at a precise 45-degree angle. This technique creates seamless corners that look professionally finished and eliminate the need for separate trim pieces.
Pro tip: Work slowly and check alignment frequently. Even a slight misalignment can disrupt the visual harmony of your marble strip border.
With your marble strips now carefully installed, you are ready to complete the final steps of grouting and sealing your beautiful new tile frame.
Step 6: Inspect edges and finish with sealing
The final stage of your marble strip installation involves careful inspection and sealing to protect and enhance your beautiful new tile frame. According to Claybrook Studio, sealing is critical to prevent potential ‘picture-framing’ where darker borders can form around tile edges.
Follow these comprehensive sealing and inspection steps:
- Carefully examine each marble strip for alignment and positioning
- Clean the entire surface to remove any installation debris
- Apply at least two coats of marble sealer
- Ensure sealer contacts both tile sides and face
- Allow each sealer coat to dry completely between applications
- Check for any uneven areas or potential imperfections
- Smooth out any rough edges with a carborundum stone
As recommended by Support Zia Tile, plan for periodic resealing based on traffic and wear. Regular maintenance like gentle vacuuming and sweeping will help preserve your marble strip frame’s pristine appearance.
Pro tip: Use a high-quality penetrating sealer specifically designed for natural stone to maximize protection and longevity.
With your marble strips now sealed and inspected, your decorative tile frame is complete and ready to enhance your space with timeless elegance.
Elevate Your Tile Framing with Premium Marble Strips
Installing decorative marble strips for tile framing demands precision, quality materials, and expert preparation. Whether you are concerned about achieving flawless cuts, perfect alignment, or long-lasting sealing, the challenge is finding marble that complements your vision while standing the test of time. At Surfaces Galore, we understand these goals and the importance of using authentic, durable marble strips that enhance every edge and border of your tile project.

Discover our wide selection of premium natural stone including high-quality marble strips designed to simplify installation and elevate style. Choose Surfaces Galore for unmatched quality and service to bring your decorative tile frame to life. Start your project now by exploring our offerings at Surfaces Galore and experience the difference that premium materials make for your tile framing success.
Frequently Asked Questions
What tools do I need for installing decorative marble strips?
You will need a wet saw with a diamond blade, a notched trowel, white thinset mortar, tile spacers, a tape measure, a T-square, a rubber mallet, work gloves, marble sealer, and grout. Gather these tools before starting your project to ensure a smooth installation process.
How do I prepare the surface before installing marble strips?
Ensure the surface is flat and level by sanding down any high spots and cleaning the area thoroughly. Remove any moldings, and address any damaged sections to create an ideal surface for marble adhesion.
What is the best way to mark the layout for marble strip installation?
Start by drawing a vertical centerline on your wall using a spirit level and then measure and mark horizontal guidelines for marble strip placement. Ensure to double-check your measurements to maintain the symmetry of your design.
How should I cut marble strips for my tile framing project?
Use a wet saw with a diamond blade for straight cuts or tile nippers for curves. Always cut marble strips face side up and avoid cuts smaller than 15 millimeters to prevent cracking.
What are the steps to install the marble strips once they are cut?
Apply a thin layer of white thinset mortar evenly to the wall, then position the marble strips carefully starting from the center and working outward. Use tile spacers to maintain consistent gaps and press each strip firmly into place with a rubber mallet.
How do I seal the marble strips after installation?
Examine each strip for alignment and cleanliness, then apply at least two coats of marble sealer, allowing each coat to dry completely. This will enhance the durability and appearance of your decorative framing, ensuring it lasts for years.

Leave a comment