
How to Clean Grout on Marble Without Damaging It

TL;DR:
- Darkened grout lines diminish the elegance of marble surfaces, which require careful, pH-neutral cleaning. Using acidic cleaners or abrasive tools can cause irreversible etching and dullness, so gentle methods like baking soda paste and steam cleaning are recommended. Regular maintenance, prompt rinsing, and resealing help preserve marble’s natural beauty and prevent stubborn stains or grout haze.
Marble floors, walls, and shower surrounds are among the most striking surfaces a home or property can have. But nothing undermines that elegance faster than darkened, grimy grout lines cutting through otherwise pristine stone. The problem most homeowners and property managers run into is reaching for a common household cleaner, scrubbing hard, and then watching the marble lose its luster or develop cloudy, dull patches. Marble is not forgiving of the wrong approach. This guide walks you through every stage of grout cleaning, from gathering safe supplies to tackling stubborn haze, so you can protect your stone while getting it back to its best.
Table of Contents
- What you need to safely clean marble grout
- Step-by-step instructions: Cleaning marble grout without damage
- Avoiding common mistakes and protecting marble surfaces
- Dealing with stubborn stains and grout haze on marble
- Why most grout cleaning advice fails marble owners
- Protect your marble investment with expert help
- Frequently asked questions
Key Takeaways
| Point | Details |
|---|---|
| Avoid acidic cleaners | Never use vinegar, lemon juice, or harsh chemicals on marble grout—they cause etching and damage. |
| Use gentle, pH-neutral solutions | A baking soda paste and soft brushing are safe, effective starters for most grout stains. |
| Steam clean for deeper results | Steam cleaning with distilled water safely lifts deep dirt without harming marble’s finish. |
| Rinse and dry thoroughly | After cleaning, always rinse and dry both marble and grout to prevent spots and mildew. |
| Protect for long-term beauty | Consistent, gentle routines safeguard marble’s elegance and reduce future staining or wear. |
What you need to safely clean marble grout
Now that you understand the challenge, let’s make sure you don’t start with the wrong supplies. The most important thing to know before picking up any cleaner is that marble is a calcium-based stone, which means it reacts badly to acids and harsh abrasives. This reaction, known as etching, creates dull spots or marks that cannot simply be wiped away. Understanding marble etching basics helps you make smarter choices before you ever open a bottle.
Why product selection matters so much
Unlike ceramic or porcelain tile, marble sits at a pH sensitivity that most people underestimate. Everyday cleaners like all-purpose sprays, grout cleaners labeled “heavy duty,” and especially acidic products on marble such as vinegar and lemon juice can permanently etch and dull the surface. Even a diluted splash can leave a mark. This is not a scare tactic. It is the most common and most preventable cause of marble damage in homes across the country.
Your cleaning products should fall into one of two categories: pH-neutral (exactly 7 on the pH scale) or very mildly alkaline (between 7 and 8). Baking soda, for example, sits around 8.3, which is gentle enough when diluted. Dish soap diluted heavily in warm water can also serve as a basic pre-rinse agent. Hydrogen peroxide at 3% concentration is acceptable for tougher staining on white or light marble, though you should always test it first in a hidden area.
Recommended tools and materials
Here is a quick look at what you need before you start, along with what to skip entirely.
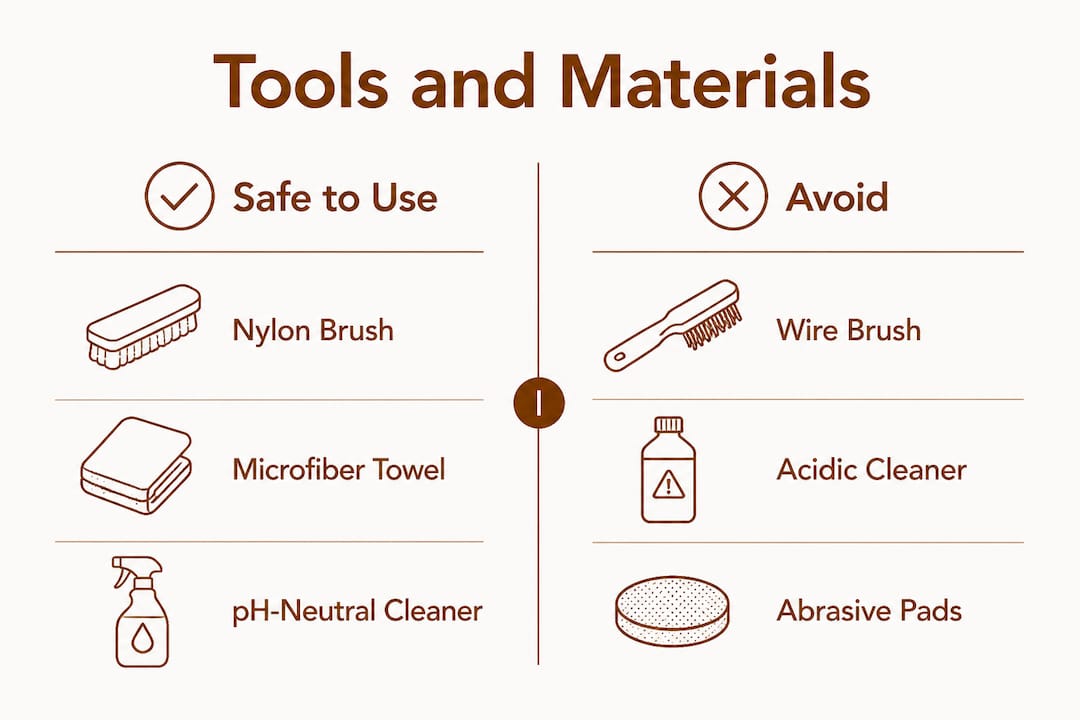
| Safe to Use | Avoid at All Costs |
|---|---|
| Soft nylon grout brush | Wire or metal brushes |
| Microfiber towels | Rough scrubbing pads |
| Plastic scraper | Metal spatulas |
| pH-neutral stone cleaner | Vinegar, lemon juice, or citrus cleaners |
| Baking soda paste | Bleach (undiluted) |
| 3% hydrogen peroxide | Commercial tile grout cleaners with acid |
| Distilled water for rinsing | Tap water in hard water areas (for final rinse) |
| Steam cleaner (with distilled water) | High-pressure washers |
Beyond the products and tools, you also want to protect yourself. Wear rubber gloves when working with hydrogen peroxide or any commercial stone cleaner. Open windows or run ventilation if you are working in a shower or bathroom, since steam and product residue can build up fast in a small space.
Essential supplies checklist:
- pH-neutral stone cleaner or mild dish soap
- Baking soda
- 3% hydrogen peroxide (for stubborn grout on light stone)
- Soft nylon grout brush or old toothbrush
- Microfiber cloths (several, for rinse and dry stages)
- Plastic scraper
- Spray bottle with distilled water
- Clean bucket for rinse water
A note on “natural” cleaners: Many homeowners assume natural equals safe for marble. That assumption causes real damage. Lemon juice, white vinegar, and even certain essential oil blends are acidic and will etch your stone. Stick to the tools and products listed above, and you will not have any surprises.
Pro Tip: Before buying any commercial cleaner marketed as “stone safe” or “marble friendly,” check the label for pH and look for independent certification from the Marble Institute of America or a similar stone care organization. If the pH is not listed and you cannot find independent confirmation, skip it.
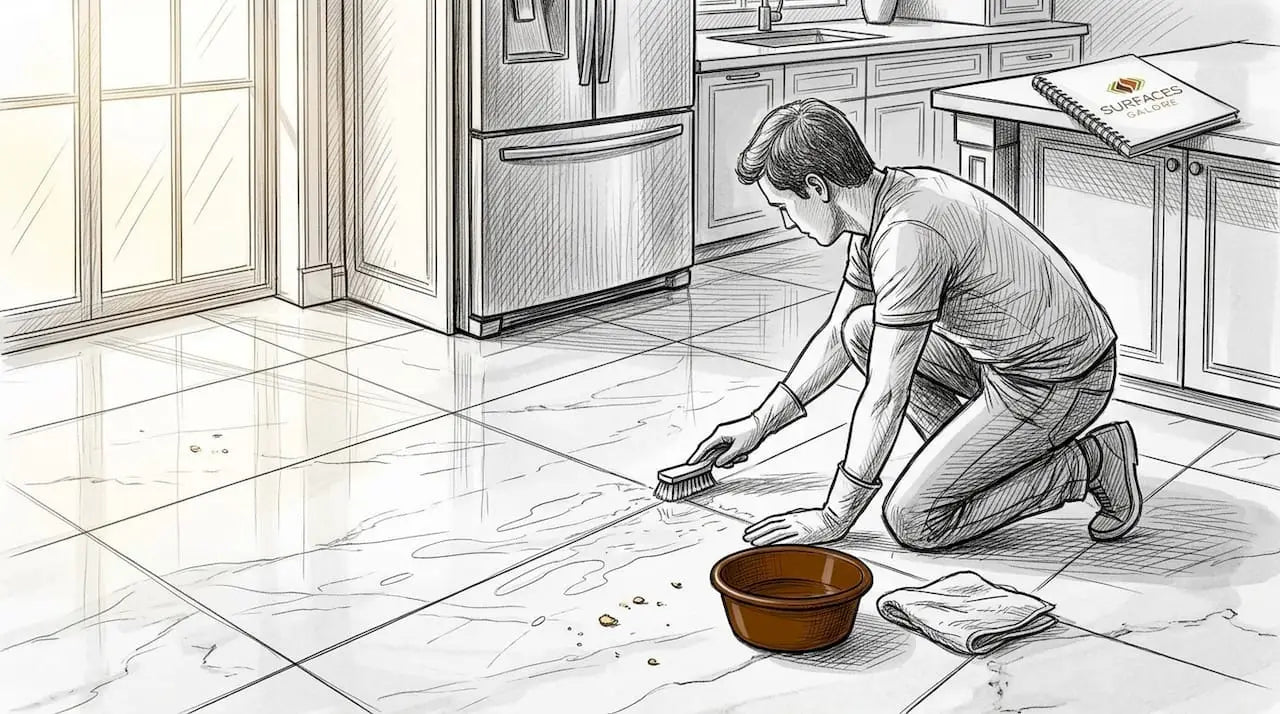
Step-by-step instructions: Cleaning marble grout without damage
With your supplies ready, you can follow several proven approaches to safely clean marble grout. The key is to build up from gentle methods before escalating to anything stronger. Most grout lines on marble can be addressed with a basic baking soda paste and some patience. Tougher buildup might need steam. Rarely will you need anything more aggressive than that.
Method 1: Baking soda paste for light to moderate staining
A baking soda paste made from baking soda and water, or baking soda and hydrogen peroxide, is one of the most trusted approaches for light to moderate grout staining, especially when paired with gentle agitation. It is effective, affordable, and gentle on marble when used correctly.
- Mix two tablespoons of baking soda with just enough water to form a thick paste. For more stubborn staining, substitute water for 3% hydrogen peroxide.
- Apply the paste directly onto the grout lines using an old toothbrush or soft nylon grout brush. Do not spread it across the marble surface itself if you can help it, since sitting paste can dull a polish over time.
- Let the paste sit for 5 to 10 minutes. Do not let it dry completely on the surface.
- Scrub the grout lines using small, circular motions. Keep pressure light. The goal is gentle agitation, not mechanical force.
- Rinse thoroughly with distilled water using a spray bottle or damp microfiber cloth.
- Dry the area immediately with a clean microfiber towel.
Always test in an inconspicuous area first. Apply a small amount of your cleaning mixture to a corner or behind a fixture, wait 10 minutes, then check for any change in color, sheen, or texture before cleaning the full surface.
Method 2: Steam cleaning for deeper cleaning
Steam cleaning is one of the safest and most effective methods for grout on sealed marble surfaces. The high-temperature steam lifts dirt and bacteria without leaving chemical residues, making it ideal for kitchens, showers, and bathrooms. Using distilled or demineralized water in your steam cleaner is recommended to reduce the risk of mineral spotting on marble.
- Fill your steam cleaner with distilled water only.
- Attach a narrow nozzle or grout-specific brush attachment for precision.
- Hold the nozzle close to the grout line and move it slowly in a controlled pass. Do not hold it stationary for more than 2 to 3 seconds in one spot.
- Wipe the loosened grime immediately with a clean microfiber cloth.
- Repeat passes as needed, section by section.
- Once the area is clean, rinse lightly with distilled water and dry completely.
For marble shower grout cleaning and other high-moisture areas, review the marble shower installation workflow to understand how your surfaces were set up and what ongoing care they require.
| Method | Best For | Dwell Time | Risk Level |
|---|---|---|---|
| Baking soda paste | Light to moderate staining | 5 to 10 minutes | Very low |
| Baking soda + H2O2 | Moderate to heavy staining | 5 to 10 minutes | Low |
| Steam cleaning | Deep cleaning and bacteria removal | No dwell time | Very low (on sealed marble) |
| pH-neutral stone cleaner | Regular maintenance | Per product label | Very low |
Pro Tip: When cleaning marble flooring, work in small sections rather than soaking the entire floor. Excess water sitting in grout joints can weaken grout over time and encourage mildew growth, especially in humid climates.
Avoiding common mistakes and protecting marble surfaces
Cleaning is only as effective as the mistakes you avoid along the way. Even homeowners who have taken care of marble for years can fall into habits that gradually damage their stone. Knowing what not to do is just as important as knowing the right techniques.
The top errors that damage marble grout
- Using acidic cleaners: Vinegar, lemon juice, citrus-based sprays, and anything marketed as a “tough grout cleaner” without a pH guarantee. These products react with the calcium in marble and cause etching, which looks like dull patches or light scratches in the finish.
- Scrubbing with abrasive tools: Steel wool, rough sponge scrubbers, and stiff wire brushes all scratch marble’s polished surface. Even if the damage is not immediately visible, it accumulates and dulls the finish over months.
- Leaving standing water on grout: Water sitting in grout joints encourages mold and mildew. In hard water areas, it also leaves mineral deposits that are difficult to remove without resorting to acidic cleaners, which creates a frustrating cycle of damage.
- Skipping the rinse step: Cleaning product residue left on marble or in grout lines can attract more dirt and cause a cloudy film. Always rinse with clean, distilled water after cleaning.
- Over-wetting the surface: Marble is a porous stone unless fully sealed. Too much water forces moisture into the stone and can cause staining from below, especially if there is any organic material in the grout.
What the experts consistently say: Rinse thoroughly and dry promptly after every cleaning session to prevent residue and water spots, and to reduce the conditions that encourage mildew growth. This single habit prevents a surprising number of recurring problems.
Preventing mildew, haze, and recurring staining
Mildew in marble grout is often a ventilation problem as much as a cleaning problem. In bathrooms and showers, make sure you run a ventilation fan for at least 15 minutes after every use. Wipe down surfaces with a squeegee or dry cloth after showering.
For kitchens and entryways, place protective mats or rugs at entry points to reduce the amount of grit and grime that reaches your marble. Clean up spills immediately by blotting, never wiping. Wiping spreads a spill and drives it deeper into the grout. Blotting lifts it out.
To protect your grout and stone long-term, reseal both the marble and the grout on a regular schedule. Most professionals recommend resealing marble floors once a year and grout every six to twelve months depending on traffic and moisture levels. Following a consistent marble maintenance workflow keeps you ahead of the problems rather than chasing them.
Pro Tip: After cleaning grout, place a thin bead of grout sealer along the lines once they are completely dry. A quality penetrating sealer repels water and oils, making future cleanings faster and easier.
Dealing with stubborn stains and grout haze on marble
Sometimes regular cleaning isn’t enough, and tougher problems need expert know-how. Two of the most frustrating situations marble owners face are deeply set stains in grout and grout haze, which is the cloudy, whitish film that forms on marble after grouting or after cleaning with the wrong products.
What grout haze is and why it forms
Grout haze forms when grout particles are not cleaned off the marble surface properly after installation or after a grout repair job. The grout slurry dries on the marble and forms a thin, opaque film that makes the stone look dull and streaky. It also forms after using certain cleaning products that leave behind a mineral or soap residue.
Haze is not the same as etching. Etching is chemical damage to the stone’s surface, while haze sits on top of the surface as a residue. That distinction matters because the removal approach is different.
Step-by-step approach for removing grout haze from marble
For grout haze or caked residue on marble, a plastic scraper used at a shallow angle combined with a pH-neutral stone cleaner at a short dwell time, followed by gentle nylon-brush agitation, is the recommended method for protecting the marble surface.
- Dampen the hazed area with distilled water to soften the residue slightly.
- Apply a small amount of pH-neutral stone cleaner directly onto the haze. Do not use general grout haze removers, since most contain acid.
- Allow the cleaner to sit for no longer than 2 to 3 minutes. Never let it dry on the surface.
- Use a plastic scraper held at a very low angle (less than 20 degrees) and apply very light pressure to begin lifting the haze. Do not dig or push down. Let the angle of the scraper do the work.
- Follow up with a soft nylon brush using short, gentle strokes along the haze.
- Rinse with distilled water and inspect the area.
- Repeat if necessary, but give the marble a rest between passes to avoid overworking it.
For deeply caked marble grout care situations, you may need to repeat this process two or three times across different sessions. Patience genuinely produces better results than force.
Additional safeguards for stubborn stain removal
- Never use a razor blade scraper, even a fresh one. The edge is too sharp for polished marble.
- Keep dwell times short. More contact time with any cleaner, even mild ones, increases risk.
- Work in small areas, about one square foot at a time, so you can monitor progress closely.
- After removing haze, polish the area with a dry microfiber cloth using circular motions to restore the surface’s natural sheen.
Pro Tip: If you suspect grout haze has been sitting on your marble luxury surface for more than a few weeks, consult a professional stone restoration specialist before attempting aggressive removal. Hardened grout residue over an extended period can bond tightly to the marble, and DIY removal at that stage carries a higher risk of scratching or permanently dulling the surface.
Why most grout cleaning advice fails marble owners
After all these tips and cautions, it is worth stepping back for a broader, experience-driven perspective. We see a consistent pattern at Surfaces Galore: homeowners who invest in beautiful marble, take great care of it initially, and then at some point follow a generic grout-cleaning hack they found online, only to call us frustrated because their stone no longer looks the way it did.
The core problem is that most grout-cleaning advice online is written for ceramic and porcelain tile. Both of those materials can tolerate acids and vigorous scrubbing. Marble cannot. A method that transforms dirty grout on a ceramic bathroom floor can permanently damage the same grout situation on a marble floor. That is not a small difference. It is a fundamental incompatibility.
We have also seen the opposite mistake: homeowners so afraid of damaging their marble that they skip cleaning altogether and allow grime and mildew to accumulate until the situation requires professional intervention. That approach is not caution. It is avoidance, and it leads to far bigger repair costs than a regular cleaning routine would have.
The truth that most guides do not say directly is this: marble rewards patience and consistency far more than it rewards intensity. You do not need aggressive products or back-breaking scrubbing. You need the right products used regularly, appropriate tools, and a willingness to dry and reseal surfaces on schedule.
If you ever need to restore marble shine after damage or persistent dullness, the recovery process almost always involves undoing damage caused by harsh cleaners or abrasive tools. In other words, the damage was avoidable. The best outcome is always to protect the stone from the start.
Building a marble-specific care routine is not difficult. It just requires understanding that this stone is different, and treating it accordingly. Once that mindset clicks, maintaining marble becomes almost second nature. You clean with gentle products, you dry quickly, you seal consistently, and your marble lasts for decades looking exactly the way it should.
Protect your marble investment with expert help
You now have a solid, stone-safe strategy for cleaning and protecting your marble grout. But ongoing marble care involves more than a single cleaning session.

At Surfaces Galore, we support homeowners and property managers through every stage of stone care, from installation to long-term upkeep. Our team works with designers, contractors, and everyday homeowners across the country and understands the real challenges that come with maintaining natural stone in active homes and properties. Whether you need guidance on sealers, grout compatibility, or product recommendations tailored to your specific marble, we are here to help. Explore our full library of streamlined marble maintenance resources, or reach out directly for hands-on support. Beautiful marble should stay beautiful for a lifetime, and the right knowledge makes that achievable.
Frequently asked questions
Can I use vinegar or lemon juice to clean grout on marble?
No. Acidic products like vinegar and lemon juice etch and dull marble surfaces on contact, causing permanent damage that cannot be removed by cleaning alone.
Is steam cleaning safe for marble grout?
Yes, when done correctly. Steam cleaning is safe and effective for grout on sealed marble surfaces because high-temperature steam lifts dirt without leaving chemical residues.
How should I dry grout and marble after cleaning?
Wipe surfaces promptly and thoroughly after rinsing. Drying promptly prevents water spots, residue buildup, and the moist conditions that allow mildew to take hold.
What should I do if grout stains remain after cleaning?
Use a plastic scraper at a low angle and apply a pH-neutral stone cleaner with a brief dwell time, followed by gentle nylon-brush agitation, to remove stubborn haze or residue without scratching the marble.
How often should I clean grout on marble surfaces?
Clean grout every few weeks or as soon as discoloration becomes visible. Staying ahead of buildup keeps cleaning sessions quick and reduces the need for more aggressive methods over time.
Leave a comment