
How to Drill Through Stone: A DIY Guide
TL;DR:
- Drilling through stone requires diamond core bits, a rotary-only drill, and continuous water cooling to prevent damage. Proper technique includes starting at an angle and gradually moving to a 90-degree drill, with water flow throughout the process. Using the correct bond hardness for each stone type extends bit life and ensures clean, chip-free holes.
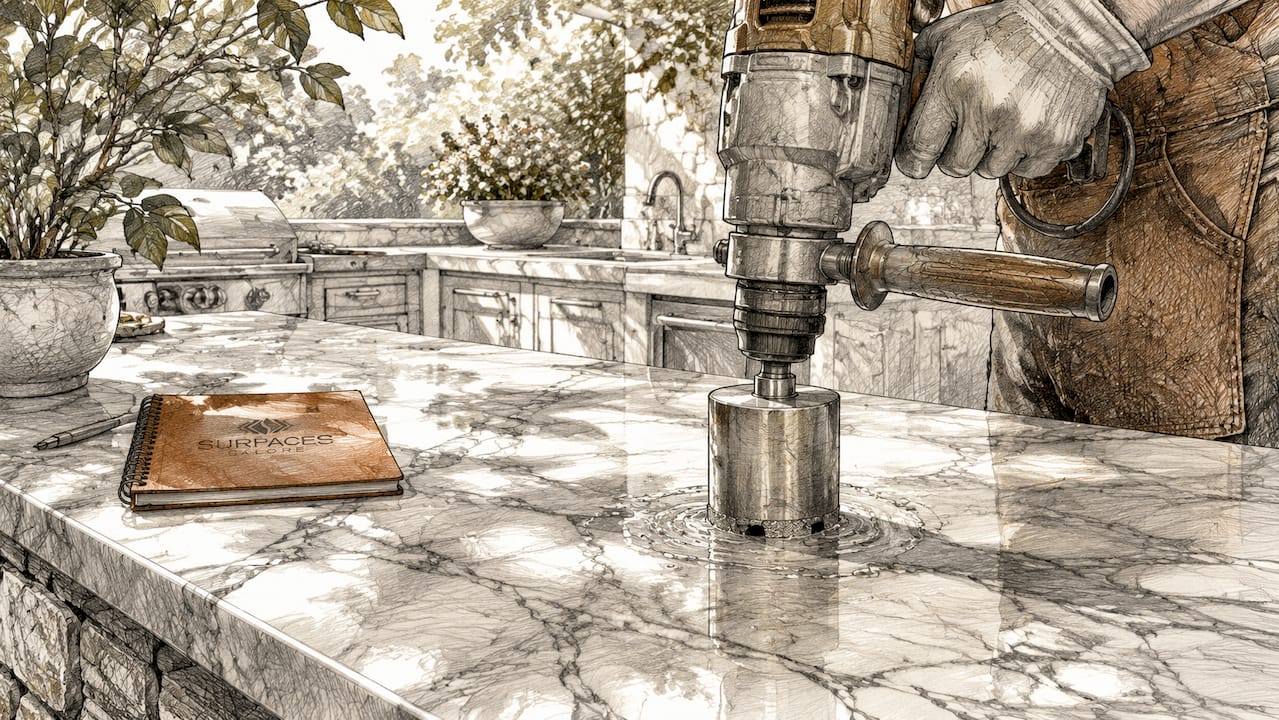
Drilling through stone is defined as the process of creating clean, controlled holes in natural or engineered stone using diamond core bits, correct rotational speed, and continuous water cooling. Standard masonry bits and HSS drill bits fail almost instantly on hard stone like granite or marble. The right approach combines a rotary-only drill, a diamond core bit matched to your stone type, and steady low feed pressure. Get those three elements right, and you will produce professional-quality holes without cracking or chipping your stone surface.
How to drill through stone: tools and equipment you need
The single most important piece of equipment is the diamond core bit. Diamond bits abrade rather than cut, grinding through stone by exposing tiny industrial diamonds embedded in a metal matrix. Standard carbide or HSS bits cannot sustain contact with hard stone and dull within seconds.
Choosing the right drill bit for your stone type
Different stones demand different bit specifications. The table below outlines the most common stone types and the corresponding bit recommendations.
| Stone type | Recommended bit | Bond hardness |
|---|---|---|
| Granite | Diamond core bit | Soft bond |
| Marble | Diamond core bit | Medium bond |
| Travertine | Diamond core bit | Medium bond |
| Limestone | Diamond core bit | Medium to soft bond |
| Porcelain tile | Diamond core bit | Hard bond |
Granite requires a soft bond diamond bit because the hard stone wears away the soft matrix quickly, continuously exposing fresh diamonds. A hard bond bit on granite traps the diamonds, causing the bit to polish the surface instead of grinding through it. Porcelain is softer relative to its abrasiveness, so a harder bond holds the diamonds in place longer.
Thin wall core bits generate less heat, drill faster, and put less strain on the drill motor. They are the preferred choice for plumbing holes, faucet cutouts, and sink installations where speed and precision matter.
Drill and cooling equipment
Your drill must operate in rotary-only mode. Hammer percussion mode must be disabled completely before you touch stone. Even a single impact pulse can cause microfractures or surface chips that ruin an otherwise clean hole.
For cooling, you have three practical options:
- Suction cup water dam: A rubber ring that attaches around the drill site and holds water directly over the bit. This is the most reliable method for horizontal surfaces.
- Water bottle with a hole in the cap: A low-cost option where a helper drips water onto the bit continuously. Works well for vertical surfaces.
- Wet drilling attachment: A dedicated ring that connects to a water supply line, used for production work or large-diameter holes.
Safety gear is non-negotiable. Wear safety glasses rated for impact protection and cut-resistant gloves. Stone chips travel fast and diamond bits can grab unexpectedly on porous surfaces.
What are the steps to drill through stone cleanly?
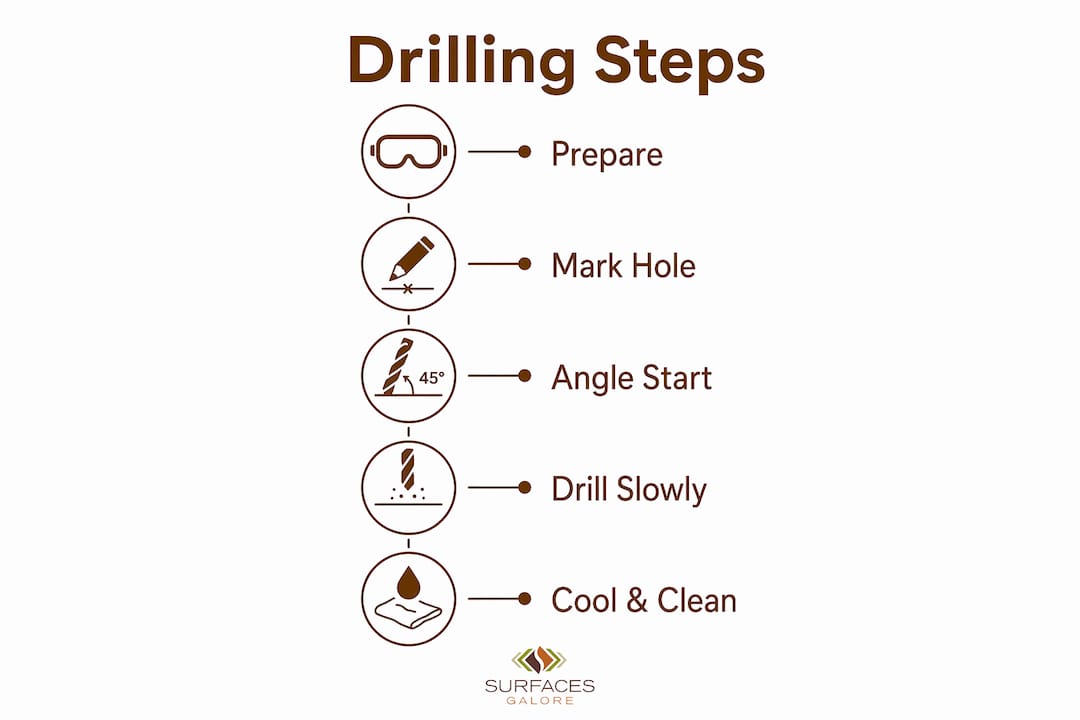
Clean stone drilling follows a specific sequence. Skipping any step increases the risk of chipping, bit skating, or cracking the slab.
-
Mark the hole location. Use a pencil or marker to place a clear center point. Apply a strip of painter’s tape over the mark. The tape gives the bit a surface to grip and reduces chipping at the entry point.
-
Set up your water cooling. Attach a suction cup water dam around the marked spot and fill it with water. If you are drilling vertically into a wall, position a helper with a water bottle to drip water onto the bit throughout the process.
-
Start the hole at an angle. Begin drilling at a 10–45 degree angle to the stone surface. This creates a small notch that stops the bit from skating across the surface. Hold this angle for 2–5 seconds until a shallow groove forms.
-
Pivot to 90 degrees. Once the notch is established, slowly bring the drill upright to a full 90-degree angle. Do this gradually so the bit stays seated in the groove.
-
Drill at low RPM with light pressure. For a standard 1-3/8 inch granite hole, maintain 600–900 RPM for wet drilling. Smaller bits need slower speeds in the 200–300 RPM range. Let the diamond abrasives do the work. Excess feed pressure generates heat without speeding up the cut.
-
Keep water flowing continuously. Water flushes stone dust out of the hole and cools the diamond bond. Without it, the bit overheats and glazes within seconds.
-
Slow down near breakthrough. As the bit approaches the back face of the stone, reduce speed and pressure significantly. Punching through at full speed causes blowout chips on the exit side.
-
Drill from both sides on thick slabs. For stone thicker than one inch, drill halfway through from the front, then flip the slab or reposition and drill from the back until the two holes meet. This eliminates exit chipping entirely.
Pro Tip: Place a scrap piece of wood directly under the stone when drilling on a workbench. The wood supports the back face at breakthrough and prevents the bit from punching out a chunk of stone.
The angle-start technique is the step most homeowners skip, and it is the one that causes the most frustration. A bit that skates across polished marble leaves a scratch that no amount of polishing will fully remove. Two seconds of patience at the start saves the entire project.
How does stone type affect your drilling approach?
Stone hardness, porosity, and internal structure all change how you drill. A technique that works perfectly on granite will damage travertine if applied without adjustment.
Granite and hard stone
Granite is the most demanding stone for drilling. It is dense, abrasive, and unforgiving of technique errors. Use a soft bond diamond bit, keep RPM in the 600–900 range for wet drilling, and never apply downward force beyond the weight of the drill itself. Granite rewards patience. Rushing produces heat, and heat glazes the bit.
Marble and limestone
Marble and limestone are softer than granite but still require diamond core bits. They chip more easily at the entry and exit points, so the painter’s tape step and the two-sided drilling approach matter more here. Medium bond bits work well for both. Feed pressure should be even lighter than with granite because these stones crack under stress more readily.
Travertine
Travertine is a porous stone filled with natural voids and channels. Those voids create a real hazard when drilling. Porous stones like travertine can cause the bit to grab suddenly when it crosses a void, jerking the drill and potentially cracking the surrounding stone. Maintain very low feed pressure and be ready to ease off immediately if you feel resistance change or vibration increase.
For more on working with travertine safely, Surfacesgalore’s guide on sealing travertine covers the material’s structure in detail, which helps you understand why it behaves differently under a drill.
Porcelain and engineered stone
Porcelain is extremely hard and brittle. It chips at the slightest provocation. Use a hard bond diamond bit, keep speed low, and apply almost no downward pressure. Engineered stone (quartz composite) behaves similarly to granite in terms of hardness but can be more uniform, which actually makes drilling slightly more predictable.
Dry drilling is possible but limited. Keep dry drilling bursts to 10–15 seconds maximum, then pause to let the bit cool before continuing. Prolonged dry drilling destroys diamond bonds and voids any warranty on quality bits.
Troubleshooting bit glazing
A glazed bit stops cutting and starts spinning in place. You will notice the drill sounds different, the bit feels like it is sliding, and no stone dust appears. The fix is to dress the bit by running it briefly against an abrasive surface such as a concrete block or a dressing stone. This abrades the metal matrix and exposes fresh diamonds. A bit that glazes repeatedly is either the wrong bond for your stone or has been run too fast and too dry.
What safety and maintenance habits protect your tools and stone?
Good habits extend bit life and protect both you and your stone surface. A diamond core bit is not cheap. Treating it correctly means it lasts through many more projects.
Signs your bit needs attention:
- The drill makes a high-pitched whine instead of a steady grinding sound
- Stone dust stops appearing in the water around the hole
- The bit feels hot to the touch immediately after use
- Progress slows dramatically despite correct technique
Pro Tip: After each drilling session, rinse your diamond core bits with clean water and let them air dry completely before storage. Stone dust left in the bit’s segments accelerates corrosion and shortens bit life.
Preventing micro-fractures starts before you drill. Never place a stone slab directly on a hard surface without padding underneath. A slab that flexes under drill pressure will crack along its weakest point. Use foam padding or rubber mats to support the full surface.
When to call a professional is a straightforward decision. If you are cutting a hole larger than two inches in diameter in a countertop, or if the stone is already installed and cracking is a risk to surrounding tiles or grout, professional fabricators have wet-saw setups and drill rigs that eliminate most of the risk. For standard faucet holes and wall anchor points, a confident DIY approach with the right tools produces excellent results.
For countertop installations where holes for sinks or faucets are part of the project, Surfacesgalore’s resource on marble countertop installation walks through the full process with stone-specific guidance.
Proper storage of your drill matters too. Keep the drill’s chuck clean and free of stone dust. Stone particles are abrasive and will wear down the chuck mechanism over time if left to accumulate. A quick wipe with a dry cloth after each session is enough.
Key takeaways
Drilling through stone successfully requires diamond core bits, rotary-only mode, and continuous water cooling working together from the first second of contact.
| Point | Details |
|---|---|
| Diamond bits are non-negotiable | Standard carbide or HSS bits fail instantly on hard stone like granite or marble. |
| Bond hardness must match stone hardness | Soft bond bits suit granite; hard bond bits suit porcelain; mismatching reduces bit life. |
| Disable hammer mode before drilling | A single impact pulse can crack or chip stone surfaces permanently. |
| Start at an angle, finish at 90 degrees | A 10–45 degree notch prevents bit skating and sets up a clean, centered hole. |
| Slow down at breakthrough | Reducing speed and pressure near the exit face prevents blowout chips on the back side. |
What I’ve learned from drilling stone the hard way
The first time I drilled through a marble slab, I used a standard masonry bit and full hammer mode. The bit lasted about four seconds before it stopped cutting entirely. The marble had a hairline crack running from the hole to the edge. That mistake cost more than a quality diamond bit would have.
The lesson I carry from that experience is that stone does not forgive impatience. Every shortcut shows up in the finished hole. Skipping the angle-start leaves a skating scratch. Skipping water cooling glazes the bit in under a minute. Applying too much pressure heats the stone and can cause thermal cracking that only appears hours later.
What I tell every homeowner who asks about this: buy one good diamond core bit instead of three cheap ones. A quality bit drills cleaner, lasts longer, and gives you the feedback you need to feel when something is wrong. Cheap bits glaze without warning and leave you guessing.
The water cooling step feels like overkill for a single small hole. It is not. Even a 30-second dry run on granite can glaze a bit beyond recovery. Set up the water dam every single time, no exceptions. The two minutes it takes to set up saves the bit and the stone.
Mastering stone drilling at home is genuinely satisfying. When you pull the core out cleanly and the hole is perfectly round with no chips, that result reflects real skill. It takes practice, but the technique is learnable by any patient homeowner with the right tools.
— cihan
Natural stone for your next home project
Knowing how to work with stone is only half the picture. The other half is starting with stone worth the effort.
Surfacesgalore is a direct importer of premium marble, limestone, and travertine tiles, mosaics, and decorative pieces, shipping nationwide from Anaheim, California. Every slab and tile in the collection is selected for durability and authentic character. Whether you are installing a marble countertop, a travertine shower floor, or a limestone accent wall, Surfacesgalore carries the material and the knowledge to help your project succeed. Browse the natural stone tile collections and find the right stone for your next installation.
FAQ
What drill bits work best for stone?
Diamond core bits are the correct choice for all natural stone, including granite, marble, travertine, and limestone. Standard masonry or HSS bits fail almost immediately on hard stone surfaces.
Can I drill stone without water cooling?
Dry drilling is possible only in short 10–15 second bursts with cooling intervals between each pass. Continuous dry drilling overheats and glazes diamond bits, ending their useful life quickly.
Why should I disable hammer mode when drilling stone?
Hammer mode delivers impact pulses that crack or chip brittle stone. Rotary-only mode is required for all stone drilling to avoid surface damage and microfractures.
How do I stop the drill bit from skating across the stone?
Start the hole at a 10–45 degree angle to create a small notch, then pivot the drill to 90 degrees once the groove is established. Painter’s tape over the drill site also helps the bit grip the surface.
How do I know if my diamond bit is glazed?
A glazed bit stops producing stone dust, makes a higher-pitched sound, and shows no drilling progress despite correct technique. Dress the bit by running it briefly on a concrete block to expose fresh diamonds.
Leave a comment