
How to grout mosaics: Step-by-step guide for perfect results

TL;DR:
- Proper preparation, timing, and technique are essential for durable, crack-free mosaic grout.
- Choosing the correct grout type depends on joint size, tile material, and moisture exposure.
- Patience during mixing, application, and curing significantly improves the final mosaic appearance.
Mosaic tile projects look stunning on Pinterest but can fall apart at the grouting stage. One wrong move, and you’re left with cracked joints, permanent haze on glass tiles, or grout that crumbles within months. The frustrating part? Most of these failures come down to skipping a handful of basic steps, not a lack of skill. This guide walks you through every stage of mosaic grouting, from choosing the right materials to fixing common problems, so your finished surface looks like it was done by a seasoned tile setter.
Table of Contents
- What you need to grout mosaics: Tools, materials, and tile prep
- Mixing grout for mosaics: Getting the consistency right
- Applying grout to mosaics: Step-by-step process
- Troubleshooting grout issues and ensuring lasting results
- Expert perspective: Why mosaic grout success depends on patience and prep
- Get professional mosaic results with SurfacesGalore’s expert resources
- Frequently asked questions
Key Takeaways
| Point | Details |
|---|---|
| Choose the right grout | Pick sanded grout for most mosaics, unsanded or epoxy for glass or tight joints. |
| Mix grout conservatively | Always mix grout to thick, cake batter consistency and only as much as needed in 30 minutes. |
| Timing and technique matter | Let grout set briefly, use a barely damp sponge, and avoid over-wetting for a flawless finish. |
| Avoid common mistakes | Too much water and rushing can cause cracks or grout haze; patience yields durable mosaics. |
| Expert resources help | Consult specialized guides and product tips for professional-level results and longevity. |
What you need to grout mosaics: Tools, materials, and tile prep
With your project goals defined, let’s make sure you have everything needed for a smooth grouting process. Getting your workspace and materials organized before you open a single bag of grout saves you from scrambling mid-project when timing is critical.
Essential tools and materials:
- Rubber float or grout float
- Margin trowel or mixing stick
- Two buckets (one for mixing, one for rinse water)
- Large, dense sponge
- Soft cloths or cheesecloth for buffing
- Safety glasses and rubber gloves
- Knee pads for floor installations
- Grout sealer (for cement-based grouts)
- Painter’s tape for protecting trim and edges
Not every grout works for every mosaic. Your joint width and tile material determine the right choice. Check out the mosaic grout options guide to understand what works best for stone, glass, and ceramic mosaics.
| Grout type | Joint width | Best for | Notes |
|---|---|---|---|
| Sanded | Over 1/8 inch | Stone, ceramic floor mosaics | Stronger, resists shrinkage |
| Unsanded | Under 1/8 inch | Glass, polished stone | Won’t scratch delicate surfaces |
| Epoxy | Any width | Wet areas, commercial installs | Hardest to apply, most durable |
Understanding grout type selection before you buy prevents costly rework. Sanded grout contains fine sand particles that add bulk and reduce shrinkage in wider joints. Unsanded grout is smooth and ideal for narrow joints on fragile tiles. Epoxy grout uses a resin-hardener system instead of cement and is waterproof from day one.
Before you even open your grout bag, your tile surface needs to be ready. Remove any spacers. Vacuum dust and debris from the joints. If your tiles have a paper or mesh backing, make sure the adhesive beneath is fully cured. If you’re planning a custom mosaic design with mixed materials, double-check that every piece is firmly bonded.
Pro Tip: Wait 24-48 hours after applying thinset before grouting on kitchen or bathroom floors. Grouting too soon can shift tiles that haven’t fully bonded, ruining your layout.
Always wear gloves. Cement-based grout is caustic and can irritate skin with prolonged contact. Keep the workspace ventilated if you’re mixing epoxy grout, as the fumes can be strong in enclosed spaces.
Mixing grout for mosaics: Getting the consistency right
Once your tools and materials are ready, the key to a flawless finish is mixing your grout correctly. Bad mixing is one of the most overlooked causes of grout failure, and it costs nothing to get right.
The target consistency is thick, smooth, and lump-free. Think of it like a thick peanut butter or cake batter consistency. If it drips off your trowel, it’s too wet. If it crumbles when pressed, it’s too dry. Both extremes weaken the finished joint.

| Grout type | Consistency target | Water ratio | Working time |
|---|---|---|---|
| Sanded | Thick peanut butter | Low, added gradually | 30-45 minutes |
| Unsanded | Smooth cake batter | Very low | 20-30 minutes |
| Epoxy | Varies by brand | Pre-measured parts | 20-30 minutes |
Step-by-step mixing process:
- Pour the dry grout powder into a clean, dry bucket first.
- Add water (or epoxy hardener) slowly, in small amounts.
- Mix with a margin trowel until no dry clumps remain.
- Let the mixture rest for 5-10 minutes (called “slaking”) so the cement fully activates.
- Stir again briefly before use. Do not add more water after slaking.
- Check the consistency by pressing a small amount between your fingers. It should hold its shape.
The grout mixing tutorial approach of mixing small batches is especially valuable for beginners. A full bag feels efficient, but if you can’t use it all in 20-30 minutes, you’ll end up working with grout that’s starting to harden in the bucket.
For a backsplash mosaic workflow, mixing roughly one to two cups of dry grout powder at a time is a smart starting point. For larger floor installations, you can scale up once you’re comfortable with your pace.
Pro Tip: Only mix what you can use in 30 minutes. Grout doesn’t wait for you, and adding water to revive stiffened grout weakens its final strength significantly.
If you’re working with stone tiles like marble or travertine, review the grouting stone tiles guide first. Porous natural stone sometimes needs pre-sealing before grouting to prevent staining.
Applying grout to mosaics: Step-by-step process
Now that your grout is mixed, here’s how to apply and clean it for lasting, beautiful mosaics. The application phase moves fast, so read through all the steps before you start.
Step-by-step application:
- Dampen the mosaic surface lightly with a sponge. This slows absorption and gives you more working time.
- Scoop a small amount of grout onto the surface with your rubber float.
- Hold the float at a 45-degree angle and press grout diagonally across the tile joints. Working diagonally prevents the float edge from dragging grout out of joints.
- Pack each joint firmly. Press with the float to eliminate air pockets.
- Scrape excess grout off the tile surface using the float held at a steeper angle.
- Let the grout firm up for 10-30 minutes before your first wipe.
- Wring out your sponge until it’s barely damp, then wipe gently in circular motions. Multiple light passes, changing rinse water frequently, produce a cleaner result than one heavy wipe.
- Rinse the sponge constantly. Dirty water redeposits grout film on your tiles.
- Let the surface dry for another 15-20 minutes, then buff off any remaining haze with a dry cloth.
The timing of your first wipe is critical. Too early and you pull grout from the joints. Too late and the haze bonds to the tile surface and becomes difficult to remove.
Precautions by tile type:
- Glass mosaics: Use unsanded or epoxy grout only. Grouting glass mosaics requires extra care because sanded grout will permanently scratch the surface.
- Polished marble or travertine: Pre-seal the tile before grouting to prevent staining. Wipe haze quickly.
- Unglazed ceramic or stone: These absorb grout fast. Work in smaller sections.
- Mixed-material mosaics: Identify the most delicate tile in your design and use the grout suited to that tile.
For a full breakdown, the stone mosaic installation guide covers surface-specific application techniques in detail.
Pro Tip: Use unsanded or epoxy grout for glass mosaics, and clean any haze immediately. Even a 10-minute delay can allow grout film to etch glass surfaces permanently.
Refer to the mosaic tile guide if you’re unsure about the composition of your specific tiles before choosing your grout and application method.
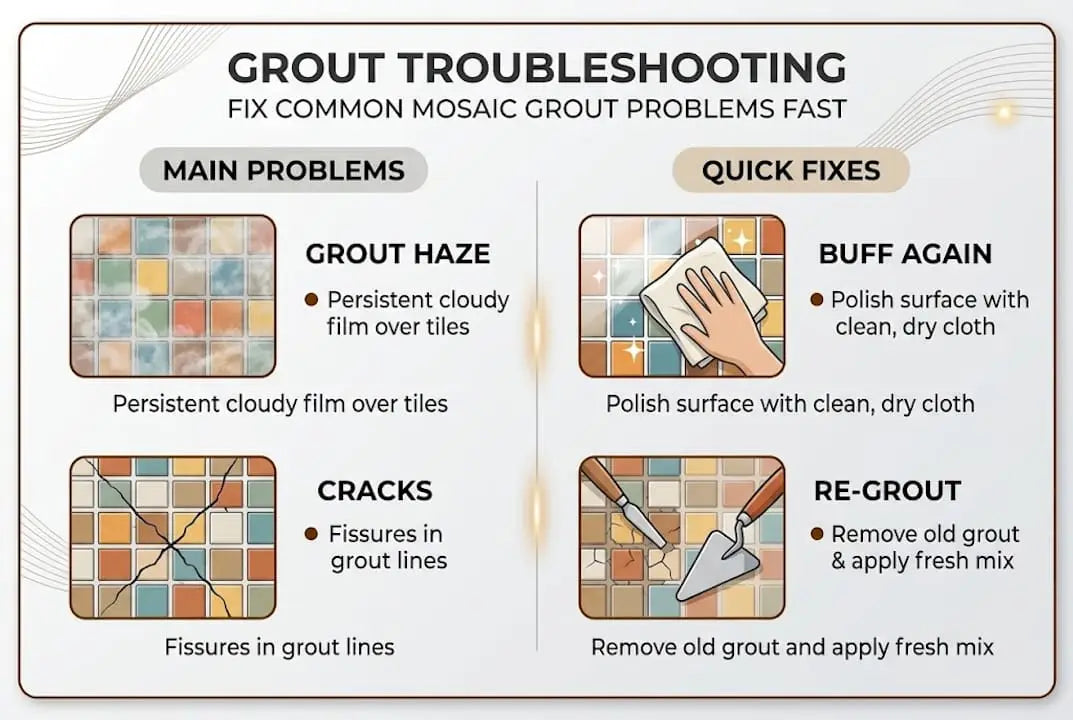
Troubleshooting grout issues and ensuring lasting results
After grouting, proper troubleshooting and care ensures your mosaic remains beautiful and robust. Even when you follow the steps carefully, issues can still appear. Knowing what to look for makes the difference between a quick fix and a full redo.
Common grouting mistakes that cause problems:
- Adding too much water to the mix (weakens the final joint and causes cracking)
- Wiping too soon (pulls grout from joints before it sets)
- Wiping with a soaking wet sponge (over-wetting dilutes the grout surface)
- Skipping the slaking step during mixing (leaves the grout under-activated)
- Poor substrate prep (uneven tile surfaces create lippage, which makes joints uneven)
- Grouting in direct sunlight or very high heat (accelerates drying and causes shrinkage cracks)
Grout haze: If a white film remains after your initial wipe, a second buffing with a dry cloth usually removes it. For stubborn haze, a commercial grout haze remover applied carefully according to label instructions works well. Avoid acidic cleaners on natural stone.
Cracks in grout joints: Small hairline cracks often result from excess water in the mix or too-fast drying. You can fill hairline cracks with matching unsanded grout or a grout repair tube. For larger cracks, rake out the old grout with a grout saw and regrout that section.
Uneven joints: These typically come from inconsistent float pressure or from not packing the grout fully during application. Minor unevenness levels out as grout cures. Significant unevenness needs to be addressed within the first 24 hours while the grout is still workable.
Epoxy grout is recommended for high-moisture areas like showers due to superior stain and mold resistance, although it requires more skill to apply cleanly than cement-based options.
Curing time varies based on temperature, humidity, and grout type. Standard cement grout reaches full cure in about 72 hours, but high-humidity environments can extend this. Check the grouting troubleshooting tutorial for more detail on cure conditions.
Pro Tip: Polymer-modified grouts cure faster than standard cement grouts and handle temperature swings better. If you’re on a tight renovation schedule, they’re worth the slightly higher price.
For inspiration on finished spaces, see the creative uses for mosaics gallery and the bathroom tile workflow for project sequencing tips.
Expert perspective: Why mosaic grout success depends on patience and prep
Most DIY guides focus on the mechanics of grouting and skip the part that actually determines success: the waiting. In our experience working with homeowners on marble, travertine, and glass mosaic projects, the mistakes we see most often have nothing to do with technique. They come from rushing.
A 30-minute difference in when you wipe can mean the difference between clean joints and a surface you have to regrout. A batch of grout mixed five minutes faster than it should be can crack within a week. These aren’t skill issues. They’re patience issues.
Glass mosaics deserve special attention here. Always use unsanded or epoxy grout with glass tiles, and clean haze the moment it appears. Grout film that sits on glass even briefly can etch the surface permanently, leaving a dull, frosted look that no amount of cleaning will fix.
Modern polymer-modified grouts are genuinely better than older formulas. They shrink less, cure more evenly, and resist staining without sealing. If you’re choosing between a budget grout and a quality polymer grout, spend the extra few dollars.
One simple habit separates confident DIYers from frustrated ones: always test your grout in a hidden corner before committing to the full surface. It takes five minutes and tells you everything about consistency, color, and working time before you’re locked in.
For a complete look at planning your tile work, the custom mosaic creation workflow walks through design decisions that affect grouting outcomes.
Get professional mosaic results with SurfacesGalore’s expert resources
You’ve got the knowledge. Now make sure you have the right materials to back it up. At Surfaces Galore, we work with homeowners and contractors across the country who want natural stone mosaics that actually hold up over time.

Whether you’re finishing a kitchen backsplash or a full bathroom renovation, browsing SurfacesGalore resources gives you access to premium stone selections, expert installation guides, and curated product pairings. For grout specifically, the premium grout choices guide breaks down what to use with each tile type we carry. And if you want to see what a well-executed mosaic project looks like from start to finish, the bathroom renovation transformation is worth a look for real-world inspiration.
Frequently asked questions
What type of grout should I use for mosaic tiles?
Choose sanded grout for joints wider than 1/8 inch, unsanded for narrower joints or glass tiles to avoid scratching, and epoxy grout for wet areas like showers where moisture resistance is essential.
How do I prevent grout haze on mosaic tile?
Wipe the surface with a barely damp sponge 10-30 minutes after grouting, using multiple light passes. For glass tiles specifically, clean haze immediately because grout film can etch glass surfaces within minutes.
Why did my grout crack after drying?
Cracking is usually caused by too much water in the mix, wiping too soon after application, or inadequate substrate preparation that leaves an uneven base for the grout to cure against.
How long should I wait before grouting after laying mosaic tiles?
Wait 24-48 hours after setting your tiles with thinset before grouting. This ensures full adhesive cure so tiles won’t shift when you apply grout pressure with the float.
Leave a comment