
Is Marble Slippery? Essential Information Before Installation

Thinking about marble for your next home project? It looks amazing, right? But before you get too carried away with those beautiful veins and luxurious feel, there's a big question you should probably ask: Is marble slippery? It's a common concern, especially if you're thinking about putting it in places like bathrooms or kitchens where things can get a bit wet. We're going to break down what you need to know about marble's natural properties and how different finishes can affect how slippery it might be. Plus, we'll cover some important installation tips to keep in mind so you can enjoy your gorgeous new marble surfaces safely.
Key Takeaways
- Marble's natural properties, including its finish, significantly impact its slipperiness. Polished marble is generally more slippery than honed or textured finishes.
- Consider the intended area for installation. High-moisture or high-traffic areas might benefit from less slippery finishes or alternative materials.
- Proper installation is vital. Ensuring a level substrate and using appropriate setting materials helps maintain the integrity and safety of the marble surface.
- While some finishes are naturally less slippery, textured tiles or mosaics can offer better grip, especially in areas prone to moisture.
- Always inspect your marble tiles before installation and consult with your supplier about specific product properties and recommended uses to make an informed decision.
Understanding Marble's Natural Properties

Marble. It’s a word that conjures images of luxury, timeless design, and enduring beauty. But before you commit to this stunning natural stone for your home, let's get real about what makes it tick. Understanding marble's inherent characteristics is your first step to a successful and beautiful installation.
Assessing Marble's Suitability for Different Areas
Marble brings a unique elegance to any space, but its natural properties mean it shines brightest in certain applications. Think about where you want to install it. High-traffic areas might see more wear and tear, while bathrooms need surfaces that can handle moisture. Marble's natural porosity means it can stain if not properly sealed, making it a fantastic choice for areas where spills are less frequent or where you're diligent with maintenance. For kitchens, while beautiful, consider its susceptibility to etching from acids. It's perfect for a statement fireplace surround or a serene bathroom vanity, but perhaps less ideal for a busy, everyday kitchen countertop unless you're prepared for the upkeep.
Evaluating Aesthetic Preferences and Finishes
This is where marble truly sings. Its natural veining creates a one-of-a-kind masterpiece in every slab. From the dramatic swirls of Calacatta Gold to the subtle elegance of Carrara White, there's a marble to match every vision. But the finish matters, too. A polished finish offers a high-gloss, reflective surface that screams luxury. However, it can be more slippery when wet. A honed finish, on the other hand, provides a smooth, matte look with better grip, making it a safer choice for floors, especially in bathrooms or entryways. We also have tumbled or leathered finishes that add texture and further improve slip resistance.
Considering Durability and Maintenance Requirements
Let's talk durability. Marble is a natural stone, and like all natural stones, it has its own personality. It's harder than many materials, but softer than granite. This means it can scratch and etch over time, especially with acidic substances like lemon juice or vinegar. But don't let that deter you! With the right care, marble is incredibly long-lasting. Regular sealing is key to protecting its surface from stains. Think of it like caring for a fine piece of art – it requires a little attention, but the reward is a surface that ages gracefully and adds immense value to your home. If you're looking for low-maintenance options, you might explore granite or quartzite, but for sheer, unparalleled beauty, marble is hard to beat. You can even find great deals on clearance marble items if you're on a budget.
Case Study: The Elegant Entryway
A homeowner wanted a grand entrance that made a statement. They chose a polished Bianco Dolomite marble for their entryway flooring. While beautiful, the initial installation was in a high-traffic area prone to wet shoes. After a few months, they noticed minor scuffs and a slightly duller appearance in the most walked-on areas. They decided to have the marble professionally honed to a matte finish. This not only masked the minor imperfections but also significantly improved the slip resistance, making the entryway both safer and more forgiving for daily use. It's a perfect example of how understanding marble's properties and adapting the finish can lead to a successful outcome.
Key Considerations Before Marble Installation
Before you even think about laying a single tile, let's talk about what really matters for a marble installation that wows. Skipping these steps is like trying to build a house without a foundation – it's just asking for trouble down the road. We want your marble to look stunning for years, not just a few months.
The Importance of Substrate Preparation
This is where the magic (or the disaster) begins. Your subfloor or wall needs to be absolutely perfect. Think clean, dry, and rock-solid. Any dust, grease, or old adhesive is the enemy of a good bond. If your floor isn't perfectly level, you're setting yourself up for cracked tiles and an uneven surface. We're talking about using self-leveling underlayment if needed. Remember, marble is a natural stone, and it needs a stable base. A weak foundation means your beautiful marble tiles could end up loose or cracked. It’s worth the effort to get this right.
Ensuring Material Compatibility with Setting Products
Not all mortars and grouts are created equal, especially when it comes to natural stone. You can't just grab any old bag off the shelf. Using the wrong products can lead to discoloration, especially with lighter marbles, or a weak bond. Always opt for setting materials specifically rated for natural stone. If you're working with white or light-colored marble, a white thin-set mortar is a must to prevent any gray bleed-through. Check the manufacturer's recommendations for both the stone and the setting materials. Getting this right means your marble’s true color shines through, without any unwanted surprises.
Planning Your Layout and Dry-Laying Techniques
This is your chance to be an artist before you become a tile setter. Don't just start slinging mortar! Lay out your tiles before you commit. This dry-lay process lets you see how the veining flows, check for color consistency across different boxes, and plan where your cuts will fall. Nobody wants a tiny, awkward sliver of tile at the edge of a room. It also helps you avoid those jarring color shifts that can happen with natural stone. A little planning here saves a lot of headaches later. It’s also the perfect time to decide on your grout joint spacing. For a sophisticated look, many prefer tight joints, around 1/16 to 1/8 inch, but always follow the product guidelines. This step is key to achieving that polished, professional finish you're dreaming of. For areas prone to moisture, consider stones with a textured or honed finish to prevent slipping, like some natural stone tile options.
Case Study: The Discolored Shower
A homeowner in Florida decided to save a few bucks by using a standard gray thin-set mortar for their stunning white Carrara marble shower walls. They skipped the dry-lay step, assuming it would all look fine once grouted. Big mistake. After installation, a noticeable gray shadow appeared behind the translucent marble, making the beautiful white tiles look dingy and dull. The fix? Ripping out the entire shower and starting over with white thin-set. It was a costly lesson in material compatibility and the importance of substrate prep for delicate stones.
Best Practices for Marble Installation
Getting your marble tiles installed correctly is super important. It's not just about making it look good right away, but also about making sure it lasts for years. Think of it like building a house – you need a solid foundation and careful work at every step. We've seen it all, and trust us, cutting corners here leads to headaches later.
Proper Tile Inspection Before Installation
Before any tile even sees adhesive, give it a good once-over. Marble is a natural stone, and that means each piece is unique. You might find slight color variations, veining differences, or even tiny imperfections. It’s totally normal! But you do want to catch anything that looks like a real defect, like a crack or a chip. Laying a tile that's already damaged is just asking for trouble down the line. If something looks off, set it aside and check with your supplier. It’s way easier to deal with it before it’s permanently fixed in place. This is also your chance to mix tiles from different boxes. Doing this helps blend any subtle color shifts, so you get a really uniform look across your whole floor or wall. It’s a small step that makes a big visual difference.
Utilizing the Right Tools and Setting Techniques
Okay, so you've picked out your gorgeous marble tiles – maybe you even found some great deals on clearance marble items. Now, how do you actually put them down? Using the right tools is key. You'll want a good quality notched trowel to spread your thin-set mortar. Make sure you're using a mortar specifically made for natural stone, and if you're working with lighter marble, definitely go for white thin-set to avoid any color showing through. Spread the mortar in small sections, combing it with the trowel to create even ridges. Then, press each tile in with a slight twist to make sure it's fully set and bonded. Don't be afraid to lift a tile occasionally to check for good coverage – no one wants hollow spots under their beautiful stone! For those larger tiles, consider using a leveling system to keep everything perfectly flush. This prevents that annoying "lippage" where one tile sticks up higher than another. It’s all about creating a smooth, level surface that looks and feels high-end.
Managing Grout Joints and Tile Spacing
Getting the spacing between your marble tiles just right is another detail that makes a huge difference. For most marble installations, you'll want tight grout joints, often around 1/16 to 1/8 of an inch. This really lets the beauty of the stone shine through without being interrupted by wide grout lines. Using tile spacers is the easiest way to keep everything consistent. You'll also want to plan your layout before you start. Laying out your tiles without any adhesive – a "dry lay" – lets you see how the patterns and colors will flow. It’s your chance to shuffle tiles around, avoid awkward cuts at the edges, and make sure you’re happy with the overall look. This is especially important with natural stone because the veining can vary so much. Planning ahead means you’ll end up with a stunning, cohesive design that you’ll love for years to come. If you're looking for inspiration on different patterns, check out our ideas for elegant checkerboard layouts or unique marble mosaic tiles.
Case Study: The Miller Residence Bathroom
The Millers wanted a spa-like bathroom retreat. They chose a beautiful Carrara marble tile for the floor and shower walls. During the dry-lay phase, they noticed a few tiles had a very strong, dark veining that they felt would be too dominant in certain areas. By shuffling them around, they were able to distribute the veining more evenly, creating a much more balanced and luxurious feel. They also opted for a very fine grout line, which made the marble appear almost seamless, truly transforming the space. This attention to detail during the installation phase made all the difference in achieving their dream bathroom.
Proper installation isn't just about following steps; it's about understanding the material and planning for the best possible outcome. Taking the time for inspection, using the right materials, and carefully laying out your tiles will pay off in a beautiful, long-lasting installation. It’s an investment in your home’s beauty and value.
Cutting and Handling Marble Tiles
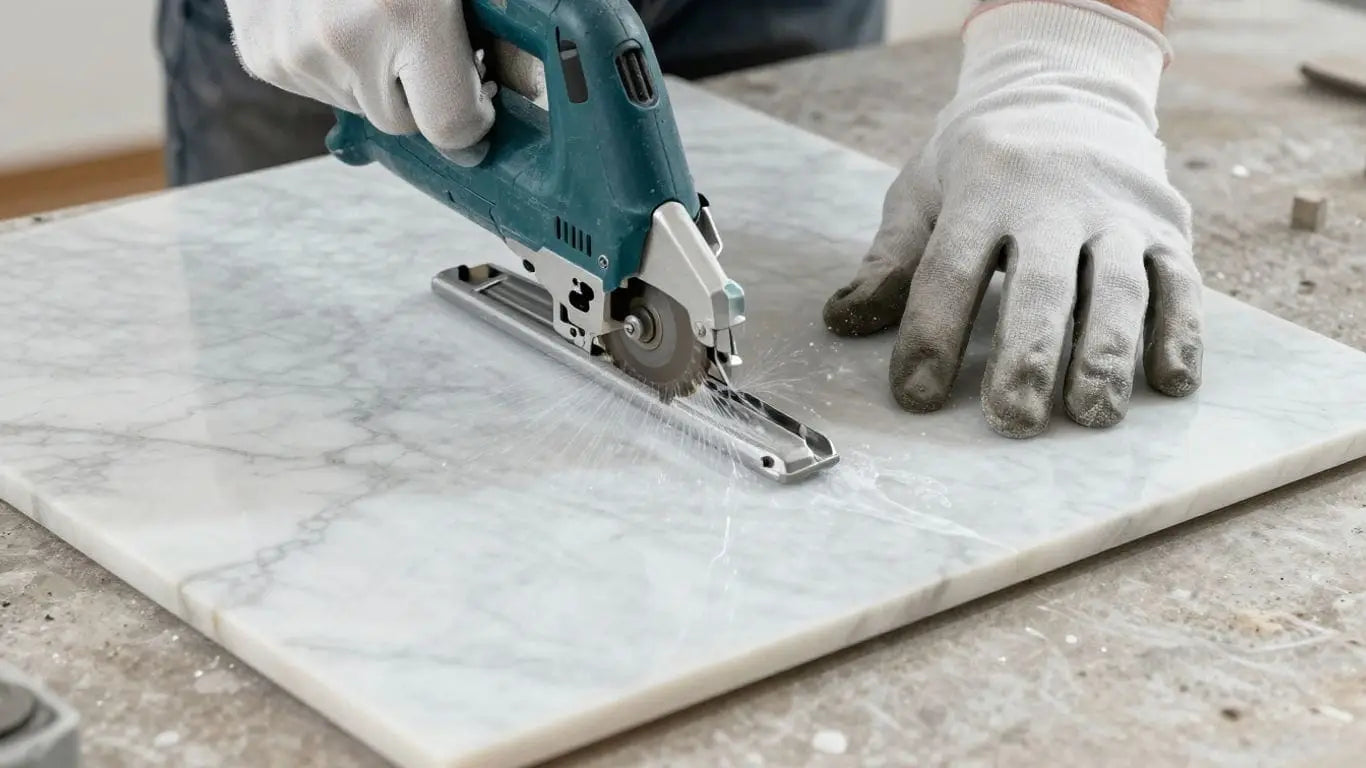
Working with marble tiles can feel a bit intimidating, especially when it comes to cutting. But honestly, it's not as scary as it sounds. With the right approach, you can achieve clean, precise cuts that make your installation look totally professional. Think of it like this: you wouldn't try to chop vegetables with a dull knife, right? Same idea here. Using the correct tools and techniques is key to getting those perfect edges and avoiding frustrating chips.
Techniques for Cutting Stone Tiles Safely
Cutting marble requires a bit of care, but it's totally doable. The most important thing is to use the right equipment. A wet saw with a diamond blade is your best friend here. It keeps the blade cool and reduces dust, which is a win-win. Always start your cut at a slower speed and gradually increase it. Gentle, steady pressure is way better than forcing it. This method helps prevent the blade from overheating and gives you more control. Remember to wear your safety gear – gloves and eye protection are a must. You can find great deals on marble tiles online in the USA if you're looking to stock up.
Minimizing Chips and Breakage During Cuts
Nobody wants chipped edges on their beautiful marble. To avoid this, always use a sharp, clean diamond blade. A dull blade is a recipe for disaster. Take your time with each cut; rushing is the number one reason for breakage. Keep the saw moving steadily, and let the blade do the work. If you're cutting a particularly delicate piece, consider using a specialized blade or a slower speed. Planning your cuts so that any edges needing to be exposed are against a wall or in a corner can also help hide minor imperfections.
Finishing Cut Edges for a Seamless Look
Sometimes, even with the best technique, you might end up with a cut edge that isn't perfectly smooth. Don't sweat it! You can easily finish these edges. A fine-grit sandpaper or a polishing pad can smooth out any rough spots. For a really professional finish, especially if the cut edge will be visible, you might want to consider a light polish. This step really makes a difference in the final appearance, giving your installation that polished, high-end look. It’s these little details that truly make your marble project shine.
Case Study: The Kitchen Backsplash Transformation
Sarah wanted a unique backsplash for her kitchen but was worried about cutting the marble mosaic tiles to fit around her outlets. She decided to rent a wet saw and watched a few online tutorials. By following the advice to cut slowly and steadily, and using a white thin-set mortar to avoid discoloration, she achieved a stunning result. The clean cuts around the outlets made the entire backsplash look professionally installed, proving that with the right approach, DIYers can tackle intricate cuts with confidence. She later mentioned how she found some amazing deals on marble tiles online USA for her next project.
Proper handling and cutting are not just about aesthetics; they are about preserving the integrity and value of the natural stone you've chosen. Taking these precautions ensures your marble installation will stand the test of time and look beautiful for years to come.
Here's a quick rundown of what to keep in mind:
- Use the Right Saw: A wet saw with a diamond blade is highly recommended.
- Patience is Key: Cut slowly and steadily; don't force the material.
- Safety First: Always wear eye protection and gloves when cutting stone. You can find more safety tips on handling tiles.
- Plan Your Cuts: Think about where cut edges will be visible and plan accordingly.
Post-Installation Care and Maintenance
Your stunning marble installation is complete! Now, let's talk about keeping it looking its absolute best for years to come. Proper care after installation is key to preserving that luxurious look and protecting your investment. It’s not complicated, but it does require a little attention.
Allowing Grout to Cure Properly
This is a critical first step. The grout between your beautiful marble tiles needs time to harden fully. Rushing this process can lead to weak grout lines that might crack or crumble later on. Most cementitious grouts need about 48 to 72 hours to cure. During this time, keep foot traffic off the newly installed areas as much as possible. Think of it as giving your marble floor its well-deserved rest after all the hard work.
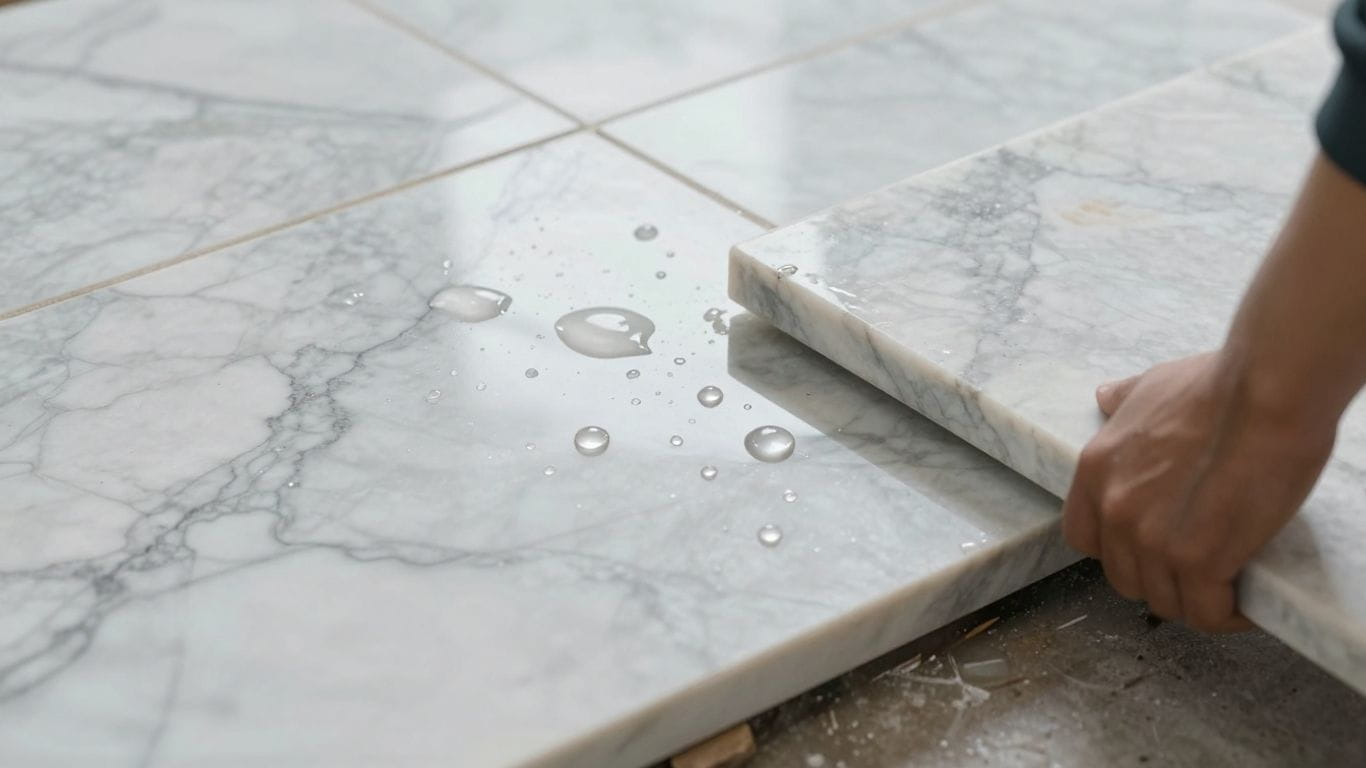
Sealing Marble to Protect Against Stains
Marble is a natural stone, and like many natural materials, it’s porous. This means it can absorb liquids, which can lead to stains. Sealing your marble is like giving it a protective shield. A good quality stone sealer will fill in the tiny pores, making it much harder for spills like wine, oil, or coffee to penetrate the surface. We recommend sealing your marble at least once a year, though this can vary based on how much traffic the area gets. For those looking to buy marble tiles online in the USA, remember to factor in the cost and availability of quality sealers.
- Always use a pH-neutral sealer specifically designed for natural stone.
- Apply thin, even coats and allow each to dry according to the manufacturer's instructions.
- Don't skip this step – it’s your best defense against common household stains.
Final Cleaning and Inspection of the Installation
Once the grout has cured and the sealer has done its job, it’s time for a final clean-up. This removes any lingering dust or residue from the installation process. Use a soft cloth or a microfiber mop with a pH-neutral cleaner made for natural stone. Avoid harsh chemicals or abrasive cleaners, as these can damage the marble's surface. Give your installation a good look-over. Check for any missed spots, uneven grout lines, or chips. Addressing these small issues now can prevent bigger problems down the road. If you notice any imperfections, don't hesitate to contact your installer or consult our customer support.
Case Study: The Miller Residence The Miller family installed a stunning Carrara marble floor in their entryway. They followed the curing and sealing recommendations diligently. Six months later, their dog had an accident right after a dinner party. Thanks to the proper sealing, the liquid beaded up on the surface, and they were able to wipe it clean with no stain left behind. This saved them from a potentially costly and stressful marble restoration.
Remember, consistent care is the secret to maintaining the timeless beauty of your marble. For more information on keeping your stone looking its best, check out our marble care guide.
Exploring Marble Finishes and Styles
Marble isn't just one thing; it's a world of textures and looks. Choosing the right finish can totally change how your space feels. Think about what vibe you're going for – super sleek and modern, or more rustic and natural? We've got options for every taste.
Polished vs. Honed Finishes: Impact on Appearance
When you're looking at marble tiles, you'll see two main finishes: polished and honed. Polished marble is like a mirror. It's super shiny, reflects light beautifully, and gives off a really luxurious, high-end feel. It's great for making a statement, maybe in a grand entryway or a fancy bathroom. But, and this is a big but, polished marble can show scratches and water spots more easily. It also tends to be more slippery when wet, which is something to really think about for areas like bathrooms or kitchens.
Honed marble, on the other hand, has a matte, softer look. It's not shiny at all, giving it a more natural, understated elegance. This finish is fantastic because it hides minor scratches and water marks better than polished. Plus, it offers a bit more grip, making it a safer choice for floors, especially in busy households. If you want that sophisticated marble look without the high-maintenance shine, honed is the way to go. You can buy marble tiles online USA in both these finishes, so you have plenty of choices.
Understanding Natural Holes and Textures
Marble is a natural stone, and that means it's unique. You'll often find natural holes or pits in certain types of marble, like travertine. Some people love this look; it adds character and a rustic charm. If you want that natural, earthy feel, leaving these holes unfilled can be a great design choice. However, if you prefer a super smooth, uniform surface, these holes can be filled during the installation process. It's all about what look you're aiming for. Don't forget to check out our clearance marble items; sometimes you can find pieces with unique natural textures at a great price.
Choosing Edge Profiles for Marble Tiles
It's not just the surface that matters; the edges of your marble tiles play a role too! The edge profile affects both the look and the installation. A straight edge gives a clean, modern look, perfect for minimalist designs. A beveled edge has a slight angle, which can make installation a bit easier and helps reduce sharp level differences between tiles. For a more rustic or handcrafted appearance, a chiseled edge can be a great option, mimicking the look of freshly quarried stone. Think about how the edges will meet and how they'll contribute to the overall style of your room.
Case Study: The Modern Bathroom Oasis
Sarah wanted a spa-like bathroom. She chose honed Carrara marble tiles for the floor because she knew it would be less slippery and easier to maintain than a polished finish. For the shower walls, she opted for polished marble tiles to add a touch of luxury and reflect light, making the space feel bigger. The combination created a beautiful contrast, blending safety with high-end style. She found exactly what she needed when she decided to buy marble tiles online USA from our extensive collection.
Case Study: The Elegant Entryway
For his home's grand entrance, Mark wanted maximum impact. He selected polished Calacatta Gold marble tiles. The high shine and dramatic veining made a stunning first impression. While he knew polished marble could be slippery, the entryway was a low-traffic area, and the visual payoff was worth the extra care. He also chose a straight edge profile for a sharp, sophisticated finish. The result? A breathtaking entryway that guests still talk about.
Marble's Role in Various Applications
Marble for Flooring and Wall Cladding
Marble flooring is the ultimate statement of luxury. Imagine walking on cool, elegant surfaces that have graced palaces for centuries. It’s not just about looks; marble is incredibly durable when installed correctly, making it a fantastic choice for high-traffic areas like entryways and living rooms. For walls, marble cladding adds a sophisticated dimension, transforming ordinary spaces into something extraordinary. Think of a marble accent wall in your living room or a full marble bathroom – pure class.
Case Study: The Grand Foyer
A client wanted to create a breathtaking entrance for their luxury home. They chose polished Carrara White marble tiles for the flooring and a portion of the entryway walls. The result was a stunning, bright space that immediately conveyed opulence and timeless style. The subtle gray veining of the marble created a dynamic yet cohesive look, perfectly complementing the home's interior design.
Marble Countertops and Vanity Tops
When it comes to kitchens and bathrooms, marble countertops and vanity tops are a dream. They offer a unique, natural beauty that laminate or quartz simply can't replicate. Each slab is one-of-a-kind, with veining patterns that tell a story. While it requires a bit more care than some other materials, the aesthetic payoff is immense. For kitchens, consider a honed finish to reduce the visibility of etching, or opt for a durable granite if heavy use is a primary concern. In bathrooms, marble vanity tops bring spa-like luxury.
Case Study: The Chic Bathroom Vanity
A homeowner was renovating their master bathroom and wanted a high-end feel. They selected a beautiful Crema Marfil marble slab for a custom vanity top. The warm beige tones and delicate veining created a serene and elegant atmosphere. Paired with modern fixtures, the marble vanity became the focal point, offering both beauty and a touch of everyday luxury.
Decorative Uses: Backsplashes and Accent Features
Marble isn't just for floors and counters. It shines in decorative applications too! Marble mosaic tiles are perfect for creating intricate backsplashes in kitchens or shower walls in bathrooms. These small pieces can form stunning patterns, adding texture and visual interest. Even a small marble accent feature, like a fireplace surround or a decorative inlay, can dramatically elevate a room's design. It’s a fantastic way to introduce the luxury of marble without a full-scale renovation. You can even find great deals on discontinued marble products for smaller, creative projects.
Case Study: The Statement Kitchen Backsplash
A homeowner wanted to add a unique touch to their kitchen. They chose a Calacatta Gold marble mosaic tile for the backsplash, featuring a mix of white, gold, and gray tones. The intricate pattern behind the range created a dramatic focal point, turning a functional area into a work of art. It was a relatively small area, but the impact was huge, showcasing how marble can be used creatively to make a big design statement.
Addressing Potential Installation Challenges
Installing marble is a rewarding process that brings timeless elegance to any space. However, like any natural stone, marble has unique characteristics that require careful attention during installation to avoid common pitfalls. Understanding these potential challenges and how to overcome them is key to a flawless finish. We’re here to guide you through it, ensuring your beautiful marble investment stands the test of time.
Preventing Discoloration with White Thin-Set Mortar
Light-colored marbles, especially whites and creams, can be susceptible to discoloration. This often happens when using a gray-colored thin-set mortar, which can subtly bleed through the stone, altering its intended hue. Always opt for a high-quality white thin-set mortar when installing light-colored marble. This simple step prevents unwanted color transfer and preserves the pristine beauty of your chosen marble. It’s a small detail that makes a huge difference in the final look. If you're looking to buy marble tiles online in the USA, ensure your supplier recommends or provides compatible setting materials.
Managing Large Format or Heavy Tiles
Modern design often calls for large format marble tiles, which can be stunning but also present handling challenges. These tiles are heavier and require more careful support during installation.
- Substrate Strength: Ensure your subfloor is exceptionally rigid and well-prepared. Large format tiles put more stress on the substrate, so a solid, level base is non-negotiable.
- Setting Material Coverage: Achieving 100% mortar coverage on the back of large tiles is critical. Use the correct trowel size and consider back-buttering (applying a thin layer of mortar to the back of the tile) for an extra secure bond.
- Leveling Systems: For large format tiles, using a tile leveling system is highly recommended. These systems help ensure that adjacent tiles are perfectly flush, preventing lippage and creating a smooth, even surface.
Case Study: A client in Miami wanted a dramatic effect with large-format Calacatta marble tiles in their master bathroom. Initially, they considered using standard installation methods. However, after consulting with our installation experts, they opted for a reinforced substrate and a specialized leveling system. The result was a breathtaking, seamless floor that perfectly showcased the marble's luxurious veining, without any hint of lippage.
Avoiding Lippage for a Level Surface
Lippage refers to the unevenness between the edges of adjacent tiles. It’s not only an aesthetic issue but can also create a tripping hazard and make cleaning difficult. Achieving a lippage-free installation requires precision and the right techniques.
- Substrate Preparation: As mentioned, a perfectly flat and level substrate is the first line of defense against lippage.
- Consistent Troweling: Use the correct notched trowel and maintain consistent pressure when applying thin-set mortar. This creates uniform ridges that allow the tile to sit evenly.
- Tile Leveling Systems: These systems are invaluable for large format or rectified tiles, as they mechanically pull tiles into alignment, guaranteeing a level plane.
- Regular Checks: Periodically check your work with a level as you go. It’s much easier to correct minor issues as they arise than to fix them after the mortar has cured.
Proper planning and attention to detail during the installation phase are paramount. Don't cut corners on substrate preparation or material selection. Investing a little extra time and using the right products, like high-quality white thin-set mortar for lighter stones, will pay dividends in the longevity and beauty of your marble installation. If you're ready to buy marble tiles online in the USA, remember that a successful installation starts with informed choices before the first tile is even laid.
Enhancing Marble's Appeal with Layouts
Marble isn't just about the stone itself; it's also about how you lay it out. The pattern you choose can totally change the feel of a room. Think of it as the jewelry for your floors or walls. Getting the layout right is key to making your marble truly shine.
Creating Elegant Checkerboard Patterns
A checkerboard pattern with marble is a classic for a reason. It's bold, it's timeless, and it always looks sophisticated. Imagine a black and white marble checkerboard in your entryway – it just screams luxury. This pattern works great for floors, especially in high-traffic areas like hallways or grand foyers. You can also use it for a striking kitchen backsplash. It’s a design that never really goes out of style. We have some amazing marble and travertine tiles perfect for this look. You can even buy marble tiles online USA from us to get started.
Case Study: The Grand Foyer
A client wanted to make their entryway unforgettable. We suggested a checkerboard pattern using classic white Carrara marble and a deep Nero Marquina marble. The result? A stunning, high-contrast floor that immediately impressed guests and added significant value to their home. It was a simple pattern, but the impact was huge.
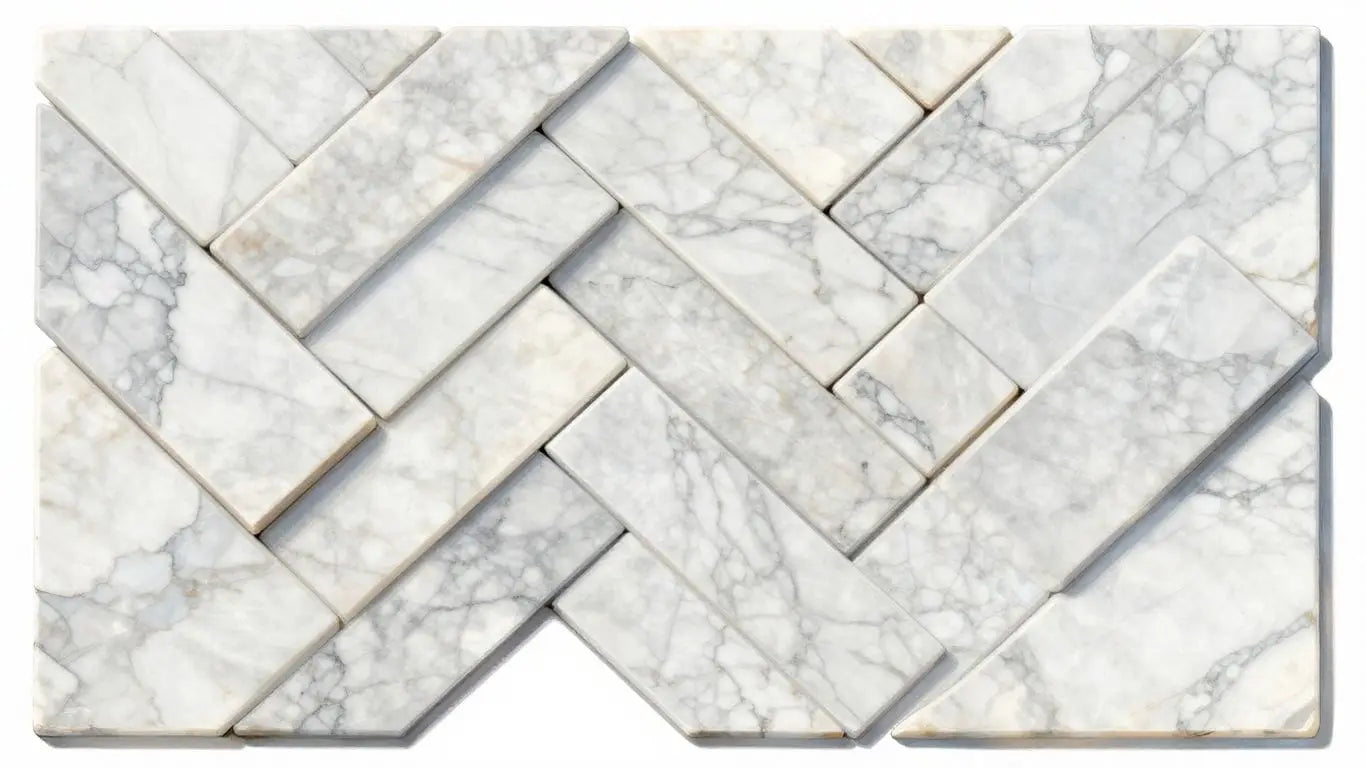
Designing with Marble Mosaic Tiles
Marble mosaic tiles are fantastic for adding intricate detail and texture. They come in all sorts of shapes and patterns – think hexagons, arabesques, or even custom designs. These are perfect for shower walls, backsplashes, or as decorative borders. A marble mosaic backsplash can really make your kitchen pop. They offer a way to bring in unique designs without covering a whole floor. You can find a huge variety of these beautiful mosaics on our site.
- Herringbone: Creates a dynamic, V-shaped pattern that adds movement.
- Penny Round: Offers a playful, textured look, great for shower floors.
- Basketweave: A classic pattern that gives a sense of depth and tradition.
Exploring Classic and Contemporary Layout Ideas
Beyond checkerboards and mosaics, there are so many ways to lay out your marble. A simple stacked or offset pattern is clean and modern, perfect for minimalist spaces. For a more traditional feel, consider a Versailles pattern, which uses multiple tile sizes to create a complex, elegant look. Even the direction you lay your tiles can make a difference – running them parallel to the longest wall can make a room feel bigger. Don't forget about borders and listellos; these decorative strips can frame your main layout and add an extra layer of sophistication. We have a wide selection of marble borders and listellos to complement any design.
Planning your layout is more than just aesthetics; it's about how the space will feel and function. Consider the scale of the room and the size of the tiles. A large room can handle a more complex pattern, while a smaller space might benefit from a simpler, cleaner layout to avoid feeling cluttered.
Ready to transform your space with the perfect marble layout? Explore our extensive collection of marble tiles and get inspired today!
Selecting the Right Marble for Your Project
Choosing the perfect marble is like picking a piece of art for your home. It's a big decision, and we're here to make it easy and exciting. Let's find the stone that speaks to you.
Understanding Color and Veining Variations
Marble is a natural wonder, and that means no two pieces are exactly alike. You'll see beautiful variations in color and veining. Think of it as a unique fingerprint for your space. Some marbles have bold, dramatic veins, while others offer a more subtle, delicate pattern. This natural variation is what gives marble its character and charm. When you buy marble tiles online in the USA, always remember that the sample you see is a guide, not an exact replica. This is why we always recommend ordering samples to see the real beauty up close.
Considering Specific Marble Types and Their Properties
Different marbles bring different vibes and performance. For instance, Carrara marble offers a classic, soft white look with gentle gray veining, perfect for a serene bathroom. Calacatta Gold, on the other hand, boasts a more dramatic white background with striking gold or gray veining, ideal for a luxurious kitchen countertop. Nero Marquina brings a bold, sophisticated black with white veins, making a strong statement in any room. Understanding these unique properties helps match the marble to its intended use and your design goals.
The Value of Ordering Marble Samples
Seeing is believing, especially with natural stone. Ordering marble samples is a non-negotiable step. It allows you to:
- Assess Color Accuracy: See how the marble's true colors look in your home's lighting.
- Feel the Texture: Get a sense of the finish – polished, honed, or something else.
- Visualize Veining: Understand the pattern and how it might repeat or vary across tiles.
- Test Durability: While not a full test, it gives you a tactile feel for the stone's density.
This simple step prevents costly surprises and ensures you're completely happy with your final choice.
Case Study: The Miller Residence
The Miller family wanted a timeless kitchen backsplash. They initially fell in love with a picture of Calacatta Gold online. After ordering samples, they realized the veining in the actual tiles was much more intense than they expected. They then explored other options and discovered Bianco Dolomite, which offered a softer, more subtle look that perfectly complemented their cabinetry. By ordering samples, they avoided a mismatch and achieved a kitchen they truly adored.
Case Study: The Chen Project
For a master bathroom renovation, the Chens were drawn to the deep, dramatic look of Nero Marquina marble for their shower walls. They ordered samples and were impressed by the rich black color and the crisp white veining. They also ordered samples of Atlantic Gray Marble, which offered a more subdued, modern feel. Ultimately, they chose Nero Marquina for its striking contrast, creating a spa-like retreat that felt both luxurious and unique. The samples confirmed their vision and gave them confidence in their selection.
Picking the perfect marble for your project can seem tricky, but it doesn't have to be! Think about the look you want and how the space will be used. We have a wide variety of beautiful marble options to fit any style. Ready to find the stone that will make your project shine? Visit our website today to explore our collection and get inspired!
So, Is Marble Slippery? The Final Word
Alright, let's wrap this up. We've talked a lot about marble, its beauty, and how to put it in your home. The big question about slipperiness? Well, it really depends. A polished marble floor can get slick when wet, just like many other hard surfaces. But with the right finish, like honed or tumbled, and by taking sensible precautions – like wiping up spills right away and maybe using rugs in entryways – you can totally manage it. It's not some impossible hazard, but it does need a little thought, especially if you have kids or older folks around. Think about where you're putting it and what kind of finish you want. If you're still unsure or want to see the options for yourself, checking out Surfaces Galore in Anaheim or their website is a good next step. They can show you different marble types and finishes that might work best for your specific needs.
Frequently Asked Questions
Is marble slippery when wet?
Marble can become slippery, especially when it's wet or polished. Honed or textured finishes offer better grip. It's always a good idea to be cautious in areas where water is present, like bathrooms or kitchens.
What's the difference between polished and honed marble?
Polished marble has a shiny, smooth surface that reflects light, making colors look richer. Honed marble has a softer, matte look and is less slippery. The finish you choose affects both the appearance and how the marble feels underfoot.
Can I use marble in my bathroom?
Yes, marble can be beautiful in bathrooms! However, it's important to remember that marble is porous and can be etched by acidic cleaners. Using a good sealant and being careful with products like soaps and shampoos will help keep it looking great. For shower floors, consider a less slippery finish.
How do I clean marble floors?
Cleaning marble is simple but requires the right touch. Use a pH-neutral cleaner made specifically for natural stone. Avoid harsh chemicals or abrasive scrubbers, as these can damage the surface. Wiping up spills quickly is also key.
Do I need to seal my marble tiles?
Absolutely! Sealing marble is a must. It helps protect the stone from stains and moisture by creating a barrier. You'll need to re-seal it periodically, usually once a year, depending on how much it's used.
What is 'lippage' and how can I avoid it?
Lippage refers to the unevenness between tile edges. To avoid it, make sure the surface underneath your marble is perfectly flat and smooth before installation. Using leveling systems during installation also helps ensure your tiles are all at the same height for a smooth finish.
Can marble be used in high-traffic areas?
While marble is beautiful, it's softer than materials like granite. For very busy areas, it might show wear more quickly. If you love marble for high-traffic spots, consider a honed finish and be prepared for a bit more maintenance to keep it looking its best.
What's the best way to cut marble tiles?
Cutting marble requires a wet saw with a diamond blade specifically made for stone. It's important to cut slowly and steadily to prevent chips or breakage. Always wear safety gear, like eye protection, when cutting.
Leave a comment