
The Complete Homeowner's Guide to Natural Stone Tile Buying: Tips and Tricks for a Beautiful Home

Thinking about adding natural stone tiles to your home? It's a fantastic idea! Natural stone brings a kind of beauty and quality that you just can't get with other materials. But with so many options out there, picking the right one can feel a bit overwhelming. This guide, 'The Complete Homeowner's Guide to Natural Stone Tile Buying,' is here to help. We'll walk you through everything you need to know, from understanding the different types of stone to making sure you get the best quality for your project. Let's make your home look amazing!
Key Takeaways
- Natural stone offers timeless beauty and adds significant value to your home, with marble and travertine being popular choices for their unique aesthetics.
- When selecting stone, consider the specific area's needs for durability and maintenance, matching the stone's properties (like hardness and porosity) to its intended use.
- Different finishes (polished, honed, tumbled) and edge profiles significantly impact the stone's appearance, maintenance requirements, and overall look.
- Always inspect stone for quality, checking for consistent color and pattern, and looking out for cracks or imperfections before purchasing.
- Accurate measurement is key for purchasing the correct amount of stone, and understanding tile sizes and pricing factors will help you budget effectively.
Understanding the Allure of Natural Stone
The Enduring Appeal of Natural Materials
Natural stone isn't just a building material; it's a piece of history, a touch of the earth brought into your home. For centuries, people have turned to stone for its unmatched beauty and strength. Think about ancient structures that still stand today – that's the power of natural stone. It brings a sense of permanence and elegance that synthetic materials just can't replicate. When you choose natural stone, you're not just decorating; you're investing in a legacy.
Key Benefits for Your Home
Why opt for natural stone? The advantages are clear and compelling. First, there's the sheer beauty. Each piece is unique, with its own patterns and colors, making your space truly one-of-a-kind. Then there's the durability. Stones like granite and slate are incredibly tough, resisting scratches and wear, which is perfect for busy households. Plus, natural stone is a sustainable choice, quarried from the earth with less processing than manufactured alternatives. It's a material that looks good, lasts long, and is kinder to the planet.
- Unmatched Aesthetic: Every tile is a unique work of art.
- Exceptional Durability: Built to last for generations.
- Timeless Appeal: Never goes out of style.
- Sustainable Choice: A natural, eco-friendly option.
Enhancing Property Value with Stone
Thinking about selling your home? Natural stone is a smart investment. Homes featuring natural stone elements, like marble countertops or travertine floors, often command higher prices and attract more buyers. It signals quality and luxury to potential homeowners. This isn't just about looks; it's about adding tangible value that pays off. Imagine potential buyers seeing stunning marble tiles in your kitchen or elegant travertine in your entryway – it makes a statement.
Investing in natural stone is one of the most effective ways to boost your home's appeal and market value. It's a feature that buyers recognize and appreciate, offering a significant return on investment.
Case Study: The Miller Residence
The Miller family wanted to update their kitchen and bathrooms. They chose a mix of granite countertops and travertine floor tiles. The transformation was dramatic. The kitchen felt more luxurious and functional, while the bathrooms gained a spa-like tranquility. When they decided to sell their home two years later, the real estate agent specifically highlighted the natural stone features. The home sold 15% above the asking price, with the buyers citing the high-quality finishes as a major draw.
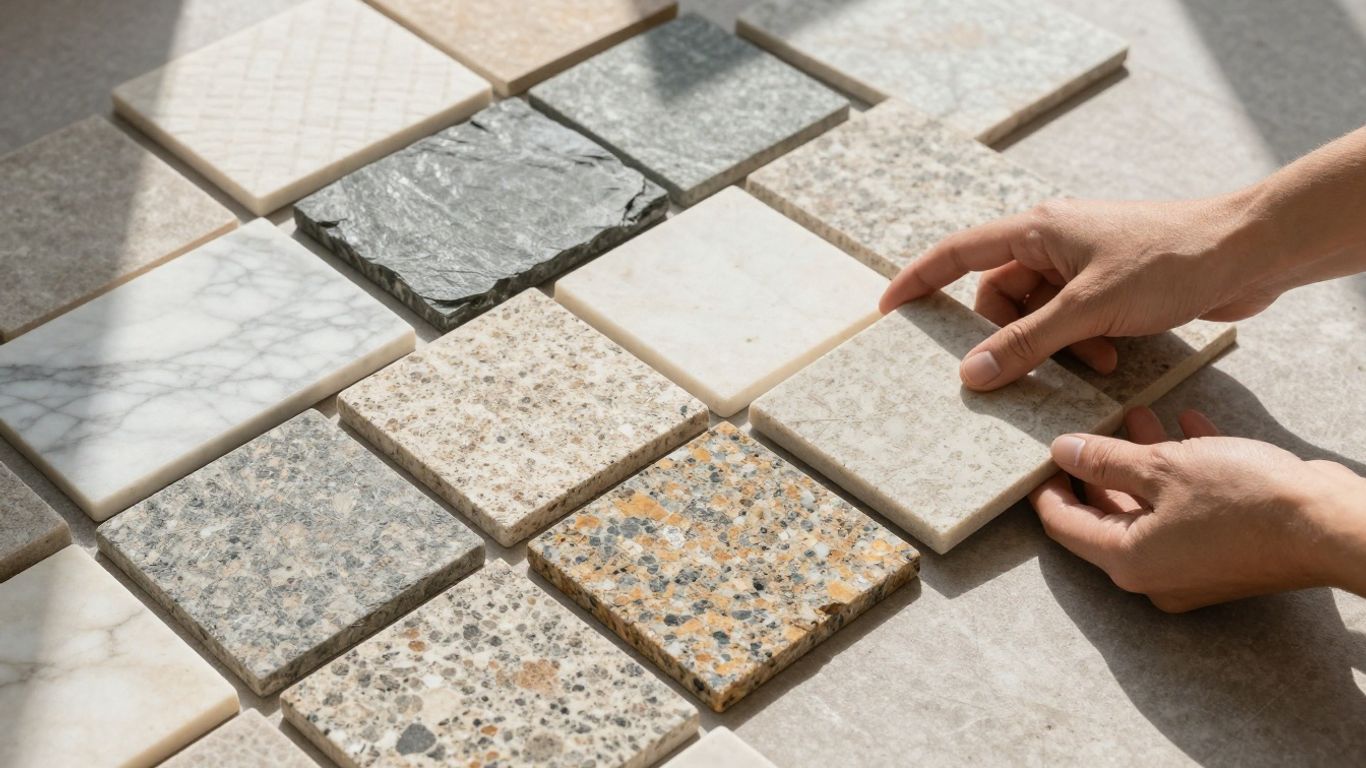
Exploring Popular Natural Stone Varieties
Choosing the right natural stone is like picking the perfect outfit for your home – it needs to look good, feel right, and last. We've got a whole lineup of stunning natural stones, each with its own personality. Let's take a look at some of the stars of the show.
Marble: A Symbol of Luxury and Elegance
Marble is the classic choice for a reason. Think grand estates, luxurious bathrooms, and statement fireplaces. Its swirling veins and cool feel just scream sophistication. It’s a material that has been admired for centuries, offering unparalleled beauty. If you're aiming for that high-end, timeless look, marble is your go-to. While it needs a bit more care, the payoff in sheer elegance is undeniable. You can even buy marble tiles online in the USA for that touch of class.
Case Study: The homeowners in our recent project wanted a master bathroom that felt like a five-star spa. We used Carrara marble tiles for the floor and shower walls. The subtle veining and polished finish created a serene, luxurious atmosphere that they absolutely loved. It transformed their everyday routine into a pampering experience.
Travertine: Rustic Charm and Natural Texture
Travertine brings a warm, earthy vibe to any space. It’s got this natural texture, almost like it was sculpted by nature itself. This stone is super versatile, working beautifully on floors, walls, and even outdoor patios. It offers a cozy, inviting feel that’s hard to beat. Plus, it’s a fantastic option if you love the look of marble but want something a bit more rugged and often more budget-friendly. We have a great selection of travertine tiles perfect for creating that natural look.
- Why Travertine?
- Unique, natural pits and pores add character.
- Comes in warm, neutral tones that complement many decors.
- Durable and suitable for both indoor and outdoor use.
Case Study: A client wanted to update their kitchen backsplash. They chose a tumbled travertine mosaic. The varied textures and earthy colors added so much warmth and personality to the space, making it the cozy heart of their home.
Granite: Unmatched Durability and Sophistication
When you need a stone that can handle anything, granite is the answer. It’s incredibly tough, resisting scratches and heat like a champ. This makes it a top pick for busy kitchens and high-traffic areas. But don't let its toughness fool you; granite also boasts a sophisticated look with its unique flecks and patterns. It’s a practical choice that doesn’t skimp on style. If you're looking for a stone that's as hardworking as it is beautiful, granite is a solid bet.
Limestone: Subtle Beauty and Affordability
Limestone offers a softer, more understated elegance. Its gentle colors and smooth texture provide a warm, inviting ambiance. It’s a great choice if you prefer a more subtle look and are looking for a more affordable natural stone option that still brings that authentic stone feel. Limestone is perfect for creating a calm and serene environment, especially in areas with less foot traffic. It’s a beautiful way to add natural character without overpowering your design.
Choosing between these stones isn't just about looks; it's about how the stone will perform in your home. Consider the daily wear and tear, the moisture levels, and how much time you want to spend on upkeep. Each stone has its own story and its own set of needs, and finding the right match is key to a beautiful, lasting result.
Choosing the Right Stone for Your Project
Selecting the perfect natural stone for your home is a big decision. It's not just about looks; it's about finding a material that fits your lifestyle, your space, and your budget. Think of it like picking a lifelong companion for your home – you want something beautiful, reliable, and suited to your needs. We're here to help you make that perfect match.
Assessing Durability and Maintenance Needs
Every stone has its own personality and demands. Some are tough cookies, ready for anything, while others need a bit more pampering. Understanding this upfront saves a lot of headaches later.
- High-Traffic Areas (Kitchens, Hallways): You need something robust. Granite is a champion here, known for its incredible hardness and resistance to scratches and heat. If you're looking to buy marble tiles online USA, remember that while beautiful, marble can be more susceptible to etching and staining in busy spots. Consider honed finishes for marble in these areas to mask minor wear.
- Wet Areas (Bathrooms, Showers): Slip resistance and moisture tolerance are key. Travertine, with its natural texture, offers good grip, especially in tumbled or honed finishes. Slate is another excellent choice for its natural slip resistance and earthy appeal.
- Low-Traffic Areas (Bedrooms, Decorative Walls): Here, you have more freedom to choose based purely on aesthetics. Marble's delicate veining can truly shine, and softer stones like limestone can provide a subtle, elegant backdrop.
Case Study: The Busy Family Kitchen
The Miller family wanted a kitchen that was both stunning and practical. They opted for granite countertops in a dark, speckled pattern. "We have three kids and a dog, so durability was non-negotiable," says Sarah Miller. "The granite has held up beautifully against spills, hot pans, and constant use. It looks as good today as it did when we installed it five years ago." This shows how matching the stone's toughness to the area's demands pays off.
Considering Aesthetic Preferences and Finishes
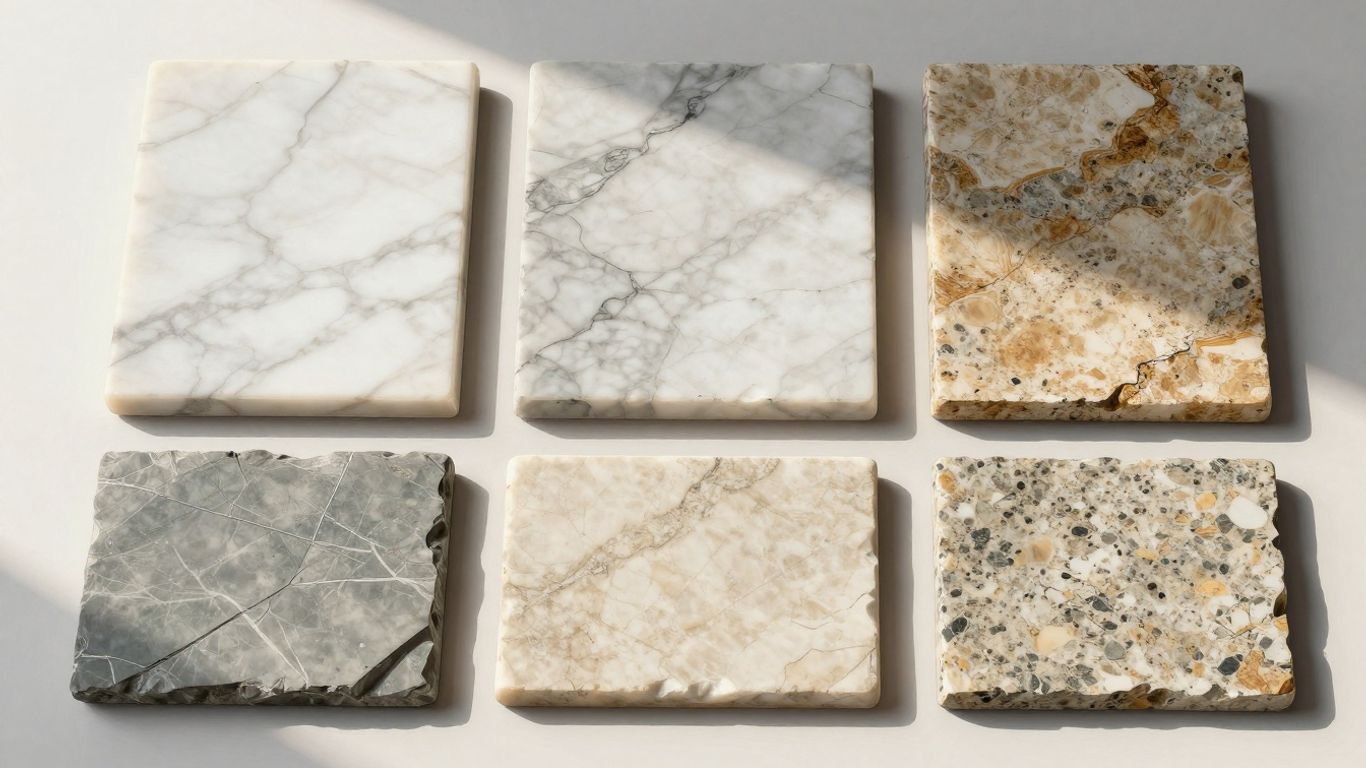
This is where your personal style comes into play. Natural stone offers an incredible range of colors, patterns, and textures. Don't be afraid to explore!
- Color Palette: Do you prefer the cool elegance of white marble, the warm earth tones of travertine, or the deep, sophisticated hues of granite? Think about how the stone will complement your existing cabinetry, paint colors, and overall home decor.
- Veining and Pattern: Each slab of natural stone is a unique work of art. Marble is famous for its dramatic veining, while granite can have a more speckled or swirled appearance. Limestone often features subtle fossil inclusions. Embrace the individuality!
-
Surface Finishes:
- Polished: Offers a high-gloss, reflective surface. It's dramatic but can show water spots and scratches more easily.
- Honed: A smooth, matte finish. It's less reflective and hides wear better than polished.
- Tumbled: Gives a worn, aged look with softened edges. Great for a rustic or Mediterranean feel.
- Brushed: Creates a textured surface with a slightly rough feel.
Matching Stone to Installation Area Requirements
Beyond durability and looks, consider the practicalities of where the stone will live.
- Flooring: For floors, especially in entryways or living areas, consider stones that are not overly porous or that can be sealed effectively. Travertine tiles are a popular choice for their natural beauty and durability in flooring applications.
- Countertops: Kitchen and bathroom countertops need to resist stains, heat, and etching. Granite and quartz (though not natural stone, often considered alongside it) are top contenders. Marble can be used, but requires diligent sealing and careful use.
- Walls and Backsplashes: This is a great place to use more delicate or decorative stones like marble or onyx. They add a luxurious touch without facing the same wear and tear as flooring or countertops.
Choosing the right stone is about balancing beauty with practicality. Think about how you live in your space and select a material that can keep up while still making your heart sing every time you see it. It’s an investment in your home’s future beauty and value.
Case Study: The Elegant Bathroom
When designing their master bathroom, the Chen family wanted a spa-like retreat. They chose Carrara marble for the floor and shower walls. "We knew marble needed care, but the soft veining and classic look were exactly what we envisioned," says Mr. Chen. "We sealed it thoroughly and are careful with cleaning products. The result is a bathroom that feels incredibly luxurious and timeless." This highlights how understanding the stone's needs allows for its successful use even in demanding environments.
Navigating Stone Finishes and Edge Profiles
Understanding Different Surface Finishes
The finish on your natural stone tile isn't just about looks; it impacts how the stone feels, how it performs, and how easy it is to keep clean. Think of it as the stone's personality. A polished finish, for example, gives a super shiny, almost mirror-like surface. It really makes colors pop and adds a touch of modern luxury. But, it can also show water spots and scratches more easily, so it needs a bit more attention. If you're going for a softer, more natural vibe, a honed finish might be your pick. It's matte, smooth, and less reflective, making it a bit more forgiving with daily wear and tear. Then there's the tumbled finish. This one gives the stone a worn, aged look, with softened edges and a slightly rough texture. It’s perfect for creating that rustic, old-world charm. For a truly natural look, some stones, like travertine, can be left with their natural holes unfilled, adding character. Or, they can be filled for a smoother surface. Each finish offers a unique aesthetic and functional benefit. For instance, a tumbled finish on travertine tiles can give your patio a charming, weathered look that feels like it's been there for years.
Exploring Edge Treatments for a Custom Look
Don't forget the edges! The way the edge of your tile is treated can really change the overall feel of your installation. A simple straight edge, also called a squared edge, gives a clean, contemporary look that works well in modern spaces. It’s straightforward and lets the stone itself be the star. If you want something a bit softer, a beveled edge (or chamfered edge) has a slight angle cut into it. This not only softens the look but also helps to reduce any sharp level differences between tiles, making installation a bit easier and safer. For a more dramatic, handcrafted appearance, a chiseled edge is the way to go. It looks like the stone was just quarried, giving it a raw, natural, and rugged feel. This is fantastic for creating a statement piece or a more traditional setting. Choosing the right edge profile is like picking the perfect frame for a piece of art – it completes the picture. You can find great examples of how different edge profiles work on various stone types in our inspiration gallery.
The Impact of Finish on Maintenance and Appearance
So, how do these finishes and edges actually affect your life with the stone? It's pretty simple: the finish you choose directly influences both the look and the upkeep. A polished finish is stunning, no doubt, but it means you'll want to be extra careful about spills and cleaning. You'll need to use specific cleaners designed for natural stone to avoid dulling that shine. A honed or tumbled finish, on the other hand, tends to hide minor imperfections and wear better, making them a more practical choice for busy households. For example, if you're looking to buy marble tiles online in the USA for a high-traffic kitchen floor, a honed finish might be a smarter bet than a high-gloss polished one. It still looks beautiful but requires less worry about everyday use. The edge profile also plays a role; a beveled edge can make cleaning easier by reducing the depth of grout lines at the surface, while a chiseled edge might require more attention to keep clean due to its textured surface.
Case Study: The Rustic Kitchen Makeover
A homeowner wanted to update their kitchen with a warm, inviting feel. They chose tumbled travertine tiles for the backsplash. The tumbled finish gave the tiles a soft, worn appearance, and the chiseled edge profile added a rustic charm that perfectly complemented the wooden cabinets and farmhouse sink. This combination created a cozy, authentic look that felt both timeless and welcoming. The homeowner found that the textured finish was forgiving of minor cooking splatters, and the edge profile added character without being difficult to clean.
Choosing the right finish and edge profile is a balance between the aesthetic you desire and the practical maintenance you're willing to do. Don't underestimate how much these details can impact the final look and feel of your project.
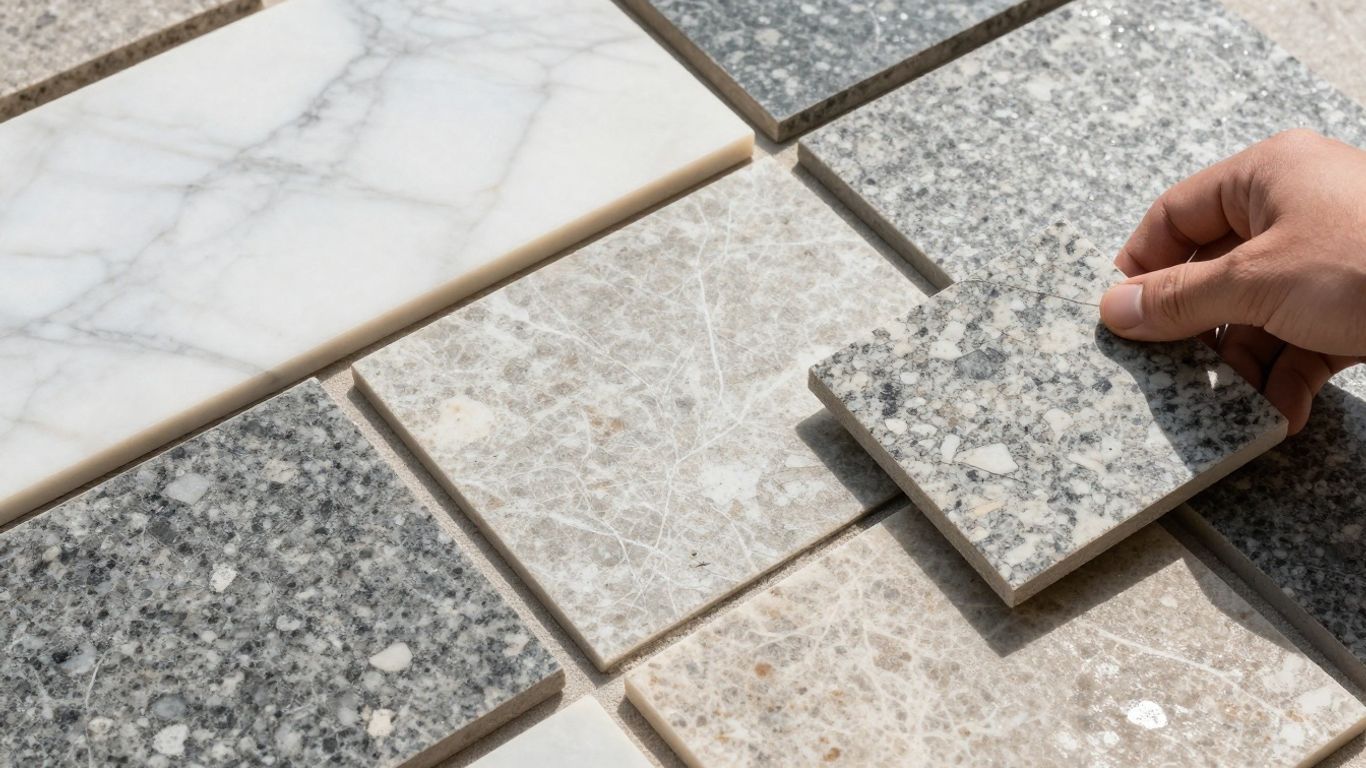
Key Considerations for Quality Stone Selection
Identifying Signs of High-Quality Stone
When you're ready to buy marble tiles online in the USA, or any natural stone for that matter, you want to make sure you're getting the good stuff. It's not just about the look; it's about how long it'll last and how much hassle it'll be down the road. Think of it like buying a car – you want something reliable, right? The same goes for your stone. Look for consistency. Does the color seem pretty even across the slabs or tiles you're looking at? Are the patterns flowing nicely, or is it all over the place? This consistency is a big sign that the stone was quarried and processed with care. It means you're less likely to have weird surprises once it's installed.
The Importance of Consistency in Color and Pattern
Natural stone is, well, natural. That means there will always be some variation. That's part of its charm! But there's a difference between charming variation and just plain messy. High-quality stone will have a pleasing, cohesive look. For example, if you're looking at travertine tiles, you want to see that characteristic pitted texture and those warm, earthy tones flowing through. If one tile looks like it came from a completely different quarry, that's a red flag. This consistency is what makes a space feel put-together and luxurious. It’s the difference between a custom-built home and a fixer-upper.
Evaluating Stone for Cracks and Imperfections
This is a big one. You absolutely need to check for cracks, chips, or any other major flaws. Sometimes, stones can develop hairline cracks during the quarrying or transport process. While minor imperfections might be acceptable, especially with certain finishes like tumbled travertine, large cracks or chips are a no-go. They weaken the stone and can lead to bigger problems later. Always inspect each piece if you can, or at least ask your supplier about their quality control. A good supplier will be upfront about any potential issues and will have a process for handling them. Remember, you're investing in something beautiful and durable, so don't settle for less than top quality.
Case Study: The Kitchen Countertop Upgrade
Sarah and Tom were renovating their kitchen and decided on a beautiful granite countertop. They found a supplier online that offered a great price, but when the slabs arrived, they noticed significant color variations and a few large chips along the edge of one slab. They contacted the supplier, who offered a small discount but insisted it was "natural character." Frustrated, Sarah and Tom decided to look elsewhere. They found Surfaces Galore, where they could see high-quality granite slabs in person. They chose a slab with a consistent pattern and no visible flaws. The installation was smooth, and they were thrilled with the final look. "It was worth paying a bit more to get stone that was truly high-quality and looked exactly how we envisioned," Sarah said. This experience taught them the importance of not just price, but also the quality and consistency of the stone itself.
When selecting natural stone, prioritize consistency in color and pattern, and meticulously inspect for cracks or significant imperfections. This diligence ensures both aesthetic appeal and long-term durability for your investment.
Calculating and Purchasing Your Natural Stone
Ready to bring the timeless beauty of natural stone into your home? The next step is getting the numbers right. Accurate calculations and smart purchasing mean you get exactly what you need, without overspending or running short.
Accurate Measurement for Material Needs
First things first: measure your space. Don't guess! Use a reliable tape measure to get the exact dimensions of the area you'll be tiling. Measure the length and width of each section, and multiply them to get the square footage for each. Add these up for your total project area. This is the foundation for all your calculations.
Don't forget to account for irregular shapes or cutouts, like around cabinets or fixtures. These areas still need tile, and often require more cuts, which adds to your material needs.
Understanding Tile Sizes and Nominal Dimensions
Natural stone tiles come in a variety of standard sizes, like 12x12, 18x18, or 24x24 inches. Keep in mind that these are often nominal dimensions. This means the actual tile size might be slightly different. Always check the product details for the exact measurements. Using the correct tile size is key to calculating how many tiles you'll need per square foot. For example, fewer large tiles are needed to cover the same area as many small ones.
Factors Influencing Stone Pricing
Several things affect the price of natural stone. The type of stone is a big one – marble and granite often cost more than limestone. The origin of the stone, its rarity, and the specific quarry can also play a role. Finishes, like polished or tumbled, can also influence the price. When you're ready to buy marble tiles online in the USA, compare prices from reputable suppliers like Surfaces Galore to get the best value.
The Waste Factor: Ordering Extra is Smart
This is where many DIYers get caught out. You must order extra tile. This accounts for cuts, potential breakage during transport or installation, and any mistakes. It's standard practice to add 10-30% to your total square footage for this 'waste factor'.
For instance, if your project area is 100 square feet, you should order between 110 and 130 square feet of tile. This might seem like a lot, but it's far better to have a few extra tiles than to run out and find that the next batch has a slightly different color or pattern. Natural stone is unique, and color consistency between batches isn't always guaranteed.
Always order extra to ensure a perfect match for future repairs.
Case Study: The Kitchen Backsplash
Sarah was renovating her kitchen and fell in love with a tumbled travertine tile for her backsplash. The area measured 30 square feet. She initially calculated she'd need exactly 30 square feet of tile. However, she decided to add 20% for cuts and potential breakage, bringing her order to 36 square feet. During installation, she had to make several intricate cuts around her outlets and a few tiles chipped slightly. Thanks to her foresight, she had enough tile to complete the project beautifully without any last-minute trips to the store or color matching headaches.
Case Study: The Grand Entryway
Mark wanted a dramatic entryway with polished marble tiles. His entryway was 200 square feet. He decided to order 25% extra, totaling 250 square feet. This proved wise. He had a few tiles that had noticeable cracks upon arrival, and the angled cuts needed for the doorway threshold generated more waste than he anticipated. Having the extra material meant he could select the best pieces and complete the installation flawlessly, maintaining the luxurious look he envisioned.
Where to Buy Your Stone
When you're ready to purchase, look for suppliers who offer a wide selection and good value. Direct importers, like Surfaces Galore, can often provide premium quality natural stone at better prices because they cut out the middleman. Whether you're looking for marble, travertine, or granite, buying from a trusted source is key to getting beautiful, durable tiles for your home. You can explore their extensive collection online or visit their showroom.
Preparing for Natural Stone Installation
Getting your space ready for natural stone tile installation is a big step. It’s not just about laying down the tiles; it’s about making sure everything is perfect beforehand so your beautiful stone looks its best for years. Think of it like prepping a canvas before painting – the better the prep, the better the final masterpiece.
Acclimating Stone Tiles to the Environment
Natural stone, like marble or travertine, needs time to get used to its new home. Before you even think about adhesive, let those tiles sit in the room where they'll be installed for at least 48 hours. This helps them adjust to the temperature and humidity. Skipping this step can lead to problems down the road, like tiles expanding or contracting unevenly. It’s a simple step that makes a huge difference in the longevity of your installation.
Ensuring a Proper and Level Subfloor
A solid foundation is everything. Your subfloor needs to be clean, dry, and perfectly level. Any bumps or dips will show through the tiles, creating an uneven surface, or 'lippage,' which is not only unsightly but can also be a tripping hazard. If your subfloor isn't quite right, consider using a self-leveling compound. A level subfloor is key to a professional-looking finish, especially when you buy marble tiles online USA.
Essential Tools and Materials Checklist
Having the right gear makes the job smoother. Don't start without these:
- Natural Stone Tiles: Of course!
- Thinset Mortar: Choose one specifically recommended for natural stone.
- Notched Trowel: The size of the notches matters – check your tile and mortar specs.
- Tile Spacers: For consistent grout lines.
- Level: To check for flatness.
- Wet Saw or Tile Cutter: For precise cuts.
- Grout: Pick a color that complements your stone.
- Sealer: Crucial for protecting your investment.
- Safety Gear: Gloves, goggles, and knee pads are a must.
Case Study: The Kitchen Countertop Transformation
Sarah and Tom wanted a stunning kitchen backsplash using tumbled travertine tiles. They carefully acclimated the tiles and spent a weekend ensuring their existing drywall was perfectly smooth and level. They even dry-laid the tiles first to plan the pattern. The result? A breathtaking backsplash that looked professionally installed, adding significant charm and value to their kitchen. They mentioned how the prep work, though time-consuming, was the most rewarding part of the process.
Proper preparation is the silent hero of any natural stone installation. It’s the difference between a floor that looks good for a few years and one that remains a beautiful focal point for decades. Don't cut corners here; your future self will thank you.
Mastering Natural Stone Installation Techniques
Installing natural stone tile takes patience and attention to detail, but the payoff is a space that's truly one-of-a-kind. If you want to buy marble tiles online USA or bring the classic appeal of limestone into your kitchen, understanding the right installation steps is key. Let’s get into the practical process.
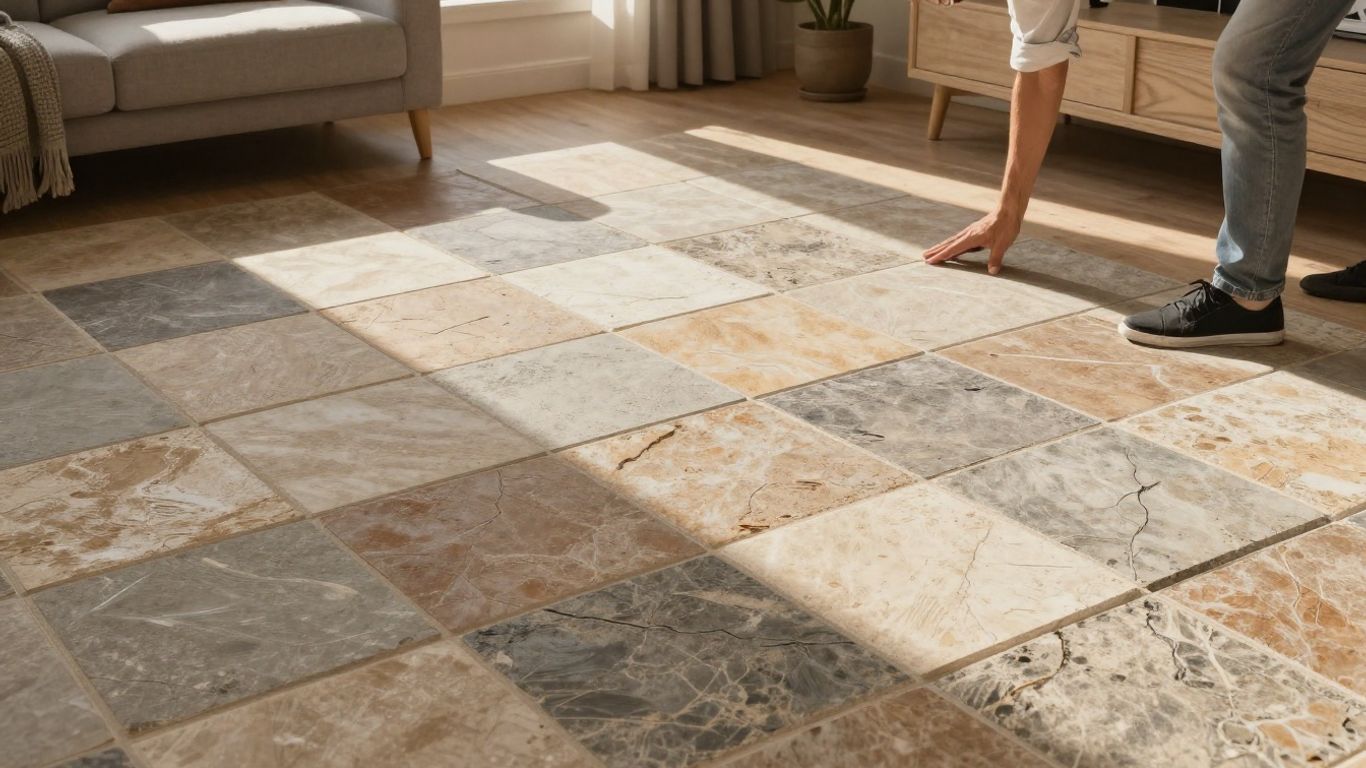
Planning Your Layout and Dry Laying
Laying out your stone tile plan sets you up for a smooth, attractive finish.
- Start by measuring your room and marking precise center lines using a chalk snap line—you want your tile pattern to look balanced when you walk in.
- Dry-lay your tiles (arrange them on the floor without adhesive). This shows how patterns, colors, and stone veining will look in the finished space. It also lets you arrange tiles with more variation or unique veining in noticeable spots for max visual impact.
- Mix tiles from different boxes as you go—this prevents color banding and harsh pattern breaks that sometimes appear with natural materials.
- Don’t forget to factor in grout joints and edge pieces. Many marble and travertine installations use tight 1/16–1/8" joints. Choose what best suits your look and the type of stone.
When you dry-lay, you catch tiny details that would be a headache to fix later—like awkward slivers along a wall or a dramatic color patch right at your doorway.
Case Study: Classic Marble Checkerboard Entry
A Chicago homeowner wanted a bold, timeless entryway using black and white marble in a checkerboard pattern. By dry-laying and shuffling tiles from different boxes, they achieved even texture and pattern across the space. This step helped avoid two black tiles next to each other and kept the checkerboard neat—no surprises after it was too late to change.
Applying Adhesive and Setting Tiles
Getting the stone tiles to stick well (and stay stuck) is about both product choice and hands-on technique.
- Pick the right thin-set mortar—specific for natural stone and the area (indoor, outdoor, wet spaces).
- Use a notched trowel to spread adhesive evenly. Hold the tool at a 45-degree angle for consistent ridges.
- Press each tile firmly in place with a slight twist—this pushes out air bubbles and helps full contact.
- Use tile spacers to keep joints even so you’re not left with crooked lines.
- Check tiles with a level as you go—stone tiles can look uneven if your subfloor is out of whack or if you’re not watching closely.
| Tool | Use |
|---|---|
| Notched Trowel | Spreads adhesive evenly |
| Rubber Mallet | Gently adjusts tile height |
| Level | Ensures a flat, even surface |
| Tile Spacers | Maintains consistent grout joints |
Case Study: Travertine Kitchen Success
A New Jersey couple laid travertine floor tile in their kitchen. The biggest challenge? Uneven subfloor and tiles of slightly different thickness. They constantly checked with a long level and tapped tiles into place with a rubber mallet, which kept the final surface smooth—no "toe-stubbers" or uneven joints.
For more structured installation guides, consider exploring professional tile installation instructions.
Cutting Stone Tiles with Precision
Stone tile needs special handling if you want clean edges and a professional finish.
- For straight cuts, use a wet saw with a diamond blade—cut slowly to prevent chipping.
- Plan cuts so that cut edges run against the wall or are covered by trim or cabinets.
- If you have to leave a cut edge exposed—say for a wall feature—lightly sand and polish it for a finished look.
- Always wear gloves, safety glasses, and ear protection. Stone tile dust can be hazardous.
Rushed cuts are a common DIY fail—take your time, measure twice, and cut once for the best results.
Case Study: Limestone Shower Niche
A Texas homeowner tackled a custom limestone shower niche. The trick was using a fresh, sharp diamond blade and marking lines carefully. By sanding exposed edges with progressively finer grit sandpaper, they achieved a smooth, professional result that wowed their guests.
With the right preparation and careful work, natural stone tile installation becomes a straightforward, rewarding project—even for homeowners new to the process. Want more DIY resources? Tap into installation and sealing guides for step-by-step visuals and expert tips.
A well-installed stone tile floor or wall isn’t just beautiful—it’s the kind of investment that pays you back for decades.
Grouting and Sealing for Longevity
You've picked out the perfect natural stone tiles, and they're installed beautifully. Now, let's talk about the finishing touches that make all the difference: grouting and sealing. These steps aren't just about filling gaps; they're about protecting your investment and keeping your stone looking stunning for years to come. Get this right, and your floors or walls will be the talk of the town.
Proper Grouting Procedures
Grouting is where your tile project really comes together. It fills the spaces between your tiles, creating a unified surface. But it's more than just aesthetics; it prevents dirt and moisture from getting underneath your tiles. For natural stone, choosing the right grout and applying it correctly is key. We recommend using a grout specifically designed for natural stone, often a sanded grout for wider joints or unsanded for very narrow ones, to avoid scratching delicate surfaces. Always follow the manufacturer's instructions for mixing – you want a smooth, consistent paste, not too wet and not too dry.
- Mix the grout to a peanut butter-like consistency.
- Apply the grout using a grout float, pressing it firmly into the joints at a 45-degree angle.
- Wipe away excess grout with the float, again at an angle, to avoid pulling it out of the joints.
- Clean the tiles with a damp sponge, rinsing it frequently. Be gentle around the grout lines.
Case Study: Sarah wanted a rustic look for her kitchen backsplash using tumbled travertine tiles. She opted for a darker, earth-toned grout to complement the stone's natural variations. After carefully applying and cleaning, the grout lines defined each tile beautifully, giving her backsplash a rich, handcrafted appearance that truly made the travertine pop.
The Crucial Role of Stone Sealing
Natural stone, especially porous types like marble, travertine, and limestone, needs protection. Sealing is your stone's best defense against stains, moisture, and etching. Think of it as giving your stone a shield. A good quality stone sealer penetrates the stone's surface, creating a barrier that repels liquids. This is especially important in areas prone to spills, like kitchens and bathrooms. Without sealing, even a simple spill could leave a permanent mark, and that's something none of us want.
- Allow grout to cure fully (usually 48-72 hours) before sealing. This is a non-negotiable step.
- Choose the right sealer. There are penetrating sealers that soak into the stone, and topical sealers that form a protective layer on top. For most natural stones, a penetrating sealer is preferred.
- Apply the sealer evenly using a clean cloth or applicator. Work in small sections.
Sealing isn't a one-time job. Depending on the type of stone and how much traffic it gets, you'll need to reapply sealer periodically. This maintenance step is vital for keeping your stone looking its best and preventing damage.
Case Study: Mark was worried about his new marble bathroom vanity staining. He followed our advice and sealed it thoroughly after installation. A few months later, a bottle of hair dye tipped over. He was able to wipe it up immediately, and thankfully, there was no stain. The sealer did its job, saving his beautiful marble from a costly repair.
Understanding Sealer Application and Frequency
Applying sealer might seem straightforward, but doing it right makes a big difference. Always read the manufacturer's instructions for the specific sealer you're using. Generally, you'll want to apply it to a clean, dry surface. For porous stones, you might need multiple coats, allowing each to dry before applying the next. As for frequency, it varies. For high-traffic areas or stones prone to staining, you might need to reseal every 6-12 months. Less used areas might only need it annually. A simple water test can tell you if it's time: sprinkle some water on the stone. If it beads up, your sealer is still working. If it soaks in and darkens the stone, it's time to reseal. Investing a little time in proper sealing and knowing when to reapply will protect your beautiful buy marble tiles online USA and keep them looking like new.
Maintaining the Beauty of Your Natural Stone
Your natural stone is a beautiful investment, and keeping it looking its best is simpler than you might think. With a little regular care, your marble, travertine, or granite will maintain its elegance for years. It’s all about using the right methods and products.
Daily Cleaning and Spill Management
Keeping your stone surfaces clean day-to-day is your first line of defense. For routine cleaning, a simple wipe-down with a damp cloth is often all that's needed. Wipe up spills immediately – this is the golden rule for natural stone. Acids, like lemon juice or vinegar, and even some common foods can etch softer stones like marble and limestone if left to sit. For tougher spots, use warm water. If you need a bit more cleaning power, opt for a cleaner specifically made for natural stone. You can find great options if you buy marble tiles online USA and check their recommended care products.
Recommended Cleaning Products
When it comes to cleaning, stick to what's safe for your stone. Harsh chemicals, abrasive scrubbers, and acidic cleaners are a big no-no. They can dull the finish, etch the surface, or even cause permanent damage. Instead, reach for a pH-neutral cleaner. These are gentle yet effective, lifting dirt and grime without harming the stone. Many manufacturers, like FILA, offer excellent pH-neutral cleaners that are perfect for marble and other natural stones. Always rinse the surface thoroughly after washing and dry it with a soft cloth to prevent water spots and maintain its shine. Using a pH-balanced neutral cleaner is a smart move for all your natural stone surfaces.
Periodic Sealing for Protection
Sealing is a vital step in protecting your natural stone from stains and moisture. Think of it as giving your stone a protective shield. The frequency of sealing depends on the type of stone and how much it's used. For most residential applications, sealing once a year is usually sufficient. However, always check the product instructions for your specific sealer. A well-sealed stone will resist spills much better, making cleanup easier and preventing deep-set stains. This is especially important for stones like travertine, which has a more porous surface.
Case Study: The Miller Residence
The Millers installed a beautiful travertine floor in their kitchen two years ago. Initially, they were worried about spills from cooking and their two young children. By following a simple routine – wiping up spills immediately and using a pH-neutral cleaner weekly – their travertine still looks as good as the day it was installed. They reseal it every 18 months, and it has held up wonderfully against daily life.
Case Study: The Chen Family
When the Chens chose a white marble for their bathroom vanity, they were concerned about water spots and potential staining from toiletries. They committed to wiping the surface dry after each use and using a specialized marble cleaner. They also resealed the marble annually. Even after three years, the marble remains pristine, a testament to consistent, proper care.
Keeping your natural stone looking its best is easier than you think! Simple steps can help maintain its shine and prevent damage. For more tips on how to care for your beautiful stone surfaces, visit our website today!
Your Beautiful Home Awaits
So, you've learned a lot about picking out natural stone for your place. It's not just about picking something pretty; it's about finding a material that fits your life, your style, and your budget. Whether you're drawn to the classic look of marble or the earthy charm of travertine, remember that quality stone is an investment that pays off. Take your time, ask questions, and don't be afraid to get samples. With the right stone, you can really make your home feel special and look amazing for years to come. Ready to start picking out those perfect tiles? Surfaces Galore is here to help you find exactly what you need, shipped right to your door.
Frequently Asked Questions
What exactly is natural stone?
Natural stone is basically rock that we dig out of the earth. Think of stones like marble, granite, and travertine. We use them just as they are, or with a little shaping, to make beautiful floors, walls, and countertops for your home.
Why should I pick natural stone over other materials?
Natural stone is super strong and lasts a really long time. Plus, every piece is unique, so your home will have a special look that no one else has. It's also good for the environment because it's a natural material.
How do I know if I'm getting good quality stone?
Look for stone that has a nice, even color and pattern. It shouldn't have big cracks or chips. A good stone will feel smooth and look well-made.
Can I use natural stone outside?
Yes, many types of natural stone, like travertine, are great for outdoor areas like patios. Just make sure it's sealed properly to protect it from the weather.
How do I clean and care for my natural stone?
It's pretty simple! Just wipe it down regularly with a mild cleaner that's safe for stone. Try to clean up spills right away to prevent stains. You'll also want to seal it every so often.
Does natural stone need sealing?
Yes, it does. Because natural stone is porous, sealing it helps keep stains and moisture from soaking in. It's a good idea to seal it at least once a year, but check the sealer's instructions.
What's the difference between marble and travertine?
Marble is known for its elegant look and fancy veining, often used for a luxurious feel. Travertine has a more rustic charm with natural holes and earthy colors, giving a cozy vibe. Both are beautiful but have slightly different care needs.
Can I get samples of the stone before I buy?
Absolutely! We offer small samples so you can see and feel the stone's color and texture in your own home before you decide. Just ask us to send you one!
Leave a comment