
Field tile explained: your guide to stylish, durable spaces

TL;DR:
- A field tile is the standard, uniform tile that covers large surface areas in kitchens, bathrooms, and outdoor spaces, providing a foundational background. Properly selecting and installing high-quality field tile is crucial for lasting durability and an elegant look, as it sets the tone for the entire renovation. Avoid prioritizing decorative accents by ensuring your primary tile choice offers both aesthetic appeal and long-term performance.
Choosing tile for a kitchen or bathroom renovation sounds straightforward until you’re standing in a showroom surrounded by hundreds of options and a salesperson asks, “So, are you looking for field tile or something more decorative?” Most homeowners freeze. The term “field tile” gets thrown around constantly in the tile world, but very few renovation guides actually explain what it means, why it matters, and how it shapes every other decision you make. Field tile contrasts with accent, decorative, border, or mosaic tiles, which are used sparingly for visual interest, patterns, edges, or curves, making this one of the most fundamental distinctions you need to understand before you spend a single dollar on materials.
Table of Contents
- What is a field tile?
- Field tile vs accent and mosaic tiles: Key differences
- Choosing the right field tile material and finish
- Installation and design tricks for field tile success
- Why field tile choice is the renovation ‘make or break’
- Find your perfect field tile with Surfaces Galore
- Frequently asked questions
Key Takeaways
| Point | Details |
|---|---|
| Field tiles defined | Field tiles cover most of a surface and set the overall design tone. |
| Difference from accents | Decorative and mosaic tiles are used for special features or design interest. |
| Material matters | Choosing the right field tile material impacts longevity and appearance. |
| Installation tips | Proper preparation and installation help avoid cracks and future problems. |
| Expert advice | Investing in quality field tile pays off in long-term style and durability. |
What is a field tile?
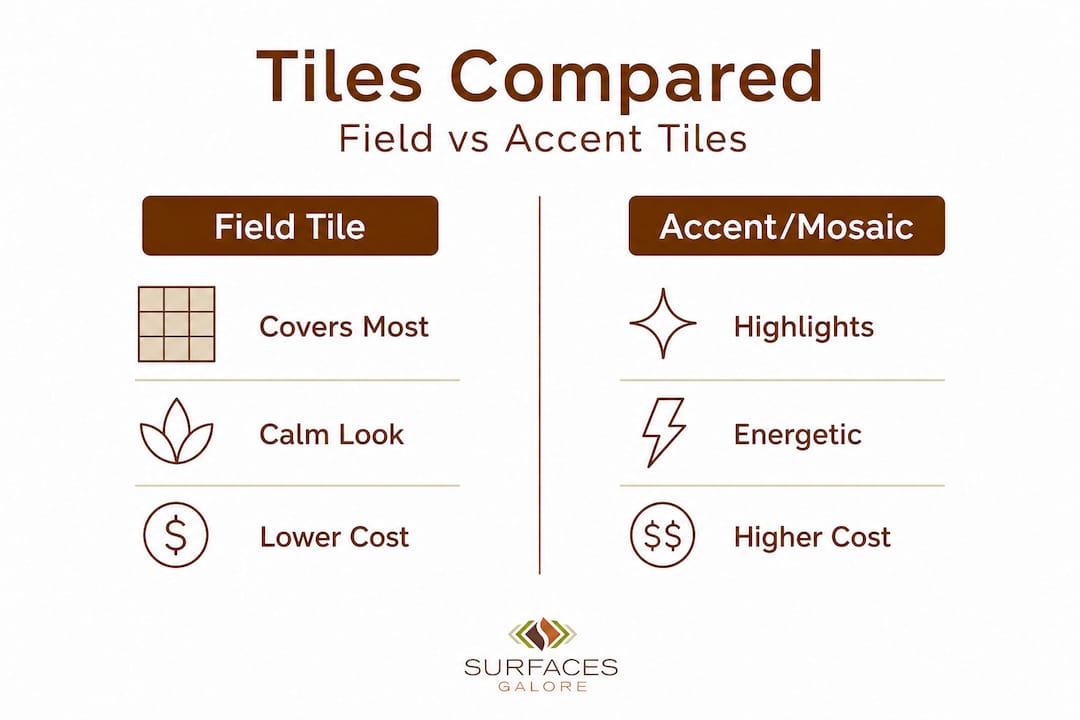
A field tile is the workhorse of any tile installation. It’s the standard, uniform tile that covers the majority of a surface, whether that’s a bathroom floor, a kitchen backsplash, a shower wall, or a living room floor. Think of it as the background canvas that everything else gets layered on top of. It’s not the star of the show, but without a well-chosen field tile, even the most beautiful accent pieces fall flat.
Field tiles are typically rectangular or square, come in consistent sizes and colors within a single lot, and are designed to be installed in a repeating pattern that covers large areas efficiently. The word “field” itself refers to the large open area being covered, similar to how a field in farming means a wide, open expanse. These tiles are built for coverage, not complexity.
Where are field tiles typically used? Here’s a quick look at the most common applications:
- Kitchen backsplash walls (the large flat area above countertops)
- Bathroom floor surfaces from wall to wall
- Shower walls from the pan up to the ceiling or a border line
- Bathroom walls in wet zones and dry zones alike
- Laundry room floors and walls
- Mudroom entryways
- Living room and hallway floors
- Outdoor patios and pool surrounds (with appropriate rated tiles)
Here’s a quick comparison to help you visualize where field tiles sit relative to other tile categories:
| Tile type | Primary purpose | Coverage area | Cost per sq ft | Visual role |
|---|---|---|---|---|
| Field tile | Cover large surfaces | 70% to 95% of total | Lower | Background/foundation |
| Accent tile | Highlight or frame | 5% to 15% | Higher | Focal point or trim |
| Mosaic tile | Decorative detail | Small sections | Highest | Pattern/texture/curves |
| Border tile | Define edges or zones | Linear strips only | Medium | Transition/framing |
Understanding this table alone can change how you budget and plan. Field tiles are typically less expensive per square foot than accents or mosaics, but they require the most material. Investing in a quality field tile matters more than many homeowners realize, because it covers the most surface area and sets the tone for everything else. You can explore different tile finish options to understand how gloss, matte, and textured surfaces affect the overall look before committing.
Field tile vs accent and mosaic tiles: Key differences
Now that the field tile definition is clear, it’s worth getting specific about how it differs from accent and mosaic tiles in real-world renovations. Many homeowners spend hours obsessing over the mosaic border or the decorative accent strip while giving almost no thought to the field tile that fills 85 percent of the wall. That’s a planning mistake that shows up fast once installation begins.
Accent and mosaic tiles are used sparingly for visual interest, patterns, edges, or curves. They are the supporting cast members in your renovation story. A glossy white subway field tile on a shower wall, for example, becomes beautiful with a simple row of hand-cut marble mosaic at eye level. Take away the field tile, and the accent has nothing to anchor it. They need each other, but their roles are completely different.
Here’s a side-by-side comparison that covers the practical differences:
| Feature | Field tile | Accent tile | Mosaic tile |
|---|---|---|---|
| Coverage | Large uniform areas | Small sections, borders | Curves, small focal zones |
| Cost impact | Moderate, high volume | High cost, low volume | Highest per sq ft |
| Durability need | Critical, must be rated correctly | Less critical | Moderate |
| Installation complexity | Moderate, pattern planning required | Low, spot placement | High, mesh backing, grouting |
| Design role | Sets tone and palette | Adds personality | Creates texture and depth |
| Best use case | Floors, walls, full backsplashes | Niches, borders, focal walls | Shower floors, curves, outlets |
A few important distinctions worth calling out separately:
- Field tiles need to be rated for their surface. A wall-rated field tile used on a floor can crack or fail under foot traffic. Always check the PEI (Porcelain Enamel Institute) rating for floor applications.
- Accent tiles don’t need to meet the same durability standards because they cover so little area and rarely experience the same wear.
- Mosaics excel at solving installation problems that field tiles can’t handle, like curving walls, sloped shower floors, and tiled outlets.
Pro Tip: If you find yourself drawn to bold, patterned accent tiles, resist the urge to use them as your primary field tile. What looks stunning in a small sample can feel overwhelming across an entire room. A heavily patterned field tile creates visual noise that makes a space feel smaller and busier. Save the drama for a single accent wall or a shower niche. Explore thoughtful mosaic tile uses in kitchen and bath designs to see how professionals balance pattern with restraint.
The balance between field and accent tiles is really a balance between calm and energy. Your field tile provides the calm. Your accents bring the energy. Tip that balance too far in either direction, and the design stops working.
Choosing the right field tile material and finish
With the roles clearly defined, the next decision is material. The material you choose for your field tile affects durability, maintenance, cost, feel underfoot, and how well it holds up in wet or high-traffic environments. There is no single best material, but there is a best material for your specific project.
Here are the four most common field tile materials and their honest pros and cons:
Ceramic
- Pros: Affordable, easy to cut, wide range of colors and sizes, good for walls
- Cons: Less dense than porcelain, can chip more easily, not ideal for heavy-traffic floors
- Best for: Kitchen backsplashes, bathroom walls, low-traffic floors
Porcelain
- Pros: Extremely dense and durable, water-resistant, works for floors and walls, frost-resistant for outdoor use
- Cons: Harder to cut, heavier, slightly more expensive than ceramic
- Best for: Bathroom floors, shower walls, entryways, outdoor patios
Natural stone (marble, travertine, limestone)
- Pros: Unmatched beauty, unique variation in each tile, increases home value, timeless aesthetic
- Cons: Requires sealing, sensitive to acidic cleaners, heavier, needs a rigid substrate
- Best for: Bathroom floors, spa-style showers, kitchen backsplashes, luxury renovations
Glass
- Pros: Reflects light beautifully, great for backsplashes, non-porous and easy to clean
- Cons: Can scratch, shows fingerprints, not suitable for floors, requires special adhesive
- Best for: Kitchen backsplashes, accent applications, small bathroom walls
When it comes to finish, the rule of thumb is simple. Glossy and polished finishes work well on walls because they reflect light and are easy to wipe clean. Matte and honed finishes work better on floors because they provide more grip when wet, which is especially important in bathrooms and showers. Textured or tumbled finishes add character but require a bit more grout cleaning effort over time.
Pro Tip: If you’re using natural stone as your field tile, sealing is not optional. Sealing natural stone protects it from water absorption, staining, and damage from cleaning products. Equally important is your subfloor preparation. You should seal natural stone and avoid flexing subfloors to prevent cracking, because even a hairline amount of flex in an older wood subfloor can crack stone tiles within months. Adding a layer of cement backer board or uncoupling membrane before tiling resolves this issue entirely.
Natural stone and porcelain remain the two most popular field tile materials in American home renovations, with porcelain commanding the largest market share due to its versatility and durability. For homeowners who want that natural stone warmth without the maintenance commitment, porcelain tiles printed with realistic stone visuals have improved dramatically in recent years. You can review specific guidance on comparing tile finishes to narrow down which surface treatment fits your room’s function and style.
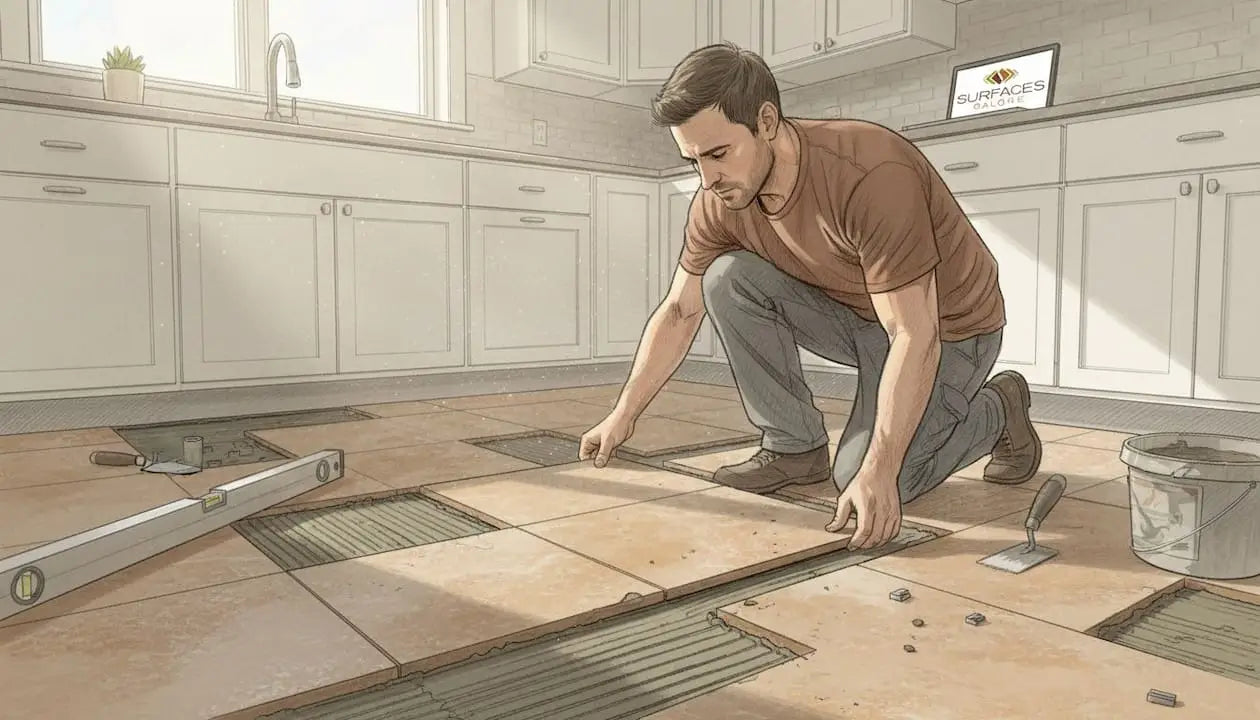
Installation and design tricks for field tile success
Knowing what to buy is only half the equation. How you install your field tile determines whether it looks professional and lasts for decades or shows problems within a couple of years. Good installation starts well before the first tile gets set.
Here are the essential steps for a successful field tile installation:
- Measure carefully and order 10 to 15 percent extra. Cutting waste, breakage during installation, and future repairs all require backup tiles. Running out mid-project and finding that your dye lot is discontinued is a frustrating and costly problem.
- Prepare the substrate thoroughly. The surface behind your tile must be clean, flat, and rigid. For bathroom floors, cement backer board or an uncoupling membrane over plywood is standard. For shower walls, use a moisture barrier or waterproofing membrane before any tile goes up.
- Dry-lay your tile pattern before mixing any mortar. Lay tiles out on the floor without adhesive first to visualize your layout, check for awkward cuts near edges, and center the pattern in the room. This step saves enormous frustration.
- Cut tiles for edges, corners, and outlets. Cut tiles for edges and outlets; use mosaics for shower floors and curves to keep the installation clean and functional. A wet saw gives the cleanest cuts for porcelain and stone. For curved or irregular shapes, this is where mosaic tile becomes your best friend.
- Set tiles with the correct thinset mortar. Use large-format tile mortar for tiles over 15 by 15 inches, and polymer-modified thinset for natural stone to improve bond strength and flexibility.
- Space tiles consistently with tile spacers or wedge leveling systems. Uneven grout lines are one of the most common rookie mistakes and they’re entirely preventable with the right tools.
- Grout only after the thinset has fully cured (typically 24 hours, longer for large-format tiles). Use unsanded grout for joints under 1/8 inch and sanded grout for larger joints. Apply grout sealer afterward to protect color and prevent staining.
“The difference between a field tile installation that lasts 30 years and one that fails in five years almost always comes down to substrate preparation. Get the surface flat, rigid, and properly waterproofed before a single tile goes in, and the rest takes care of itself.” — Experienced tile contractor perspective shared across professional tile forums
One of the most overlooked design tricks for field tile success is planning your transitions thoughtfully. Where your field tile meets a different flooring material, a wall edge, or a countertop, the transition should feel intentional. Check out specific guidance on bathroom wall tiling tips to understand sequencing and where to start your layout for the cleanest visual result. For edges, a tile edging guide covers options like Schluter strips, bullnose tiles, and metal trim that make field tile installations look finished and polished.
One more design insight worth emphasizing: field tile pattern matters as much as the tile itself. The same 3x6 subway tile looks completely different installed in a classic horizontal stack versus a vertical stack versus a herringbone pattern. The pattern changes the perceived proportions of the room, the sense of movement, and the overall style. Horizontal patterns make rooms feel wider. Vertical patterns draw the eye up and make ceilings feel higher. Diagonal and herringbone patterns add energy and movement. Choose your pattern based on the feeling you want the room to have, not just what looks interesting in a sample photo.
Why field tile choice is the renovation ‘make or break’
Here’s something most design guides won’t tell you directly: obsessing over your accent tiles while treating your field tile as an afterthought is the single most common mistake in tile-driven renovations. Walk into any design blog or Pinterest board, and everything is showcased as accents. The hand-painted border. The dramatic mosaic niche. The bold patterned insert. Very few articles say: “Your field tile is the most important decision you will make.”
We’ve seen it play out in renovation after renovation. A homeowner spends weeks selecting the perfect decorative border strip, then grabs a generic, low-grade ceramic field tile because it was on sale. The finished room looks amateur, not because the accents failed, but because the foundation tile cheapened everything around it. Quality field tile grounds the entire design. It’s the thing your eyes register first and last when you walk into a room.
Here’s the contrarian truth: a gorgeous, well-chosen field tile with very simple or no accent tiles will almost always outperform a mediocre field tile with elaborate accents. A richly veined travertine field tile laid in a classic grid or offset pattern needs nothing else to make a room feel luxurious. The stone does the work. Add a simple pencil liner border, and you have a finished, timeless result.
From a return-on-investment standpoint, this matters too. Appraisers and real estate professionals consistently note that natural stone field tiles in kitchens and bathrooms drive measurable increases in perceived home value. A porcelain or marble field tile that looks rich and well-maintained signals quality craftsmanship to buyers. Accent tiles rarely appear in listing descriptions or appraisal notes, but “marble tile floors” and “stone tile shower” absolutely do.
The practical advice here is straightforward. Set your field tile budget first and protect it. If the overall budget gets tight, simplify your accents before you compromise your field tile quality. A clean, high-quality field tile with minimal trim will outlast, outperform, and outlook a cheap field tile dressed up with expensive accents every single time.
Find your perfect field tile with Surfaces Galore
Choosing the right field tile sets the foundation for everything else in your renovation, and it deserves more than a quick scroll through a big-box store’s limited selection.
At Surfaces Galore, we’ve built our entire business around helping homeowners, designers, and contractors find premium natural stone field tiles that deliver lasting beauty and real durability. As a direct importer of marble, travertine, and limestone, we offer authentic materials at prices that make quality accessible without compromise. Whether you’re planning a full bathroom renovation or a kitchen backsplash refresh, explore our full tile collection at Surfaces Galore and access expert guides to help you match the right material, finish, and size to your specific project. We ship nationwide from our Anaheim, California warehouse, so quality stone is always within reach.
Frequently asked questions
Can field tiles be used on both walls and floors?
Yes, most field tiles are designed for either walls or floors, but you should always verify the tile’s specific rating before installation, as wall-rated and floor-rated tiles have different durability and slip-resistance requirements.
What’s the ideal grout line for field tile?
Grout lines for field tiles typically range from 1/16 to 1/8 inch for rectified tiles, though you should always follow the manufacturer’s recommendations for your specific tile format and material.
Do natural stone field tiles always need to be sealed?
Yes, sealing is strongly advised for all natural stone field tiles, particularly in kitchens and bathrooms, because unsealed stone absorbs moisture and is vulnerable to staining and long-term surface damage.
Are mosaics or cut tiles better for curved surfaces?
Mosaics are the preferred choice for curved surfaces, shower floors, and irregular shapes because their small individual pieces conform easily to contours that standard field tiles cannot accommodate without awkward cuts or gaps.
How do I prevent cracking in my field tile installation?
Cracking almost always traces back to subfloor or wall flex, so ensure your substrate is rigid and properly prepared before tiling, since even minor subfloor movement can fracture tiles over time, especially natural stone.
Leave a comment