
Hand-Cut Mosaic for Custom Kitchen and Bath Designs

TL;DR:
- Hand-cut mosaics are uniquely shaped tiles that create organic and customizable patterns.
- They are ideal for kitchens and bathrooms due to their durability and design flexibility.
- Proper planning, surface prep, and slow, careful installation ensure a lasting, high-quality result.
There is a moment in nearly every renovation when a homeowner realizes that the tile they chose looks almost identical to every other tile on the block. Mass-produced sheet mosaics are efficient and affordable, but they carry a sameness that is hard to ignore once you see it. Hand-cut mosaic is the alternative that changes that equation entirely. Each piece is shaped by hand, assembled with intention, and installed to create something that cannot be replicated by a machine. This article covers what hand-cut mosaic is, why it works so well in kitchens and bathrooms, how installation actually unfolds, and where creative design can take you.
Table of Contents
- What is a hand-cut mosaic?
- Why choose hand-cut mosaic for kitchens and bathrooms?
- Hand-cut mosaic installation basics
- Design inspiration: creative ways to use hand-cut mosaics
- Why hand-cut mosaics offer more than meets the eye
- Bring your hand-cut mosaic vision to life
- Frequently asked questions
Key Takeaways
| Point | Details |
|---|---|
| Hand-cut mosaic defined | Hand-cut mosaics are individually shaped and laid tiles, offering one-of-a-kind patterns and artistry. |
| Ideal for wet areas | With proper installation and grout, hand-cut mosaics perform beautifully in kitchens and bathrooms. |
| Design flexibility | They allow unlimited personalization in color, material, and layout for standout renovation projects. |
| Installation basics matter | Correct preparation and material choices are crucial for lasting quality and appearance. |
| Custom inspiration | Hand-cut mosaics work in backsplashes, accent walls, and floors to make any space truly yours. |
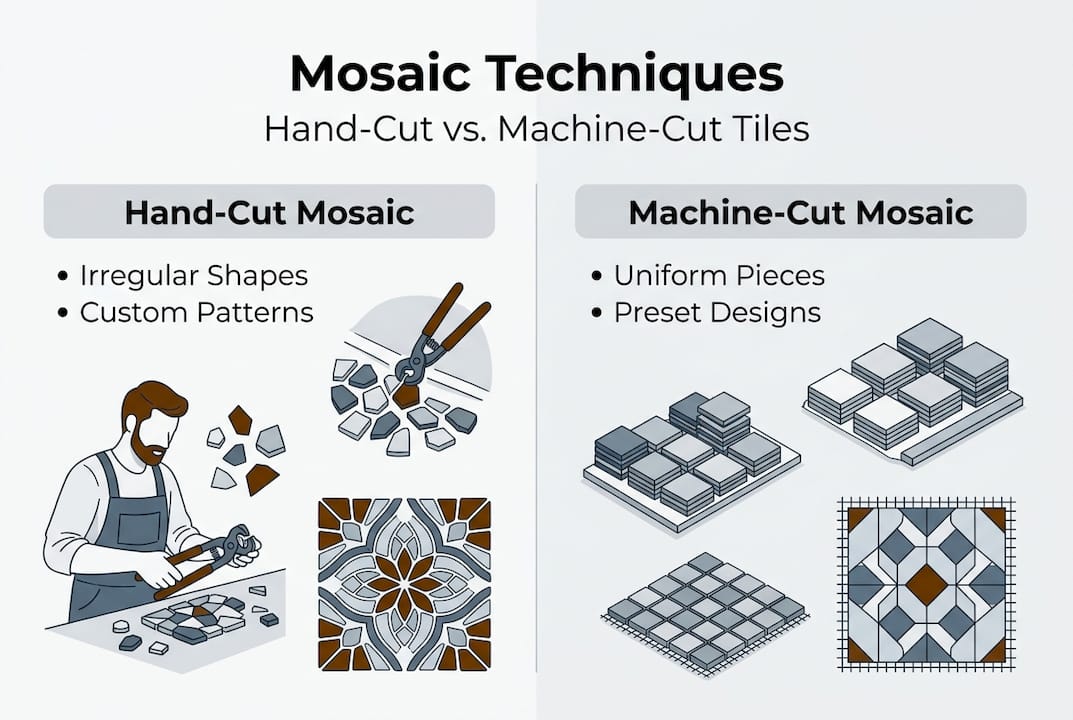
What is a hand-cut mosaic?
A hand-cut mosaic is exactly what it sounds like: a decorative surface made from individual pieces of tile or stone that have been cut by hand, not stamped out by a machine. An artisan uses tools like a tile nipper, a wet saw, or a hammer and hardie (a specialized cutting chisel) to shape each piece to a specific size and angle. The result is a surface with subtle variation in piece shape, edge texture, and spacing that gives the finished installation a richness that machine-cut tiles simply cannot match.
The contrast with sheet mosaics is significant. Machine-cut or mesh-mounted sheet mosaics are produced in uniform grids where every piece is identical in size and spacing. They install quickly and look clean, but they offer little room for custom patterns or organic shapes. Hand-cut mosaic, by contrast, gives you full control over the design. You can curve a border, create a medallion, or blend colors in a gradient that flows naturally across a wall.
Common materials used in hand-cut mosaics include:
- Marble: Rich veining and a polished or honed finish make it a top choice for luxury kitchens and bathrooms
- Travertine: Its natural pits and earthy tones add warmth and texture
- Glass: Reflective and vibrant, ideal for backsplashes and accent walls
- Ceramic and porcelain: Durable, versatile, and available in a wide color range
- Smalti glass: A traditional Italian material used in fine art mosaics, known for its intense color
The basic workflow follows a clear path. First, the design is sketched or mapped on paper. Then each tile piece is hand-cut to shape. The pieces are arranged in the intended pattern, often on a flat surface, before being transferred to mesh backing sheets. As hand-cut mosaic tiles are placed one by one or as small sections onto mesh sheets for custom patterns, the design stays organized during transport and installation. You can explore the full range of options in our guide to types of stone mosaics and learn more about the process in our custom mosaic creation workflow.
| Feature | Hand-cut mosaic | Machine-cut sheet mosaic |
|---|---|---|
| Piece uniformity | Variable, organic | Identical, uniform |
| Design flexibility | Very high | Limited |
| Installation speed | Slower | Faster |
| Artisan character | Strong | Minimal |
| Cost | Higher | Lower |
Why choose hand-cut mosaic for kitchens and bathrooms?
Kitchens and bathrooms are the two rooms where design investment pays off most visibly. They are high-traffic, high-moisture spaces that people use every single day, and they are among the first things buyers notice during a home sale. Hand-cut mosaic fits both demands: it looks extraordinary and it performs well in demanding conditions.
Personalization is the biggest draw. With hand-cut mosaic, you are not selecting from a catalog of preset patterns. You are building something original. Want a Moroccan-inspired star pattern in your shower niche? Done. A subtle ombre effect moving from cream to charcoal across your kitchen backsplash? Absolutely possible. The design potential is only limited by your imagination and your budget.
Here are some of the most popular applications:
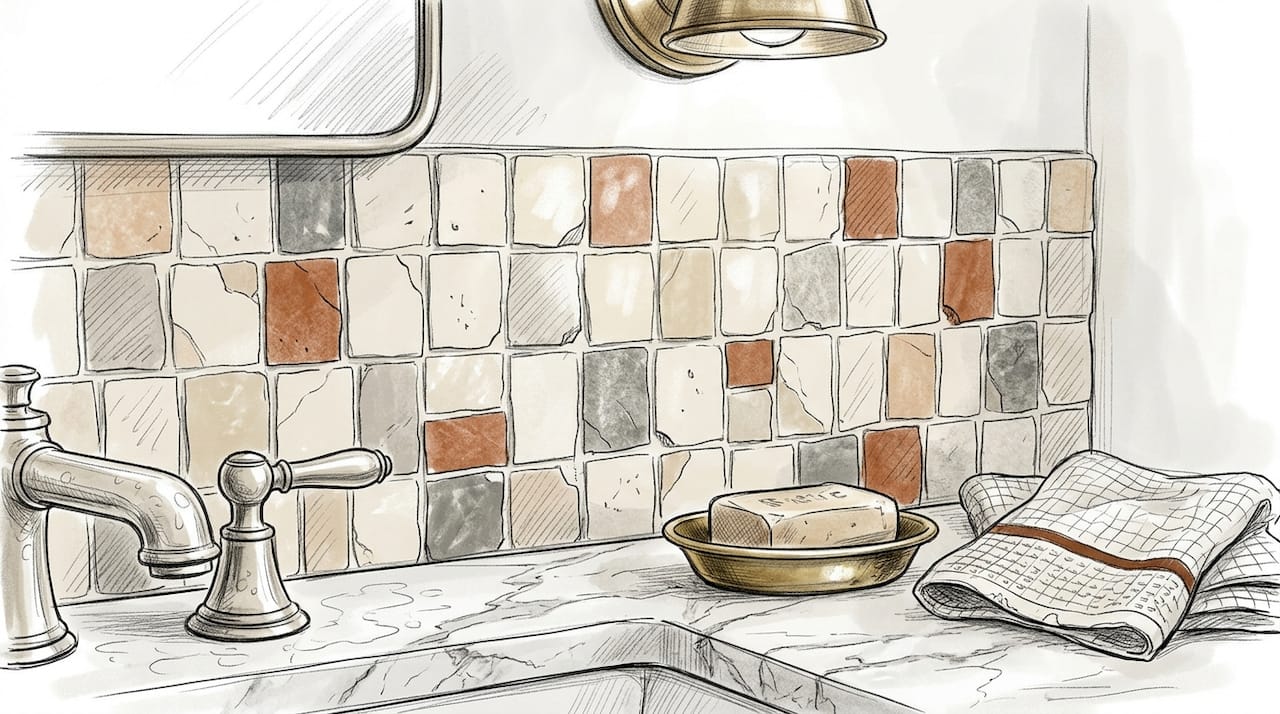
- Kitchen backsplashes: The area behind the stove or sink becomes a focal point rather than a background
- Shower walls and niches: Waterproof and beautiful, mosaics handle steam and splashing without issue
- Bathroom accent walls: A single wall in a bold mosaic pattern can anchor the entire room
- Floor medallions: A hand-cut medallion in the center of a bathroom floor adds a classical elegance
- Outdoor kitchens: Natural stone mosaics hold up well in covered outdoor cooking areas
Durability is another strong argument. Natural stone and quality ceramic are dense, hard materials that resist scratches, stains, and moisture when properly sealed. Polymer-enhanced grout is recommended for hand-cut mosaic installations in wet areas for added durability, and it also resists mold and mildew better than standard grout. You can see more ideas in our guide to creative mosaic tile uses and stay current with bathroom tile trends.
Pro Tip: Always dry-lay your mosaic pieces on the floor or a large table before committing to adhesive. This lets you catch pattern mismatches, color inconsistencies, and spacing issues before they become permanent problems.
| Benefit | Why it matters for kitchens and baths |
|---|---|
| Custom design | Matches your exact vision, not a catalog |
| Water resistance | Safe for showers, backsplashes, wet floors |
| Long lifespan | Natural stone lasts decades with basic care |
| Resale value | Unique tile work is a recognized selling point |
Hand-cut mosaic installation basics
Installing hand-cut mosaics is more involved than laying standard floor tile, but it is manageable with the right preparation and patience. Here is a step-by-step breakdown to help you either tackle it yourself or have a more informed conversation with your installer.
- Plan your layout: Sketch the full design to scale before you buy materials. Know where cuts will fall at edges and corners.
- Prepare the surface: The substrate must be flat, clean, and structurally sound. For wet areas, use cement board or a waterproofing membrane beneath the tile.
- Dry-lay the pattern: Arrange all pieces on the floor in the intended pattern. Adjust spacing and alignment before any adhesive touches the wall.
- Select the right adhesive: Use a white polymer-modified thinset for light-colored stone. Gray thinset can bleed through and discolor translucent materials like marble or glass.
- Apply adhesive and set tiles: Work in small sections. Press each mesh sheet firmly into the adhesive with a grout float or tile beater board.
- Allow full cure time: Let the adhesive cure for at least 24 hours before grouting. Rushing this step leads to tile movement and cracked grout.
- Grout the joints: Use unsanded grout for joints under 1/8 inch and sanded grout for wider gaps. In wet areas, polymer-enhanced grout is the professional standard.
- Clean and seal: Wipe off grout haze with a damp sponge before it hardens. Seal natural stone after grouting to protect against staining.
As surface preparation, proper adhesive, and correct grout are critical for long-lasting results in kitchens and baths, skipping any of these steps is the most common reason DIY projects fail. Our backsplash mosaic DIY workflow and stone mosaic installation guides walk through each stage in detail, and our mosaic grout selection guide helps you pick the right product for your specific project.
“Measure twice, cut once” is not just a woodworking rule. In mosaic work, a single miscalculated cut on a hand-shaped marble piece can waste expensive material and throw off an entire pattern. Precision is always worth the extra minute.
Pro Tip: When working around curved surfaces like a rounded shower niche, score the back of the mesh sheet with a utility knife so it can flex and conform to the curve without buckling.
Design inspiration: creative ways to use hand-cut mosaics
With installation covered, it is time to spark your imagination. Hand-cut mosaics are not just functional surfaces. They are a medium for personal expression, and the design possibilities are genuinely exciting.
As hand-cut mosaics allow for unique, customized designs in backsplashes, floors, and accent walls, the real question is not whether you can do something creative, but which creative direction fits your home best.
Here are some design directions worth considering:
- Ombre accent walls: Transition from a deep navy at the base to soft sky blue at the top of a shower wall. The hand-cut variation in each piece makes the gradient feel organic, not printed.
- Medallion floors: A circular or geometric medallion centered in a bathroom floor creates an immediate focal point. Marble and travertine are the classic choices.
- Backsplash as art: Instead of a uniform grid behind your stove, commission a hand-cut scene, a botanical motif, or an abstract geometric pattern that becomes the centerpiece of the kitchen.
- Mixed material borders: Combine marble with glass or travertine with ceramic to create borders or frames around mirrors, windows, or doorways.
- Shower niche features: A small niche lined in a contrasting hand-cut mosaic pattern draws the eye and adds a luxury hotel feel to an everyday bathroom.
- Matching grout strategy: Use grout that matches your tile color for a seamless, monolithic look. Choose a contrasting grout color to highlight the individual pieces and celebrate the hand-cut character.
Our custom mosaic design guide is a great resource for turning inspiration into a concrete plan. If you are also deciding on flooring, our guide on how to pick floor tiles covers material and scale decisions that pair well with mosaic work. For a full room approach, the bathroom tile design workflow helps you coordinate every surface cohesively.
Why hand-cut mosaics offer more than meets the eye
Most remodelers approach tile as a background decision. They pick something neutral, something safe, something that will not offend future buyers. That thinking makes sense for flooring in a hallway. It makes much less sense for a kitchen backsplash or a master bath shower that you will look at every single morning.
Hand-cut mosaics force a different kind of decision-making. You cannot just click “add to cart” and call it done. You have to think about color relationships, pattern scale, material texture, and how natural light will interact with the surface at different times of day. That process, even when it feels slow, produces results that feel genuinely personal.
We have also seen something interesting in projects that use hand-cut stone: the slight imperfections in piece shape and spacing are not flaws. They are the signature of the work. A perfectly uniform machine-cut grid reads as a product. A hand-cut surface reads as a decision, a statement, something chosen with care. That distinction matters more than most people expect when they are living with the result every day.
Focus on quality in the statement pieces and keep surrounding surfaces quieter. One extraordinary hand-cut feature wall does more for a room than three mediocre ones. Our custom mosaic design lessons reinforce this principle with real project examples.
Bring your hand-cut mosaic vision to life
You now have a solid foundation for understanding, planning, and designing with hand-cut mosaics. The next step is finding the right materials and support to make it real.
At SurfacesGalore, we carry an extensive selection of natural stone mosaics, including marble, travertine, and specialty decorative pieces that work beautifully in hand-cut applications. Whether you are browsing for inspiration or ready to order for a specific project, our team is here to help. Our mosaic creation guide is a free resource that walks you through the full design and ordering process. Reach out directly if you want project-specific recommendations. We ship nationwide and love helping homeowners bring ambitious ideas to life.
Frequently asked questions
What makes a hand-cut mosaic different from other tiles?
Hand-cut mosaics are created by individually shaping and placing each piece, resulting in custom patterns and greater design flexibility than mass-produced sheet tiles. As hand-cut tiles are placed one by one or on mesh, each installation is genuinely unique.
Is a hand-cut mosaic suitable for wet areas like showers?
Yes, hand-cut mosaics are ideal for wet areas when installed with proper adhesives and polymer-enhanced grout for durability. Polymer-enhanced grout is best for wet areas with hand-cut mosaics.
Can I install a hand-cut mosaic by myself as a DIY project?
With basic tiling skills, the right tools, and attention to detail, most homeowners can complete small hand-cut mosaic installations themselves. Homeowners can successfully install hand-cut mosaics by following proper preparation steps.
How do I clean and maintain a hand-cut mosaic surface?
Clean hand-cut mosaics with a soft cloth, mild detergent, and avoid harsh chemicals or abrasive tools to maintain their appearance. Sealing natural stone annually adds an extra layer of protection against staining and moisture.
How long does it take to install a hand-cut mosaic in a kitchen or bath?
Installation times vary by design complexity but expect at least a few days for preparation, dry-laying, setting, and grouting. Pattern planning and proper installation require time for best results.
Leave a comment