
Top Marble Tile Mistakes Contractors Still Make in 2026

Marble tiles look amazing, right? They add a touch of class to any room. But getting them installed perfectly isn't always as easy as it seems. Even experienced contractors can mess up. We're talking about the Top Marble Tile Mistakes Contractors Still Make. Let's go over some common slip-ups so you know what to look out for, or maybe avoid if you're doing it yourself.
Key Takeaways
- Using the wrong thinset mortar or not applying it correctly can lead to tiles not sticking well.
- Not using the right trowel size or technique with thinset can cause weak spots and unevenness.
- Cutting marble without the proper diamond blade or wet saw can result in chipped edges and wasted material.
- Failing to use a stone sealer after installation leaves marble vulnerable to stains and damage.
- Not preparing the subfloor properly with cement backer board can cause tiles to crack or shift later on.
1. Thinset Mortar
You wouldn't build a house on sand, right? The same goes for your stunning marble tiles. The adhesive you choose, specifically the thinset mortar, is absolutely critical. Using the wrong type or applying it incorrectly is a fast track to cracked tiles, uneven surfaces, and a costly redo. We see it all the time – contractors cutting corners here, and it never ends well.
The right thinset mortar is non-negotiable for a lasting, beautiful marble installation. It needs to be specifically formulated for natural stone. Why? Because marble is porous and can discolor if it reacts with certain adhesives. Always opt for a high-quality thin-set mortar designed for marble. If you're working with lighter colored tiles, a white thinset is your best bet to prevent any gray undertones from showing through. It's a small detail that makes a huge visual difference.
Think of it like this:
- Compatibility is Key: Always check that your thinset is rated for natural stone. Generic mortars just won't cut it.
- White for Light: Light marble? Use white thinset. It's that simple.
- Mix It Right: Follow the manufacturer's instructions precisely. Too much water weakens it, too little makes it unworkable.
We had a client, Sarah, who wanted a luxurious bathroom with Carrara marble. Her contractor, unfortunately, used a standard tile adhesive. Within six months, she started seeing dark spots and some tiles loosened. It was a classic case of incompatible materials. Replacing it involved not just new tiles but also repairing the subfloor. A bit of research and the right choice of thinset, like those you can find when you buy marble tiles online USA, would have saved her a lot of headaches and money.
Proper thinset application means creating a solid bond across the entire back of the tile. This prevents hollow spots, which can lead to cracking under pressure. A slight wiggle as you set the tile helps achieve this full coverage.
Don't let a cheap or incorrect mortar ruin your investment. Choosing the right thinset is the first step to a flawless finish and a tile job that stands the test of time. It's a small part of the process, but it has a massive impact on the final result. Make sure your contractor understands this, or better yet, ensure they're using the best materials available for your project.
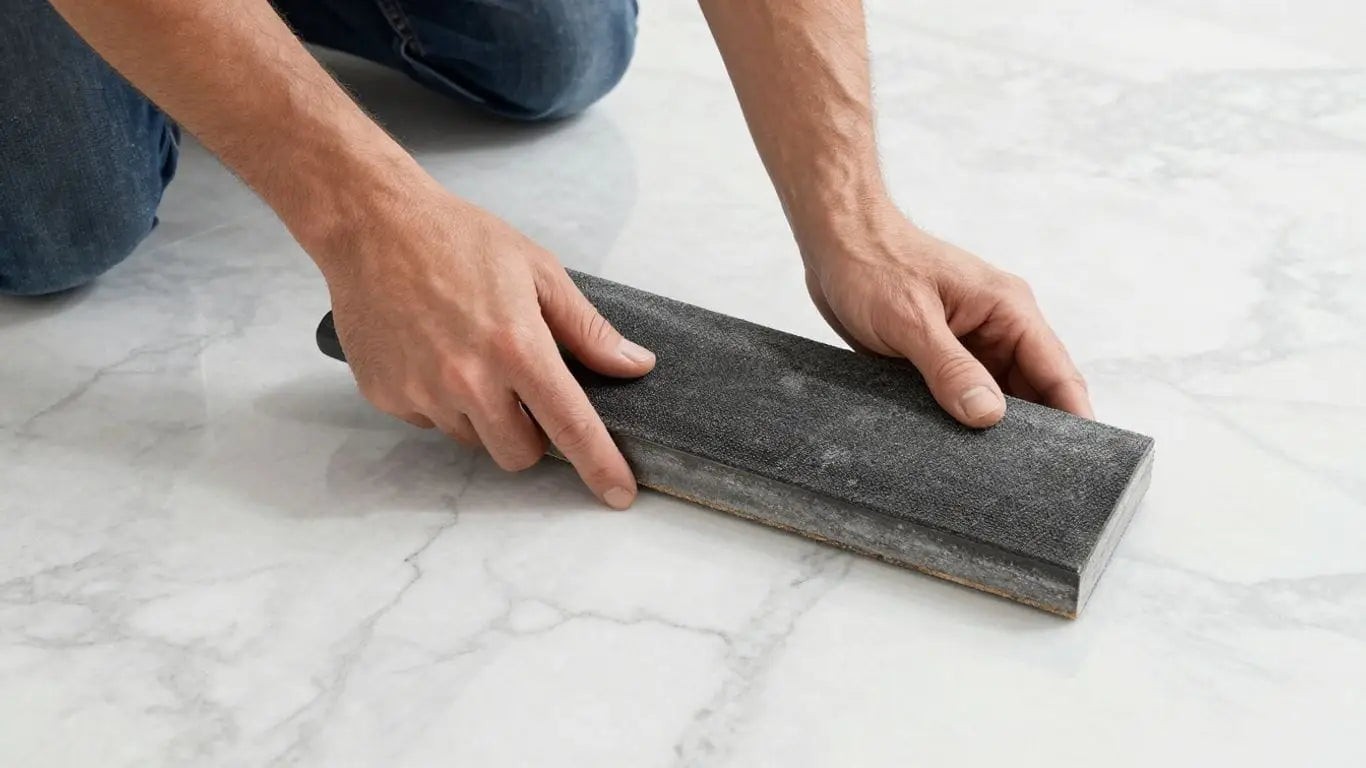
2. Notched Trowel
You'd think this one is obvious, right? But you'd be surprised how many contractors still mess this up. Using the wrong trowel, or using it incorrectly, is a fast track to tile failure. We're talking about the notched trowel, your best friend when it comes to applying thin-set mortar. It's not just about spreading the stuff; it's about creating those uniform ridges that allow for proper adhesion and air release.
The size and shape of the notches matter. Too small, and you won't get enough coverage. Too big, and you'll have way too much mortar, leading to potential 'squeeze-out' and unevenness. For marble tiles, especially larger ones, you need a trowel that can create a consistent, full-bed bond. This is where a good quality notched trowel, often paired with back-buttering each tile, makes all the difference. It’s a simple step, but it’s critical for a lasting installation. If you're looking to buy marble tiles online in the USA, make sure you're also getting the right tools to install them properly.
Think about it: you've invested in beautiful marble, maybe some elegant Bardiglio Imperiale Marble tiles, and you want them to last. A proper trowel technique ensures that the mortar grips the tile and the substrate firmly. Without it, you risk hollow spots, which can lead to cracking down the line. It’s a small detail that has a huge impact on the longevity and appearance of your finished floor or wall.
Here’s a quick rundown on why the right trowel is non-negotiable:
- Consistent Coverage: Creates even ridges for full mortar contact.
- Air Release: Helps eliminate air pockets that weaken the bond.
- Adhesion: Maximizes the surface area for a strong, lasting connection.
- Lippage Prevention: Contributes to a flatter, more even surface when used correctly with leveling systems.
A contractor once told me he just used a flat trowel because it was faster. Faster, maybe, but his callbacks were even faster. You can't cut corners on the basics, especially with natural stone. It demands respect and the right tools.
Case Study: A homeowner in Chicago invested in stunning Tundra Gray Marble for their kitchen. The initial contractor, rushing the job, used a trowel with worn-out notches. Within six months, several tiles began to loosen and crack. A second opinion revealed the poor adhesion due to inadequate mortar coverage. The fix involved removing and re-tiling the entire floor, a costly and time-consuming lesson in tool selection. The second installer, a seasoned pro, emphasized the importance of the notched trowel and proper technique, ensuring the new installation was solid and beautiful for years to come. This is why we always recommend checking out quality tile installation tools to ensure your project is done right the first time.
3. Diamond Blade
Cutting marble tiles can feel like a gamble. You’ve picked out the perfect slabs, maybe even snagged a great deal on clearance marble tiles online USA, and now it’s time for the cuts. This is where many projects go south. A dull or incorrect blade can chip, crack, or just make a mess of your beautiful stone. The right diamond blade is non-negotiable for a clean, professional finish.
Think of your diamond blade as the surgeon’s scalpel for your marble. It needs to be sharp, precise, and designed for the material. Using a blade meant for ceramic or even basic stone will lead to frustration and wasted material. We’ve seen it happen: contractors rushing a cut with the wrong blade, only to end up with jagged edges that ruin the aesthetic and require costly repairs or replacements.
Why a Diamond Blade is Key:
- Precision: Diamond blades cut through hard materials like marble with minimal effort.
- Clean Edges: They produce smooth, chip-free edges, which is vital for marble where edges might be visible.
- Efficiency: A good blade cuts faster and more cleanly, saving you time and reducing material waste.
Case Study: The Flipped Vanity Top
A client in San Diego was installing a marble vanity. They opted for a budget-friendly option and bought tiles online. During the cut for the sink cutout, the contractor used a standard tile blade. The marble chipped badly on the front edge, making it impossible to use. They had to order a whole new tile, plus pay for expedited shipping. If they had used a proper diamond blade designed for natural stone, that costly mistake could have been avoided. It’s a classic example of how the right tool saves money and headaches.
When you’re ready to buy marble tiles online, remember to factor in the cost of a quality diamond blade. It’s an investment that pays off in the quality of your finished work. Don't let a bad cut be the reason your stunning marble installation looks anything less than perfect. For the best results, always pair your diamond blade with a wet saw to keep the blade cool and minimize dust.
4. Grout Float
You've laid your beautiful marble tiles, and they look stunning. But wait, there's a critical step before you can truly admire your work: grouting. This is where the grout float comes in, and frankly, many contractors still mess this up. It's not just about slapping grout into the gaps; it's about doing it right.
A good grout float is your best friend for achieving professional-looking grout lines. Using the wrong technique or tool here can lead to uneven joints, grout pushed too deep, or worse, grout scraped off entirely. We've seen it happen – beautiful marble tiles ruined by sloppy grout work. It’s a shame, especially when you can buy marble tiles online in the USA and have them delivered to your door, only to have the final look compromised.
Why the Grout Float Matters:
- Even Application: It helps spread the grout evenly across the tile surface and into the joints. Think of it like frosting a cake – you want smooth, consistent coverage.
- Proper Depth: The rubber edge of the float is designed to pack the grout into the joints without digging too deep or leaving air pockets. This is key for durability and preventing future cracks.
- Excess Removal: It's also your primary tool for scraping off the bulk of the excess grout from the tile faces, working at a diagonal to the tile lines. This makes the subsequent cleaning much easier.
Common Grout Float Fails:
- Scraping Too Hard: Gouging out grout from the joints instead of just removing the excess from the tile surface.
- Working Against the Joints: Not holding the float at a consistent 45-degree angle to the tile edges, which can lead to uneven lines.
- Not Cleaning Enough: Leaving too much grout residue on the tiles, making the final cleanup a nightmare.
Case Study: A client in Miami hired a contractor who rushed the grouting process. He used a basic putty knife instead of a proper grout float. The result? Grout lines were inconsistent, some too deep, others barely filled. The beautiful Calacatta marble looked messy and unfinished. We had to go back in, carefully remove the poorly applied grout, and re-grout using the correct tools and techniques, including a high-quality grout float. The difference was night and day.
Another instance involved a contractor who used a grout float but didn't clean it often enough. The thick, semi-hardened grout smeared across the tiles, creating a hazy film that was incredibly difficult to remove. This is why rinsing your float frequently is non-negotiable.
Don't let a simple tool like the grout float be the downfall of your stunning marble installation. Invest in a good one, learn the technique, and your grout lines will be as perfect as the tiles themselves. If you're looking for premium marble to install, remember to check out options to buy marble tiles online in the USA.
5. Tile Spacers
You've picked out the perfect marble tiles – maybe it's the classic Carrara or the dramatic Calacatta Gold. You're ready to lay them down and create that stunning floor or backsplash. But wait! Are you forgetting something? Those little plastic or wooden pieces might seem insignificant, but they are absolutely critical. We're talking about tile spacers.
These small but mighty tools are the secret to achieving perfectly uniform grout lines, which is essential for a professional, high-end look, especially with natural stone like marble. Without them, you risk uneven gaps that can make even the most beautiful tiles look sloppy. It's like trying to build a perfect wall without a level – you might get close, but it won't be quite right.
Why are they so important for marble?
- Consistency is Key: Marble tiles, with their natural veining and color variations, demand precision. Spacers ensure that each tile is placed at the exact same distance from its neighbors, creating a harmonious visual flow.
- Preventing Lippage: Consistent spacing helps prevent
6. Leveling Clips
Uneven marble tiles? That's a contractor's nightmare, and a homeowner's headache. It's called lippage, and it's a common mistake that makes even the most beautiful marble look cheap. Leveling clips are your best friend here. They're small but mighty tools that ensure each tile sits perfectly flush with its neighbors. No more tripping hazards or grout lines that look like they're doing their own thing.
Think about it: you've invested in stunning marble, maybe you even decided to buy marble tiles online USA after seeing the selection. You want that seamless, luxurious finish, right? Without leveling clips, especially with larger format tiles, you're practically inviting lippage. It's a simple fix that makes a massive difference.
Why Leveling Clips Matter:
- Eliminates Lippage: This is the big one. Perfectly flat surfaces are key for marble.
- Consistent Grout Lines: Helps maintain even spacing for a clean look.
- Faster Installation: Can speed up the process by holding tiles in place.
- Professional Finish: The difference between a DIY job and a pro install.
Case Study: The 'Oops' Kitchen
A client of ours, let's call him Mark, was installing a gorgeous Calacatta marble backsplash. He skipped the leveling clips, thinking it was an unnecessary step for a backsplash. Big mistake. The tiles ended up slightly uneven, and the grout lines looked inconsistent. It wasn't terrible, but it wasn't the high-end look he paid for. We went back in and used leveling clips to fix it, and the transformation was night and day. Mark learned that even for backsplashes, these little guys are game-changers.
Another time, a contractor friend was doing a large marble floor. He was rushing and didn't use a proper leveling system. Weeks later, some tiles started to chip at the edges because they weren't fully supported. That's a costly repair that could have been avoided with a few dollars worth of clips. Don't let that be you. Investing in leveling clips is a small price to pay for a flawless, durable marble installation. It's a pro move that guarantees a stunning result, every time. Make sure you're not making this common mistake; check out the wide range of marble tiles available at Surfaces Galore to start your project right.
7. Wet Saw
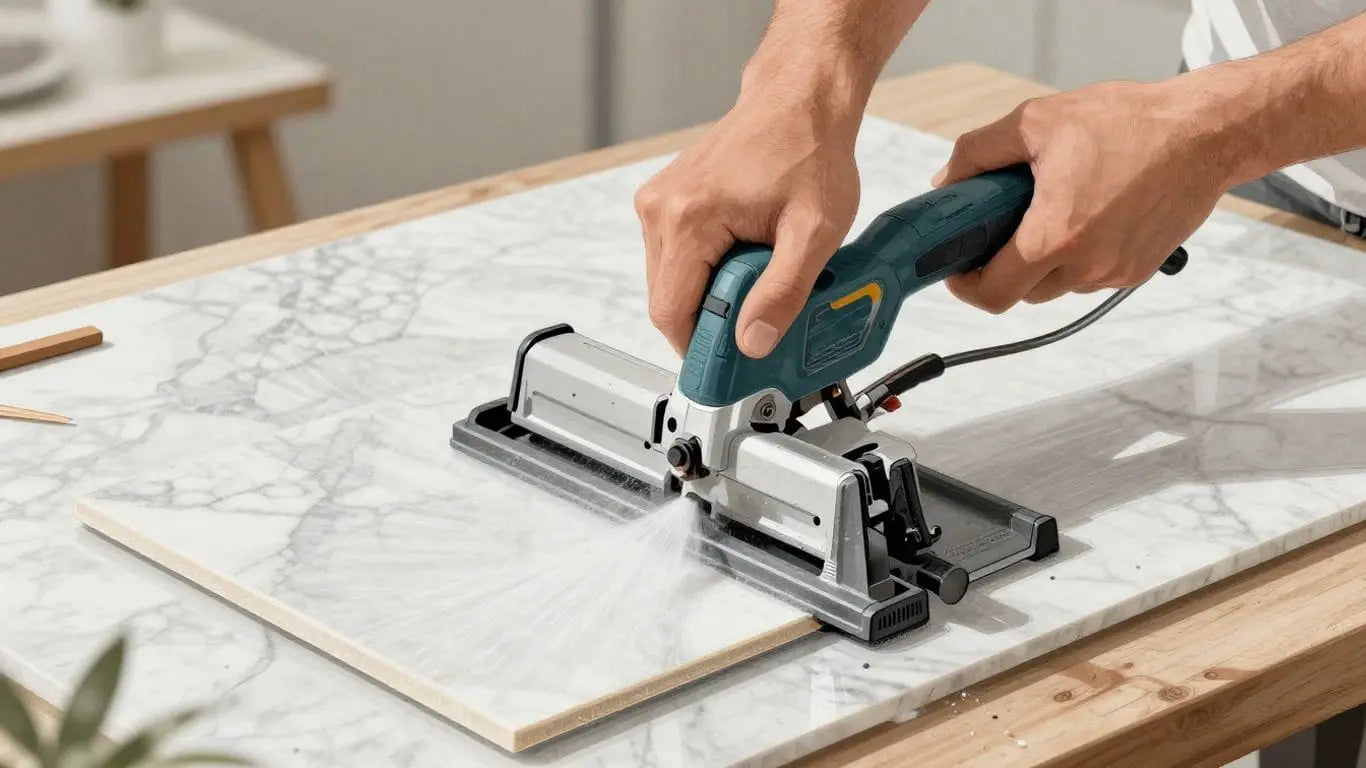
Cutting marble tile isn't like cutting wood. You need the right tool for a clean, precise edge. That's where a wet saw comes in. Trying to cut marble with a standard tile cutter or, worse, a hammer, is a recipe for disaster. You'll end up with chipped edges, wasted material, and a lot of frustration.
A professional-grade wet saw, equipped with a diamond blade, is your best friend for any marble installation. It uses water to keep the blade cool and to control the dust, which is a big deal for both safety and the quality of your cut. Don't skimp on this tool; it's an investment that pays for itself.
Why a Wet Saw is Non-Negotiable:
- Precision Cuts: Achieve clean, straight lines every time, even on intricate patterns.
- Chip Prevention: Marble is brittle. A wet saw minimizes chipping, keeping your tiles looking pristine.
- Dust Control: Water lubrication significantly reduces airborne dust, creating a safer work environment.
- Efficiency: Faster and more accurate cuts mean less time spent on tedious tasks.
Case Study: A contractor in Miami was installing a high-end marble floor. He decided to try a cheaper, manual tile cutter for some of the smaller cuts, thinking it would save time. The result? Cracked tiles and uneven edges that required him to buy extra material. He ended up losing money and time. After switching to a proper heavy-duty tile saw, the rest of the job went smoothly, and he learned a valuable lesson about using the right equipment for natural stone.
When you're ready to buy marble tiles online in the USA, make sure you also have access to a reliable wet saw. It's the difference between a professional finish and a DIY disaster. For the best results, always use a blade specifically designed for stone. You can find a wide selection of marble tiles and the tools you need to install them at places like Surfaces Galore. They offer everything from Carrara White to Bardiglio Imperiale, and their team can help you find the perfect fit for your project.
8. Damp Sponge
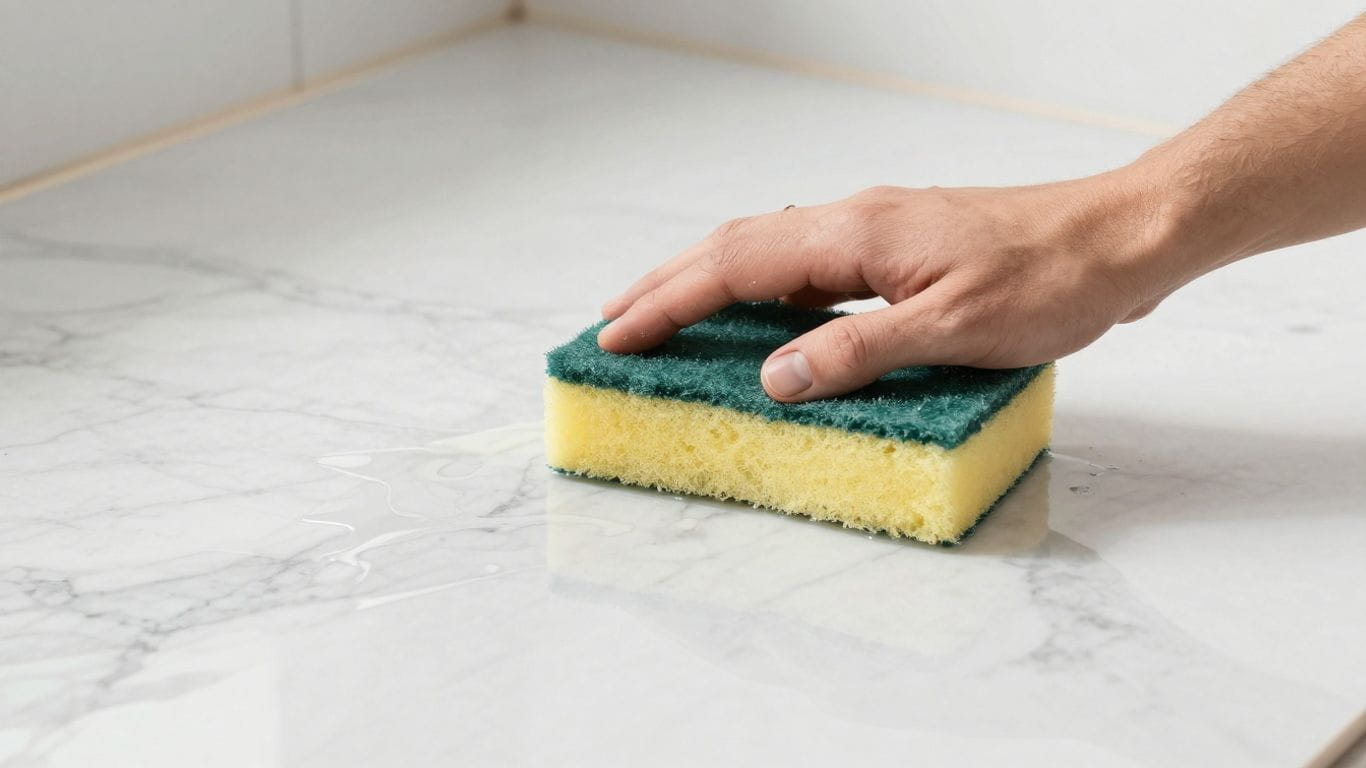
Don't underestimate the power of a simple damp sponge. It's your best friend when it comes to cleaning up excess grout. Get it wrong, and you'll be left with a hazy mess on your beautiful marble tiles.
The right technique is key: use a damp sponge to wipe away excess grout from the tile surfaces, but be careful not to pull grout out from the joints. Rinse your sponge often. This step is critical for a clean finish.
Think of it like this: you've spent time and money picking out stunning marble tiles, maybe some classic Carrara White or elegant Bardiglio Imperiale Marble. You've carefully installed them, and now it's time for the final clean. A sloppy grout cleanup can ruin the whole look.
Case Study 1: A homeowner in Chicago was installing a marble backsplash. They rushed the grout cleanup, leaving a cloudy film on the tiles. It looked dull and unfinished. After re-cleaning with a properly damp sponge and frequent rinsing, the marble's natural beauty shone through.
Case Study 2: A contractor installing a marble floor in a high-end bathroom in Los Angeles used a sponge that was too wet. They ended up washing too much grout out of the joints. This created weak spots and an uneven appearance. The fix involved re-grouting those sections, costing extra time and money.
Remember, a clean tile installation is a professional tile installation. For the best results, always buy marble tiles online USA from reputable suppliers. You can find great options at Surfaces Galore, offering everything from mosaic marble to premium Italian marble.
9. Stone Sealer
Look, we've all seen it. Beautiful marble tiles installed, grout lines perfect, everything looks great. Then, a few months later, a dark spot appears from a spilled glass of wine, or a faint ring from a wet cup. That's where a good stone sealer comes in. It's not just an optional extra; it's a vital step for protecting your investment.
Marble and travertine are natural stones, which means they're porous. Think of them like a sponge. Without sealing, they can easily soak up liquids, leading to stains and discoloration. A quality sealer creates a barrier, giving you more time to clean up spills before they become permanent marks. This simple step can save you a lot of headaches and money down the road.
Why Sealing Matters:
- Stain Prevention: It stops spills like wine, oil, or coffee from penetrating the stone.
- Moisture Protection: Helps prevent water damage and efflorescence (white powdery deposits).
- Easier Cleaning: Makes routine cleaning simpler and more effective.
- Preserves Appearance: Keeps your marble looking its best for years to come.
Sealing Frequency:
How often you need to reseal depends on the sealer used and the traffic the area gets. For most residential applications, sealing once a year is a good rule of thumb. High-traffic areas might need it more often. Always check the manufacturer's instructions for your specific sealer. If water stops beading up on the surface, it's probably time to reseal.
Case Study 1: A homeowner in Miami installed a stunning Crema Marfil marble floor in their kitchen. They skipped the sealing step, thinking it was unnecessary. Within six months, a cooking oil spill left a permanent dark stain that couldn't be removed. A simple sealing application beforehand would have prevented this costly repair.
Case Study 2: A contractor in Austin, Texas, completed a bathroom renovation using Bardiglio Imperiale marble tiles. They sealed the tiles as part of the process. When a shampoo bottle leaked, the liquid beaded up on the surface, allowing the homeowner to wipe it away without any damage to the marble. This saved both the client and the contractor from a potential callback.
Don't let a preventable mistake ruin the beauty of your marble. Make sure sealing is part of your installation process. If you're looking to buy marble tiles online in the USA, remember to factor in the cost and importance of a good quality stone sealer. It's a small price to pay for long-term protection and peace of mind. You can find excellent options for natural stone sealers that are specifically formulated for marble and travertine.
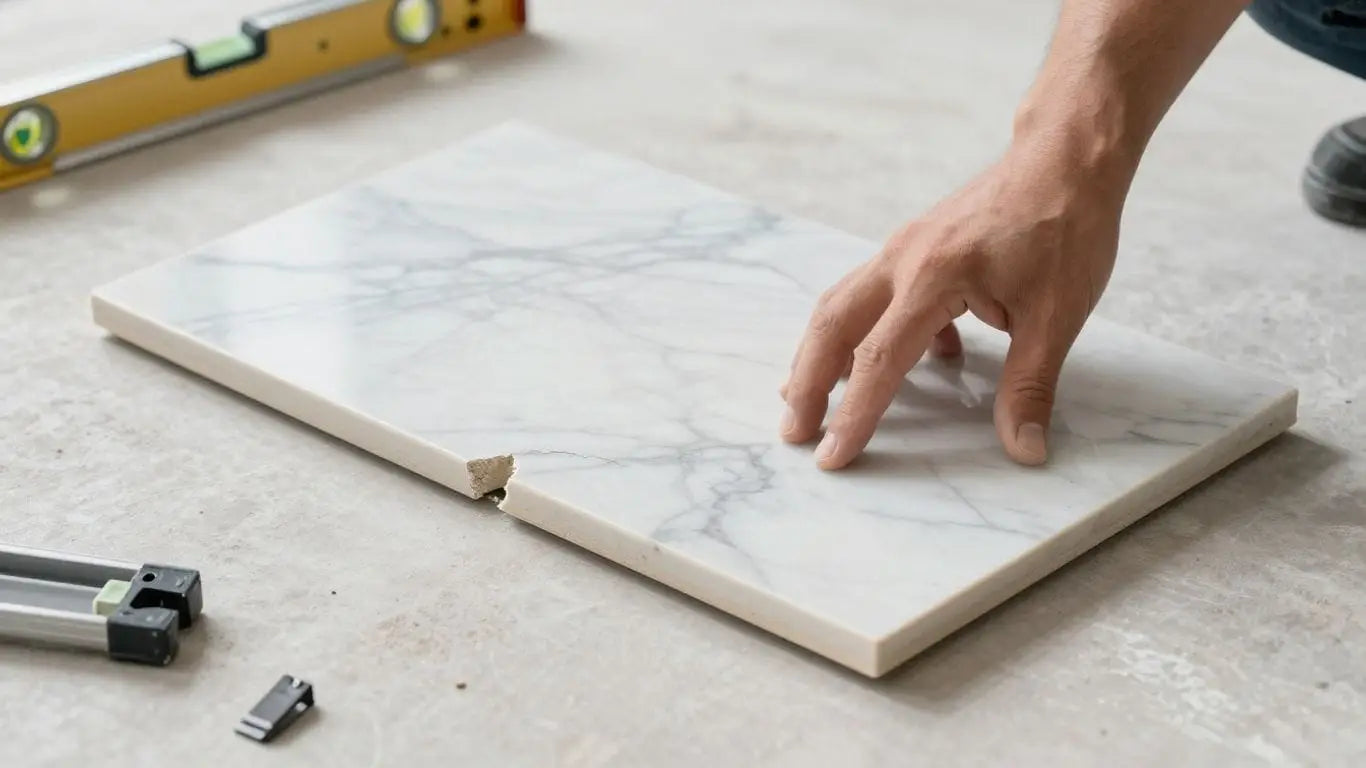
10. Cement Backer Board
Don't skip the cement backer board. Seriously. This is where so many projects go wrong, leading to cracked tiles and unhappy clients. Marble is beautiful, but it's also heavy and can be brittle. It needs a solid, stable foundation. That's where cement backer board comes in. It acts as a stable, moisture-resistant layer between your subfloor and the tile. Without it, your subfloor can flex, especially with wood, and that movement will transfer right up to your gorgeous marble tiles, causing them to crack or pop loose. Think of it as the unsung hero of a long-lasting marble installation.
A stable substrate is non-negotiable for marble.
Why is it so important?
- Prevents Cracking: It provides a rigid surface that minimizes subfloor movement, a major cause of tile failure.
- Moisture Resistance: Unlike drywall, cement backer board doesn't break down when exposed to moisture, making it ideal for bathrooms and kitchens.
- Adhesion: It creates a consistent surface for your thin-set mortar to bond to, leading to a stronger installation.
Case Study 1: A homeowner in Phoenix decided to save a few bucks by skipping the backer board on their bathroom floor. Within six months, hairline cracks started appearing in their beautiful marble tiles. The subfloor, exposed to normal bathroom humidity, had warped slightly, and the marble couldn't handle the flex. The fix? Ripping out the entire floor and starting over – a much more expensive lesson.
Case Study 2: A contractor in Austin installed marble in a high-traffic entryway. They used a standard plywood subfloor without a cement backer board. Heavy foot traffic and the weight of the marble tiles caused the subfloor to flex over time. This led to grout lines cracking and several tiles becoming loose. The client was understandably upset, and the contractor had to redo the entire entryway, costing them significant time and money.
When you're looking to buy marble tiles online in the USA, remember that the quality of the installation is just as important as the quality of the tile itself. Using cement backer board is a small investment that pays huge dividends in durability and customer satisfaction. Don't cut corners here – your clients (and their beautiful marble) will thank you.
When setting up your tiles, using cement backer board is a smart move. It gives your tiles a solid base to stick to, preventing cracks and making sure they last longer. Think of it as a strong foundation for your beautiful tile work. Ready to get started with the best materials for your project? Visit our website today to explore our selection!
Wrapping Up Your Marble Project
So, we've gone over a few common slip-ups people make when working with marble tiles. It's easy to get excited about how beautiful marble looks, but remember, it's a natural stone and needs a bit of extra care during installation. Paying attention to the details, like prepping your surface right and using the correct materials, really makes a difference in the long run. Don't forget to inspect your tiles before you start laying them, and always plan your layout. Doing these things helps avoid headaches later and makes sure your beautiful marble looks great for years to come. If you're ever unsure, reaching out to a pro or a trusted supplier like Surfaces Galore can save you a lot of trouble. Happy tiling!
Frequently Asked Questions
Why is using the right thinset mortar so important for marble tiles?
Using the correct thinset mortar is key because marble is a natural stone that can sometimes change color if the wrong type of mortar is used. For lighter marble, a white mortar is best to avoid any gray showing through. It also needs to bond well to keep the tiles from coming loose later.
How does the size of the notched trowel affect marble tile installation?
The notched trowel spreads the mortar onto the surface. Using the right size helps create the perfect amount of coverage on the back of each tile. If the notches are too small or too big, you might end up with gaps or too much mortar, which can lead to problems down the road like cracked tiles.
What's the best way to cut marble tiles without chipping them?
Cutting marble requires a special tool called a wet saw, which uses a diamond blade. This blade is designed to cut through hard stone smoothly. It's important to go slow and steady, and make sure the saw has water to keep the blade cool and reduce dust. Rushing can cause the marble to chip or break.
When should I use a grout float and how do I use it?
A grout float is used after the tiles are set and the adhesive has dried. You use it to push the grout into the spaces between the tiles. It's important to hold it at an angle and move it across the tiles to make sure all the gaps are filled completely. You'll then use it to scrape off the extra grout.
Are tile spacers really necessary when installing marble?
Yes, tile spacers are very important! They help ensure that the space between each tile is the same size. This creates neat, even grout lines, which makes the whole floor or wall look professional and clean. Without them, your lines might be crooked or uneven.
What are leveling clips and why would a contractor use them?
Leveling clips are small tools that help make sure your marble tiles are perfectly flat and even with each other. This is especially helpful with larger tiles or when the subfloor isn't perfectly flat. They prevent one tile from sticking up higher than another, which is called 'lippage' and can be a tripping hazard.
Why is a wet saw recommended over other saws for cutting marble?
A wet saw is specifically designed for cutting hard materials like marble. It uses a continuous stream of water to cool the diamond blade and wash away dust and debris. This prevents the blade from overheating, reduces airborne dust (which is healthier), and helps create cleaner, smoother cuts without chipping the delicate edges of the marble.
How should a damp sponge be used during the grouting process?
After applying the grout with a float, you use a damp (not soaking wet) sponge to carefully wipe away the excess grout from the surface of the tiles. It's crucial to rinse the sponge very often in clean water and wring it out well. This prevents you from pulling too much grout out of the lines, which needs to stay put to bond the tiles.
Leave a comment