
Seal travertine like a pro: Step-by-step workflow

TL;DR:
- Proper surface preparation and drying are critical for effective travertine sealing and long-term protection.
- Routine testing with water beads and oil ensures sealant effectiveness and timely resealing.
- Surface cleaning, void filling, and correct sealer choice are more important than brand for durability.
Travertine is one of the most beautiful natural stones you can install, but one poorly sealed surface can turn that investment into a maintenance nightmare. Homeowners and contractors who skip or rush the sealing process often discover oil stains that won’t lift, water rings etched into the stone, and permanent discoloration that shows up only weeks after installation. Fixing those problems later costs far more in time, materials, and heartache than doing it right the first time. This guide walks you through the complete workflow, from gathering the right supplies and prepping the surface all the way to testing the seal and knowing exactly when to reseal, so your travertine stays protected and looks stunning for years.
Table of Contents
- What you need before you start
- Step-by-step travertine sealing workflow
- Testing, verification, and resealing schedule
- Troubleshooting and common mistakes to avoid
- The real secret to flawless travertine sealing: Expert insights
- Ready to transform your travertine? We can help
- Frequently asked questions
Key Takeaways
| Point | Details |
|---|---|
| Preparation is crucial | Proper cleaning, repairing, and drying lay the groundwork for the best sealing outcome. |
| Follow a proven workflow | Applying sealer in small sections with proper wait times ensures maximum protection and beautiful results. |
| Verification prevents problems | Test sealed travertine with water and oil to confirm protection before heavy use. |
| Maintenance extends lifespan | Regular resealing and surface care maintain your travertine’s appearance and durability. |
| Avoid common mistakes | Skipping key steps or using the wrong products can ruin even the finest stone surfaces. |
What you need before you start
Getting your preparation right is where most DIY sealing projects either succeed or fall apart. Before you open a single bottle of sealer, you need the correct tools, a thorough understanding of your specific travertine surface, and any repair work done in advance.
Supply checklist
Having everything at hand before you start prevents mid-job shortcuts that compromise results. Here is everything you need:
- Penetrating (impregnating) sealer suited for natural stone
- pH-neutral stone cleaner (never acidic or alkaline products)
- Matching travertine filler or epoxy compound for voids
- Lint-free application cloths or a foam applicator pad
- A brush or roller for larger surface areas
- Painter’s tape to protect grout lines and adjacent surfaces
- Scraper and denatured alcohol for removing old sealer
- Plastic sheeting to protect nearby furniture or cabinetry
- Rubber gloves and safety glasses
- Fans or dehumidifier to assist drying in humid climates
Assessing your travertine before you touch the sealer
Travertine is a naturally porous stone formed from calcium carbonate deposits. Its signature look comes from the small holes and voids that run through the surface. Understanding whether your tiles are tumbled, honed, brushed, or filled and honed travertine directly affects how much sealer you will need and how many coats to apply.
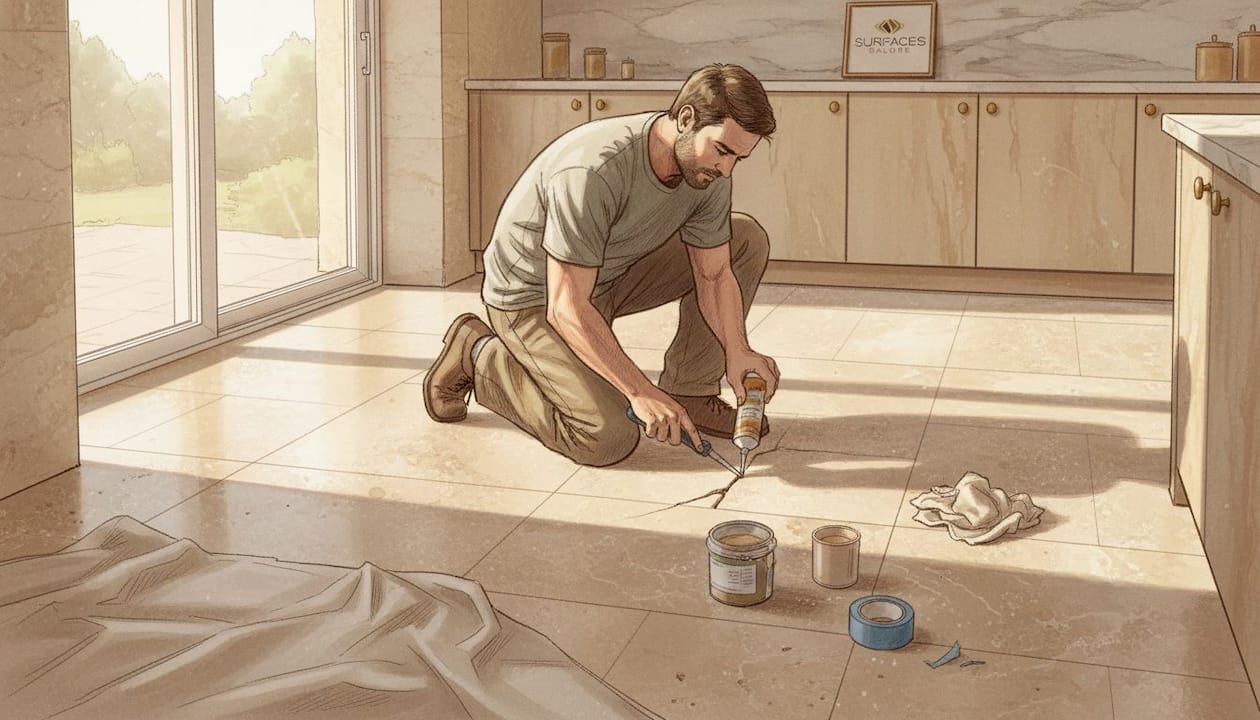
If the surface still has open voids, those holes need to be filled before sealing. An unfilled void traps sealer unevenly, leading to blotchy results and weak spots where staining can still occur. Review your travertine filler options to choose a product that matches your stone’s tone and finish.
Surface preparation: the non-negotiable step
Preparation includes repairing cracks and chips with matching filler, removing old sealant if present using a scraper and denatured alcohol, and ensuring the surface is completely dry to avoid trapping moisture beneath the new seal.
Trapped moisture is a serious problem. Sealing over a damp surface locks water under the protective barrier, which can cause cloudiness, whitening, or even mold growth beneath the stone. If your tiles were recently washed, mopped, or rained on, allow a minimum of 24 to 48 hours of dry time before proceeding.
| Preparation task | Tool needed | Why it matters |
|---|---|---|
| Remove old sealer | Scraper, denatured alcohol | Prevents adhesion failure |
| Fill open voids | Travertine filler, putty knife | Ensures even sealer coverage |
| Clean surface | pH-neutral cleaner, mop or brush | Removes oils, dirt, residue |
| Dry completely | Fans, dehumidifier | Prevents trapped moisture |
| Repair chips/cracks | Matching epoxy filler | Stops sealer from pooling in damage |
Pro Tip: For pool decks or outdoor wet areas, run fans and allow an extra 12 to 24 hours of drying time beyond what you think you need. Humidity in those environments is almost always higher than it appears on the surface.
Step-by-step travertine sealing workflow
With your materials and preparations in place, you are ready to proceed with the actual sealing workflow. Following each step in sequence is critical. Skipping ahead or combining steps is the fastest way to create a job that looks fine on day one and fails within months.
Step 1: Deep clean the surface
Use a pH-neutral stone cleaner and a stiff brush or mop to scrub the entire surface. Work in small sections so that the cleaner does not dry before you wipe it up. Avoid anything acidic like vinegar or lemon-based products, and avoid alkaline degreasers not formulated for natural stone. Both types will etch the surface or react badly with the calcium carbonate in the stone, leaving it more vulnerable than when you started.
If you are working on an area that has heavy grease or oil buildup, such as a kitchen floor or an outdoor patio near a grill, you may need two cleaning passes.
Step 2: Dry for 24 to 48 hours
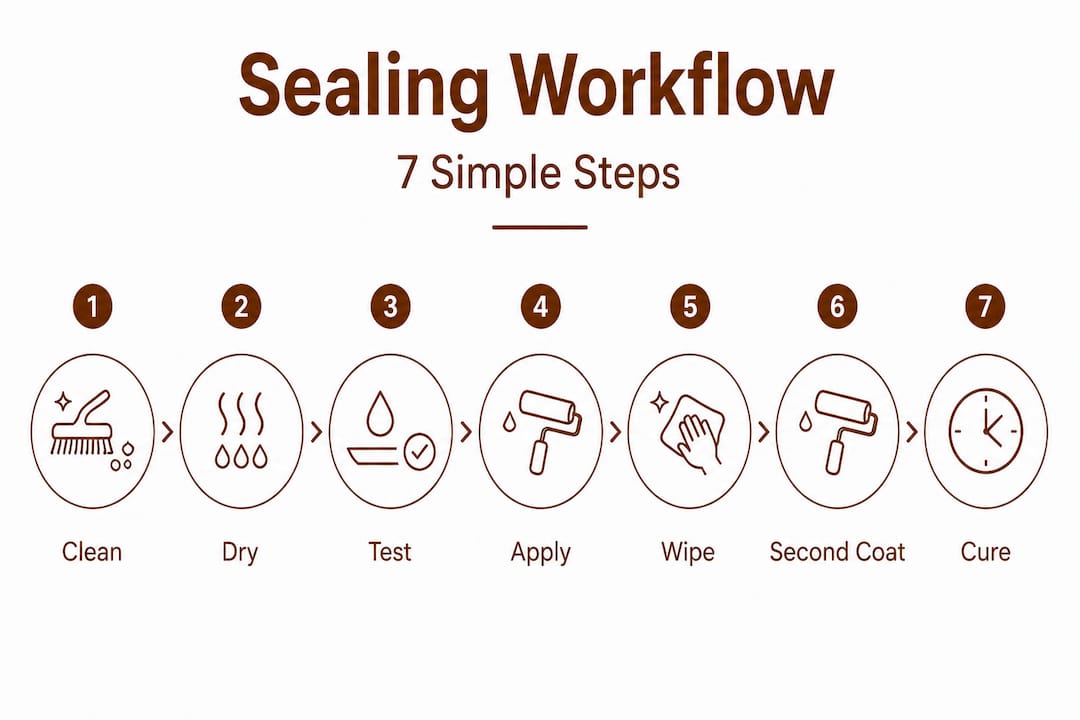
This is the step most people rush, and it is almost always why sealing jobs fail. The complete sealing workflow requires drying for 24 to 48 hours after cleaning, testing the sealer on a small corner area first, applying penetrating sealer in manageable sections, letting it penetrate for 10 to 15 minutes, wiping excess, applying one to two coats with 30 minutes to one hour between coats, and curing for 24 to 72 hours with no foot traffic or water exposure.
In humid climates or enclosed bathrooms, 48 hours is the safer choice. In dry desert climates like southern California, 24 hours is usually sufficient.
Step 3: Test your sealer in an inconspicuous corner
Before committing the entire surface, apply a small amount of sealer to a corner or hidden edge. Wait 15 minutes and check for discoloration, cloudiness, or any unexpected reaction. Different travertine finishes absorb sealer at different rates, and this simple test saves you from a costly mistake across the whole floor.
Step 4: Apply the penetrating sealer in sections
Work in areas no larger than three feet by three feet. Apply sealer with a lint-free cloth, foam pad, or brush in a thin, even coat. Work the product into the stone in small circular motions to encourage absorption. Do not flood the surface; more is not better with penetrating sealers. A thin, even application that absorbs fully is far more effective than a thick application that sits on top.
Sealer type comparison
| Sealer type | How it works | Best used for | Lifespan |
|---|---|---|---|
| Penetrating (impregnating) | Absorbs below surface | All travertine, especially wet areas | 3 to 7 years |
| Topical (film-forming) | Sits on surface | Indoor decorative use only | 1 to 3 years |
| Color-enhancing penetrating | Absorbs and deepens tone | Tumbled or rustic finishes | 3 to 5 years |
For almost every residential and commercial application, a penetrating sealer is the right choice. It does not change the stone’s appearance, works from within, and holds up far better than topical options in wet or high-traffic environments. If you want more inspiration for how sealing fits into a larger design vision, explore how to design with travertine in different spaces.
Step 5: Wipe excess sealer and allow penetration
After the sealer has sat for 10 to 15 minutes, use a clean lint-free cloth to wipe away any product that has not absorbed. If you skip this step, excess sealer dries on the surface and leaves a sticky, hazy film that is difficult to remove later.
Step 6: Apply a second coat if needed
For highly porous unfilled travertine, a second coat applied after 30 to 60 minutes of drying time is usually necessary. Apply the second coat using the same method as the first. For denser or already-filled tiles, a single coat is often sufficient.
Step 7: Cure the surface
After the final coat, allow the surface to cure completely. No foot traffic, no water, no furniture for at least 24 hours for indoor surfaces, and up to 72 hours for exterior applications. For a complete picture of what the installation and sealing process looks like from start to finish, the travertine tiling process guide is a helpful resource.
Pro Tip: In cold weather below 50 degrees Fahrenheit, sealers cure much more slowly and may not bond properly. If possible, seal during moderate temperatures and keep the space at room temperature during the curing period.
Testing, verification, and resealing schedule
After you seal, it is vital to ensure the protection is effective and know when to revisit the process. A beautiful seal job that goes unchecked will eventually fail without you noticing, leaving the stone unprotected right when you need the defense most.
How to test your seal for effectiveness
Two simple tests tell you everything you need to know about how well your sealer is working.
- Water bead test: Pour a few tablespoons of water onto the sealed surface and watch what happens. If the water beads for 10 or more minutes without soaking in, the seal is intact and working. If the water starts to absorb or darken the stone within a few minutes, the sealer is failing or worn through.
- Oil test: Place a small amount of cooking oil on the surface and leave it for 15 to 20 minutes. A properly sealed surface will show no staining or darkening where the oil sat. Any discoloration means the stone is absorbing oils and needs resealing.
- Water absorption benchmark: If water soaks into travertine in under four minutes, the porosity is high and sealing is urgently needed. This benchmark is especially useful for assessing older stone that has never been sealed or not sealed in many years.
These tests are worth running immediately after the curing period ends to confirm your work was effective, and then again every six to twelve months as part of routine maintenance.
Understanding what the tests tell you
A failed water bead test does not always mean you need a full reseal immediately. Sometimes just one high-traffic area wears through the sealer while the rest of the surface remains protected. Spot resealing that area alone can extend the protection of the whole floor without the expense and effort of a full job.
Resealing schedule: how often is often enough
| Location and use | Recommended reseal interval |
|---|---|
| Indoor floors, low traffic | Every 4 to 5 years |
| Indoor floors, high traffic | Every 2 to 3 years |
| Outdoor patios and walkways | Every 1 to 2 years |
| Pool decks | Every 1 to 2 years |
| Showers and wet rooms | Every 1 to 2 years |
| Kitchen countertops | Every 1 to 2 years |
Penetrating sealers last 3 to 7 years depending on the quality of the product and the environment. Some premium penetrating sealers even increase the stone’s tensile strength by up to 30%, which means the stone itself becomes more resistant to cracking and stress over time, not just staining.
For your specific space and traffic patterns, the travertine resealing guide provides detailed guidance on adapting the schedule to your situation. If you want to understand the full value of keeping up with sealing, the page on long-term travertine protection covers the complete picture.
Pro Tip: Mark your calendar or set a phone reminder six months after your initial seal. Run the water bead test at that point. You will catch any early wear before staining can occur.
Troubleshooting and common mistakes to avoid
Even with the best workflow, knowing what NOT to do is key for perfect results. Some of the most common sealing failures come from small decisions made in the middle of the job, not from a lack of effort.
The most frequent mistakes
Experts consistently identify these as the top errors that homeowners and even some contractors make when sealing travertine:
- Skipping the deep clean. Surface-level dust removal is not enough. If oils, residue, or old wax remain in the stone’s pores, the sealer bonds to those contaminants rather than the stone itself, dramatically shortening its effectiveness.
- Choosing the wrong sealer type. A glossy topical sealer might look appealing on the shelf, but on outdoor travertine or a pool deck it will peel, cloud, and flake within months. Always match the sealer to the location and finish.
- Over-applying sealer. More product does not mean better protection. Excess sealer sits on the surface, dries into a hazy film, and can actually repel future applications, making correction difficult.
- Sealing a damp surface. Moisture trapped under a sealer is a guaranteed failure. You cannot see it at first, but cloudiness and whitening appear within days.
- Ignoring the test patch. Skipping the corner test before a full application is gambling with your entire floor. Always test.
- Using acidic cleaners after sealing. Vinegar, citrus, and many general-purpose cleaners strip penetrating sealers over time. Only use pH-neutral cleaners on sealed travertine.
- Sealing too soon after installation. New grout and mortar can take up to 28 days to fully cure. Sealing before this point traps moisture from the setting materials under the stone.
Special considerations for high-porosity and wet area travertine
Highly porous travertine with natural holes needs void filling before any sealer is applied. On pool decks specifically, you should prioritize a slip-resistant penetrating sealer rather than any glossy or film-forming product. A glossy surface around a pool is a safety hazard, and a topical sealer in a wet environment will break down rapidly, potentially leaving white film or haze across the entire deck area.
“The right sealer for the right location is not optional advice; it is the difference between a surface that performs and one that fails.”
For helpful guidance on working safely and effectively on your own, the DIY tiling and sealing tips resource is a practical starting point, and for pool-specific applications, pool deck sealing advice addresses the unique challenges of wet and outdoor environments in detail.
Pro Tip: If you accidentally apply too much sealer and see a hazy film forming as it dries, act fast. Use a clean cloth dampened with a small amount of the same sealer (not a solvent) to reactivate the excess and wipe it away before it fully cures. Once it cures, removal is far more involved.
The real secret to flawless travertine sealing: Expert insights
With the practical how-to in hand, here is what years of hands-on experience reveal about getting truly exceptional results. And the answer might surprise you: the brand of sealer you choose matters far less than people assume.
Walk into any tile supply store and you will find a dozen sealers all promising extraordinary protection. Some contractors obsess over specific brands or formulas, convinced that the right product is the secret to a perfect job. In reality, surface preparation is the single biggest variable that determines whether a seal lasts two years or seven. A premium sealer applied to a poorly cleaned, slightly damp surface will underperform every time. An average sealer applied to a bone-dry, thoroughly cleaned, properly filled surface will outperform it.
Patience is also profoundly underrated in this process. Most failures we see in practice happen not because of bad products but because someone rushed the drying time, skipped the test patch, or applied three coats in an afternoon instead of letting each one breathe. Natural stone rewards patience in a way that synthetic surfaces simply do not.
The other insight worth sharing: sealing is not something you do once and then forget. Verification through regular testing and staying on a resealing schedule is what actually protects your investment over the long term. One initial seal and no follow-up for a decade is a plan that ends with permanent stains. Consistency is what separates a travertine surface that ages beautifully from one that looks tired and damaged within a few years.
Lastly, adapt your approach to your specific space. A bathroom shower and an outdoor pool deck are both travertine surfaces, but they require different sealers, different application methods, and different maintenance schedules. No single one-size-fits-all process covers every situation. Understanding the benefits of sealing stone in different environments helps you make better decisions for every room or project you tackle.
Ready to transform your travertine? We can help
Understanding the sealing process is powerful, but having access to quality products and expert guidance makes every step more reliable, especially for larger or more complex installations.
At Surfaces Galore, we work directly with homeowners, contractors, and designers who want travertine that performs as well as it looks. Our team can help you select the right stone finish for your project from the start, which simplifies sealing and long-term care significantly. Whether you are starting fresh with new tiles or maintaining an existing floor, knowing all the sealing benefits helps you make smarter choices at every step. Browse our full travertine collection online or reach out to our Anaheim, California team for personalized recommendations. We ship nationwide and are here to help your project achieve the lasting beauty natural stone is known for.
Frequently asked questions
How do I know if my travertine needs to be resealed?
Use the water bead test: if water soaks in or does not bead for 10 or more minutes, it is time to reseal. Visible darkening where water contacts the stone is also a reliable sign.
How long should I wait after cleaning before sealing travertine?
Wait at least 24 to 48 hours to ensure the surface is completely dry before applying sealer, because even slight moisture trapped under the seal causes cloudiness and adhesion failure.
Can I seal over old travertine sealer?
No. Old sealant should be removed using a scraper and denatured alcohol before applying fresh sealer, as applying over existing product prevents proper bonding and shortens the life of the new seal significantly.
How often should outdoor travertine and pool decks be resealed?
Outdoor travertine and pool decks should be resealed every 1 to 2 years due to higher UV exposure, moisture, and foot traffic compared to protected indoor surfaces.
What is the main difference between penetrating and topical sealers for travertine?
Penetrating sealers absorb into the stone for long-lasting internal protection, while topical sealers form a surface layer that can flake, cloud, or whiten over time, especially in outdoor or wet environments where they are not recommended.
Recommended
- Step-by-step travertine tiling: A DIY guide for homeowners– SurfacesGalore
- Polish Travertine for a Lasting Natural Shine– SurfacesGalore
- Design with Travertine for Timeless Home Elegance– SurfacesGalore
- Sealing Travertine for Lasting Luxury Protection– SurfacesGalore
- Hardscape installation workflow: efficient steps for Atlanta
Leave a comment