
Top Marble Backsplash Ideas for Kitchens and Bathrooms

TL;DR:
- A marble backsplash is a visually impactful kitchen upgrade that depends on marble type, finish, and installation pattern. Honed finishes are trending in 2026 for hiding water spots and etching, especially in active kitchens. Full-height slabs with slip-matching create continuous, dramatic effects, but require professional installation and careful slab selection.
A marble backsplash is defined as a wall covering installed behind a sink, stove, or countertop using natural marble stone, and it remains one of the most visually impactful upgrades a homeowner can make. The top marble backsplash ideas in 2026 center on three decisions: marble type, finish, and installation pattern. Carrara, Calacatta, and Statuario are the three most specified marble varieties for backsplash projects, each offering a distinct look and price point. Finish choices between honed and polished surfaces shape both the daily maintenance experience and the overall aesthetic. Trending techniques like slip-matching and geometric mosaic layouts are redefining what a marble tile backsplash can look like in a modern home.
1. Top marble backsplash ideas by marble type and finish
Choosing the right marble type is the single most important decision in any backsplash project. The three dominant options each serve a different budget and design goal.
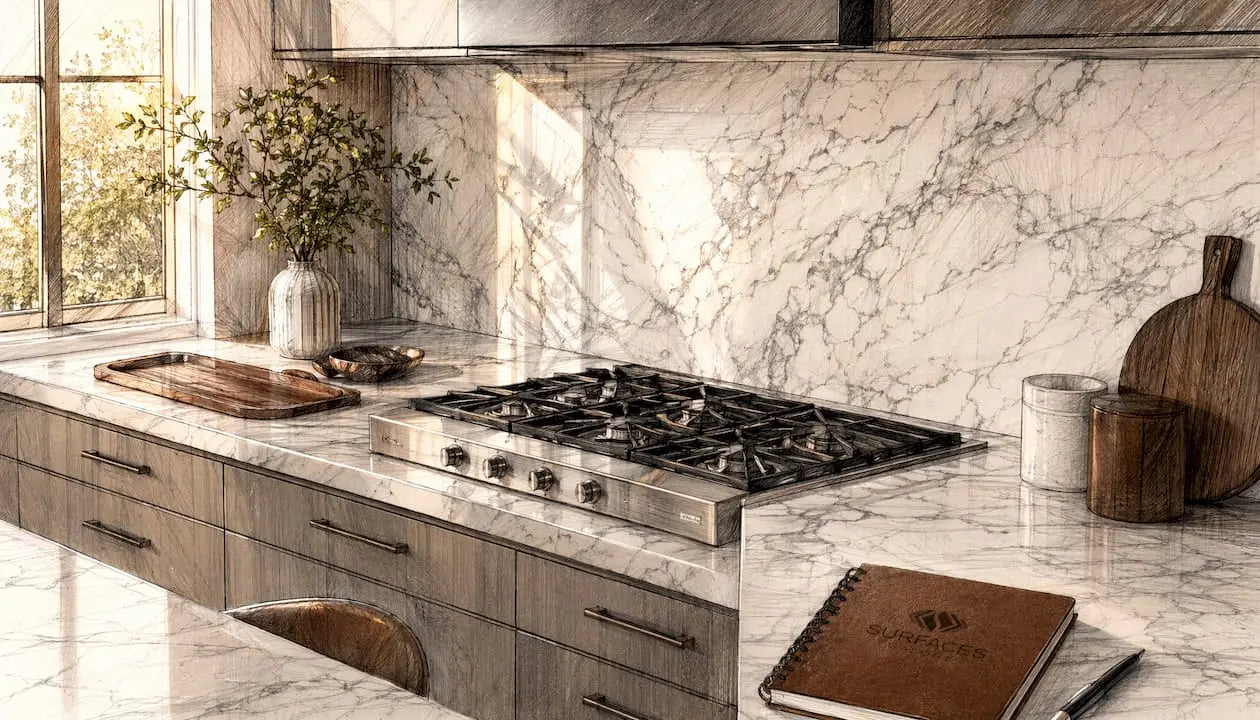
Carrara marble is the most common entry-level choice. It features soft gray veining on a white or blue-gray background and costs $8–$18 per square foot. That price range makes it accessible for full-height kitchen backsplashes without a major budget commitment.
Calacatta marble sits in the mid-to-premium tier at $15–$40+ per square foot. Its veining is bolder and more dramatic than Carrara, with warmer gold and brown tones running through a bright white background. Designers often specify Calacatta for focal-wall backsplashes where visual impact matters most.
Statuario marble is the premium option, ranging from $30 to $100+ per square foot. It has a bright white base with thick, sweeping gray veins that photograph exceptionally well. Statuario works best in powder rooms or low-traffic kitchen zones where its surface can be protected.
| Marble Type | Veining Style | Price Range | Best Application |
|---|---|---|---|
| Carrara | Soft gray, subtle | $8–$18/sq ft | Full-height kitchen or bathroom |
| Calacatta | Bold, warm tones | $15–$40+/sq ft | Focal wall, range hood surround |
| Statuario | Dramatic, bright white | $30–$100+/sq ft | Powder room, accent area |
Honed vs. polished: which finish wins in 2026?
Honed finishes are trending over polished surfaces in 2026 because they mask water spots and acid etching far better. A honed surface has a matte, velvety texture that absorbs light rather than reflecting it. Polished marble is glossy and easier to wipe down because spills sit on the surface rather than soaking in. The tradeoff is that polished marble shows etching and fingerprints more visibly, which becomes a real issue in active kitchens.
Pro Tip: Specify a honed finish for any backsplash within splatter range of your stove. Reserve polished marble for bathroom backsplashes where cooking acids are not a factor.
2. Subway tile layouts and grout color choices
The subway tile format remains the most widely installed marble backsplash style. Standard subway tiles measure 3 inches by 6 inches, though 4-by-12-inch and 2-by-8-inch formats are gaining ground for a more elongated, modern look. The tile format itself is only half the decision. Grout color determines whether the backsplash reads as a unified surface or a grid pattern.
White or cream grout creates a tone-on-tone effect that lets the marble’s veining carry the visual interest. Dark gray or charcoal grout draws attention to the tile layout itself, creating a graphic quality that suits contemporary kitchens. For a cleaner, more hygienic surface, unsanded grout in a tight joint width reduces the number of crevices where grease and moisture collect.
Pro Tip: Use a 1/16-inch grout joint with marble subway tiles to minimize grout lines and keep the focus on the stone’s natural pattern.
3. Full-height slab backsplashes and slip-matching
A full-height slab backsplash runs from countertop to ceiling or upper cabinets, covering the entire wall in a single continuous piece of marble. Solid slab backsplashes are more hygienic than tiled options because they eliminate grout lines where bacteria and mold accumulate. That practical benefit combines with a dramatic visual effect that no tile layout can replicate.
Slip-matching is the technique of aligning consecutive slabs so the veining flows continuously from one panel to the next. The result is a gallery-like effect where the stone’s natural movement draws the eye across the entire wall. This is a major 2026 marble backsplash trend, particularly for kitchen ranges and island-facing walls. Homeowners should inspect full slabs for veining alignment before fabrication to confirm the visual flow matches their expectations.
Slab installation considerations:
- Large slabs weigh 12–15 pounds per square foot, requiring professional installation
- Professional installers use thinset adhesive and mechanical fasteners anchored into studs for safety
- Wait at least 24 hours after installation before touching the surface to protect the adhesive bond
- Slab backsplashes require precise templating and cutting by a fabricator before delivery
Pro Tip: Ask your fabricator to photograph the slab layout on the shop floor before cutting. This lets you approve the veining alignment before any material is committed.
4. Geometric mosaic patterns: herringbone and chevron
Mosaic marble backsplashes use small tiles arranged in geometric patterns to create texture and movement. Herringbone and chevron are the two dominant formats in 2026. Both use rectangular tiles set at angles, but herringbone creates a staggered zigzag while chevron uses mitered cuts for a continuous V-shape.
Herringbone suits traditional and transitional kitchens because its irregular rhythm feels organic. Chevron reads as more formal and geometric, making it a strong choice for modern or minimalist spaces. Both patterns work well with Carrara marble because the subtle veining does not compete with the pattern itself. For a unique marble backsplash, consider mixing a mosaic field tile with a solid marble border in a contrasting finish.
Mosaic sheets are typically mounted on mesh backing, which simplifies installation for experienced DIY homeowners. The mesh keeps spacing consistent and reduces cutting time. The tradeoff is more grout lines than a subway tile layout, which means more cleaning maintenance over time.
5. Marble backsplash maintenance and sealing
Marble is a calcium carbonate stone, which means acids etch its surface on contact. Lemon juice, vinegar, tomato sauce, and even some cleaning sprays cause dull spots on polished marble within seconds. Understanding this risk shapes every maintenance decision for a kitchen backsplash.
Sealing marble is a three-stage process. Seal before grouting, seal again after grout sets, and perform annual water-bead tests to determine when resealing is needed. Use a high-solids impregnating sealer and remove any excess within 5–10 minutes to avoid a surface haze. The water-bead test is simple: drop water on the marble surface. If it beads up, the seal is intact. If it soaks in, reseal immediately.
Marble backsplash maintenance steps:
- Seal the marble surface before grouting with a penetrating impregnating sealer
- Allow the first seal coat to cure fully, then grout as normal
- Apply a second seal coat after grout has set and cured
- Clean daily with a pH-neutral stone cleaner, never vinegar or citrus-based products
- Wipe spills immediately, especially acidic foods and beverages
- Perform the water-bead test annually and reseal when water absorbs rather than beads
Pro Tip: For kitchen backsplashes, specify honed marble to better hide etch marks from cooking acids. Etching on honed surfaces appears as a subtle sheen change rather than a visible dull patch.
Honed marble hides smudges and etch marks better than polished, but it is slightly more porous. Polished marble is easier to wipe clean because its dense surface resists absorption. Both finishes require the same sealing protocol. The difference shows up in how visible the damage is when maintenance lapses.
6. Backsplash ideas by room and budget
Different rooms call for different marble backsplash strategies. The right choice depends on traffic level, exposure to moisture and cooking acids, and the visual role the backsplash plays in the space.
Kitchen backsplash options
Full-height slab backsplashes deliver the most visual drama in kitchens. They work best behind ranges and on walls that face the dining area. For homeowners on a tighter budget, a 4-inch marble backsplash strip along the countertop edge delivers the look of natural stone without the cost of full coverage. Carrara is the practical choice for kitchen applications because its price point allows full coverage, and its subtle veining pairs with most cabinet colors.
Marble performs best in low-traffic backsplash areas like butler’s pantries where direct cooking splatters are minimal. For the area directly behind the stove, a honed finish and a rigorous sealing schedule are non-negotiable.
Bathroom backsplash options
Bathrooms offer the best conditions for marble because cooking acids are absent. A 4-inch marble backsplash behind a bathroom vanity is one of the most affordable ways to introduce natural stone into a home. Taller backsplashes that extend to the mirror or wall-mounted faucet line create a spa-like effect. Calacatta or Statuario work well in bathrooms because the lower traffic and acid exposure reduce maintenance demands.
Powder room statement walls
Powder rooms are the ideal space for artistic marble backsplash designs. Because the room sees no cooking and minimal daily use, even the most delicate Statuario slab can be used without concern. A floor-to-ceiling marble panel with slip-matched veining turns a small powder room into a design feature.
| Room | Recommended Marble | Format | Budget Range |
|---|---|---|---|
| Kitchen (full coverage) | Carrara | Subway tile or slab | $8–$18/sq ft |
| Kitchen (accent strip) | Carrara or Calacatta | 4-inch strip | $8–$40+/sq ft |
| Bathroom vanity | Calacatta | 4-inch or tall backsplash | $15–$40+/sq ft |
| Powder room | Statuario | Full-height slab | $30–$100+/sq ft |
Explore marble kitchen backsplash options at Surfacesgalore to see how different marble types translate from slab to finished installation.
7. Accent and mixed-material backsplash designs
Not every marble backsplash needs to cover an entire wall. Accent applications use marble strategically to create focal points without the cost of full coverage. A marble slab behind the range hood paired with painted tile or a simpler material on the side walls is a common approach in mid-range kitchen renovations.
Mixed-material backsplashes combine marble with materials like unlacquered brass hardware, wood open shelving, or matte ceramic tile. The marble anchors the design with natural texture while the secondary materials add warmth or contrast. The key rule is to keep the marble as the dominant surface. When marble is reduced to a small accent strip, it can read as an afterthought rather than a design choice.
For a modern marble backsplash style that feels current in 2026, pair a honed Calacatta slab with flat-front cabinetry in a warm white or sage green. The contrast between the stone’s natural movement and the cabinet’s clean geometry is one of the most requested looks in kitchen renovation right now.
8. DIY vs. professional installation
Marble backsplash installation falls into two clear categories based on tile size and format. Small mosaic tiles and standard subway tiles are manageable DIY projects for homeowners with basic tiling experience. Full slab installations are not. Large slabs weigh 12–15 pounds per square foot and require professional handling, templating, and mechanical fastening.
For DIY tile installations, the critical steps are surface preparation, consistent adhesive coverage, and proper sealing before and after grouting. Skipping the pre-grout seal is the most common DIY mistake. Grout is porous and will stain the marble surface if the stone is not sealed first.
For slab work, always hire a fabricator with natural stone experience. Ask to see completed slab backsplash projects before committing. The fabricator’s ability to template accurately and cut cleanly determines whether the veining alignment holds across the finished installation.
Key takeaways
The best marble backsplash designs combine the right marble type, a honed finish for active kitchens, proper sealing, and an installation format matched to the room’s traffic and budget.
| Point | Details |
|---|---|
| Choose marble by budget and use | Carrara suits kitchens; Calacatta and Statuario work best in bathrooms and powder rooms. |
| Honed finishes outperform polished in kitchens | Honed marble hides etch marks and water spots better in high-use cooking areas. |
| Sealing is a three-stage commitment | Seal before grouting, after grouting, and retest annually with the water-bead method. |
| Slab backsplashes require professional installation | Slabs weigh 12–15 pounds per square foot and need mechanical fasteners anchored into studs. |
| Slip-matching is the defining 2026 trend | Aligning veining across consecutive slabs creates continuous visual flow and a luxury finish. |
What I’ve learned from living with marble backsplashes
The advice I give most often is the advice most homeowners ignore until after installation: go see the slab in person before you commit. Photographs of marble are almost useless for predicting how a specific slab will look in your kitchen. Veining varies dramatically within the same marble variety, and the difference between a Calacatta slab with bold, sweeping veins and one with thin, scattered lines is enormous. I have watched homeowners fall in love with a marble type online and then be disappointed by the actual slab delivered to their home.
The second thing I have learned is that honed marble in a kitchen is not a compromise. For years, polished marble was considered the premium choice. The reality is that a polished backsplash behind an active stove will show etch marks within months, and those marks are permanent without professional refinishing. A honed surface in the same location will absorb the same abuse and show almost nothing. The maintenance difference is not subtle.
The third lesson is about scale. Homeowners consistently underestimate how much visual weight a full-height slab backsplash carries. In a small kitchen, a dramatic Statuario slab can overwhelm the space. In that situation, a Carrara subway tile backsplash with a clean white grout line delivers elegance without competition. Restraint is a design skill, and marble rewards it.
If you are planning a DIY installation, limit yourself to tile formats. The marble backsplash tips that matter most for DIY are surface prep, pre-grout sealing, and patience with curing times. Rushing any of those steps costs more to fix than the time saved.
— cihan
Natural stone for your backsplash project at Surfacesgalore
Surfacesgalore is a direct importer of premium natural stone based in Anaheim, California, shipping marble tiles, slabs, and mosaics nationwide to homeowners, designers, and contractors.
Whether you are planning a full-height Calacatta slab installation or a classic Carrara subway tile backsplash, Surfacesgalore carries authentic natural stone at prices that reflect direct importing rather than retail markup. The collection includes marble tiles and mosaics in honed and polished finishes, with options suited to every room and budget. Browse the full range of natural stone backsplash options and find the marble that fits your project.
FAQ
What is the best marble for a kitchen backsplash?
Carrara marble is the best all-around choice for kitchen backsplashes because it is affordable at $8–$18 per square foot and its subtle veining suits most cabinet colors. Specify a honed finish to minimize visible etching from cooking acids.
How often does a marble backsplash need to be sealed?
Marble backsplashes need sealing before grouting, again after grout sets, and then annually. Perform the water-bead test each year: if water soaks into the surface rather than beading up, reseal immediately.
Can I install a marble backsplash myself?
Small marble tiles and mosaic sheets are manageable DIY projects for homeowners with basic tiling experience. Full slab backsplashes require professional installation because slabs weigh 12–15 pounds per square foot and need mechanical fasteners anchored into wall studs.
What is slip-matching in a marble backsplash?
Slip-matching is the technique of aligning consecutive marble slabs so the veining flows continuously from one panel to the next. It is a leading 2026 trend that creates a seamless, gallery-like effect across the full backsplash wall.
Is honed or polished marble better for backsplashes?
Honed marble is better for kitchen backsplashes because it hides etch marks, water spots, and fingerprints more effectively than polished. Polished marble suits bathroom backsplashes where cooking acids are not present and the glossy surface is easier to wipe clean.


Leave a comment