
Understanding Marble Installation Cost: A Comprehensive Guide for 2026

Thinking about marble for your home? It's a beautiful choice, no doubt. But figuring out the Marble Installation Cost can feel like a puzzle. This guide breaks down what goes into that price, from the type of marble you pick to how it's put in. We'll help you get a clearer picture so you can budget wisely for your project.
Key Takeaways
- The type of marble, its finish, size, and thickness all play a big role in the overall Marble Installation Cost.
- Proper preparation of your space, including a solid and level substrate, is vital for a lasting marble installation.
- Professional installation involves careful planning, precise cutting, and correct setting techniques to avoid issues.
- Grouting and sealing are important steps to protect your marble and achieve a finished look, adding to the total cost.
- Calculating material needs accurately, accounting for waste, and considering cost-saving options like clearance items can help manage your budget.
Understanding Marble Installation Cost Factors
Thinking about marble for your next project? It's a fantastic choice, bringing timeless elegance and value to any space. But before you fall in love with that perfect slab, let's talk about what goes into the cost of getting it installed. Understanding these factors is key to budgeting wisely and getting the stunning results you expect.
The Impact of Marble Type on Installation Expenses
Not all marble is created equal, and this is a big one for your wallet. Rare, exotic marbles with unique colors and dramatic veining, like Calacatta Gold or Statuario, naturally cost more than more common varieties such as Carrara White. The quarry's location and the stone's grade also play a role. Think of it like choosing a gemstone – the more unique, the higher the price tag. When you're ready to buy marble tiles online USA, remember that the specific type you select will be a primary driver of your overall material cost.
Considering Marble Finishes and Their Cost Implications
The finish you choose for your marble can subtly affect the installation cost. A polished finish, while beautiful and reflective, often requires more meticulous work to achieve that mirror-like shine. Honed finishes, which offer a softer, matte look, might be slightly less labor-intensive. Tumbled or brushed finishes add texture and character, and their installation might involve specific techniques to maintain that desired look. Each finish has its own charm and associated labor, so discuss this with your installer.
Assessing the Influence of Marble Size and Thickness on Budget
Larger marble tiles or slabs mean fewer pieces to install, which can sometimes speed up labor. However, larger, thicker pieces are also heavier and more difficult to handle, requiring more labor and potentially specialized equipment. For flooring, a standard thickness is usually around 3/8" to 1/2", while countertops will use thicker slabs. The size and thickness directly impact how the material is transported, cut, and set, all of which factor into the final installation price. For example, installing large format tiles might require a different setting material than smaller mosaics.
Case Study: The Grand Entrance Hall
A client wanted a dramatic entrance hall using large-format Calacatta Gold marble tiles. The sheer size and weight of these tiles (36"x36" and 3/4" thick) meant that specialized lifting equipment was needed, and the installation team had to work with extreme precision to ensure perfect alignment. While the material cost was high due to the marble's rarity, the installation labor was also significantly impacted by the handling requirements of these substantial pieces. The final result was breathtaking, but the cost reflected the complexity of working with such premium, large-format material. This project highlighted how both the marble type and its physical dimensions directly influence installation expenses.
When budgeting for marble, always get detailed quotes that break down material costs versus labor. This transparency helps you understand where your money is going and allows for informed decisions about your project's scope and material choices.
Preparing Your Space for Marble Installation
Getting your space ready for marble installation is super important. It's like building a strong foundation for a beautiful house – you don't want anything to go wrong later. Taking the time now saves you headaches and money down the road. Let's make sure your marble looks amazing for years to come.
Marble is beautiful, but it's also heavy and needs a stable base. Think of it like a fancy cake – it needs a sturdy plate to sit on. If your subfloor or wall isn't flat and solid, your marble tiles could crack or shift. We need to make sure the surface is clean, dry, and perfectly level. Any bumps or dips can cause big problems later on. For wood subfloors, we often add a layer of cement backer board or an uncoupling membrane. On concrete, a crack-isolation membrane is a good idea. This prep work is key to a long-lasting marble installation. It’s worth the effort to get this right before you even think about laying a single tile. You can find great options for subfloor preparation when you buy marble tiles online USA.
Using the right stuff to stick your marble down is just as vital as the marble itself. Not all mortars and grouts are created equal, especially when it comes to natural stone. You need products specifically made for marble and travertine. Using the wrong adhesive, like a premixed mastic, can cause issues. We always recommend a high-quality thin-set mortar. If you're using light-colored marble, a white thin-set is a must to avoid any gray showing through. Always check the manufacturer's instructions to make sure everything plays nicely together. This includes any metal trims or other materials you might be using alongside your stone.
Let's talk about why this prep work is so critical. A poorly prepared substrate is the number one reason for future problems with natural stone. We've seen it happen – tiles popping loose, cracks appearing out of nowhere. It's usually because the surface underneath wasn't quite right. Taking the time to clean, level, and stabilize your subfloor or wall is an investment. It means your gorgeous marble will stay put and look fantastic for ages. It’s the difference between a quick fix and a lasting masterpiece. Proper preparation is a big part of marble installation success.
Case Study: The Uneven Foundation Fiasco
We had a client who was eager to get their new marble floors installed. They skipped some of the substrate prep, thinking it wasn't a big deal. A few months later, they called us back because some tiles were cracking and others felt loose. When we went to check, we found the subfloor was uneven. The weight of the marble had caused the tiles over the low spots to flex and break. We had to remove the marble, fix the subfloor, and reinstall everything. It cost them double what it would have if they'd prepped it right the first time. It’s a tough lesson, but a good reminder: don't skimp on the prep!
Quick Prep Checklist:
- Cleanliness: Ensure the subfloor is free of dust, grease, old adhesive, and any debris.
- Levelness: Use a long level to check for high or low spots. Address these with patching compounds or self-leveling underlayment.
- Stability: The subfloor must be stiff and not flex. Add reinforcement if needed, especially over wood joists.
- Moisture Barrier: If necessary, install a proper moisture barrier or crack isolation membrane.
Proper substrate preparation is not just a step; it's the bedrock of a successful and enduring marble installation. It prevents future issues like cracking, shifting, and delamination, saving you significant repair costs and disappointment.
Key Steps in Professional Marble Installation
Getting your marble installed right is super important. It's not just about slapping tiles down; it's a process that makes sure your beautiful stone looks amazing for years. Think of it like building a strong foundation for a house – if that's shaky, nothing else will hold up.
Planning Your Marble Layout and Dry-Laying Techniques
Before any glue or mortar touches your marble, we plan. This means figuring out exactly where each tile will go. We often do a 'dry lay,' which is basically laying out all the tiles without any adhesive. This lets us see how the patterns and colors flow across the whole area. It’s also the best time to catch any awkward cuts or to make sure the veining looks just right. This step is key to avoiding surprises and making sure the final look is exactly what you envisioned. It’s a bit like a dress rehearsal for your floor or wall.
Applying Mortar and Setting Marble Tiles Correctly
Once the layout is perfect, we move to setting the tiles. We use a special notched trowel to spread a thin-set mortar evenly. This creates ridges that help the marble bond properly. Each tile is pressed firmly into the mortar with a slight twist to make sure there are no air pockets underneath. We check this often by lifting a tile to see the mortar coverage. Using tile spacers keeps the grout lines consistent, and a level makes sure everything is flat, avoiding that annoying "lippage" where one tile sticks up higher than another. We work in sections, letting the mortar set before moving on.
Achieving Consistent Grout Joints and Level Surfaces
Consistent grout joints are what give a marble installation that polished, professional look. We use spacers to keep these lines uniform, whether you prefer a tight joint or something a little wider. Keeping the surface level is just as vital. Natural stone tiles can vary slightly, so we use techniques and sometimes leveling systems to make sure the entire surface feels smooth underfoot and looks perfectly flat. This attention to detail is what separates a good installation from a truly great one. It’s about creating a flawless canvas for your stunning marble.
Case Study: The Miller Residence Bathroom
The Millers wanted a luxurious master bathroom with Carrara marble. Initially, they considered a DIY approach but realized the complexity of laying large marble tiles. We planned their layout meticulously, dry-laying the tiles to showcase the dramatic veining of the Calacatta Gold marble. This allowed us to position the most striking pieces strategically. During installation, we paid close attention to the mortar bed, ensuring full coverage for each tile. The result was a stunning, seamless floor that exceeded their expectations. They mentioned how the dry-lay process really helped them visualize the final outcome and feel confident in their choice to hire professionals.
Proper installation is more than just aesthetics; it's about the longevity of your investment. A well-installed marble surface resists issues like cracking, chipping, and uneven settling, saving you potential headaches and costs down the line. It’s about building beauty that lasts.
If you're looking to buy marble tiles online in the USA, remember that the installation process is just as important as the material itself. We're here to help make sure your marble project is a success from start to finish. Explore our marble tiles and let us help you achieve the look you desire.
Cutting and Shaping Marble for Precision
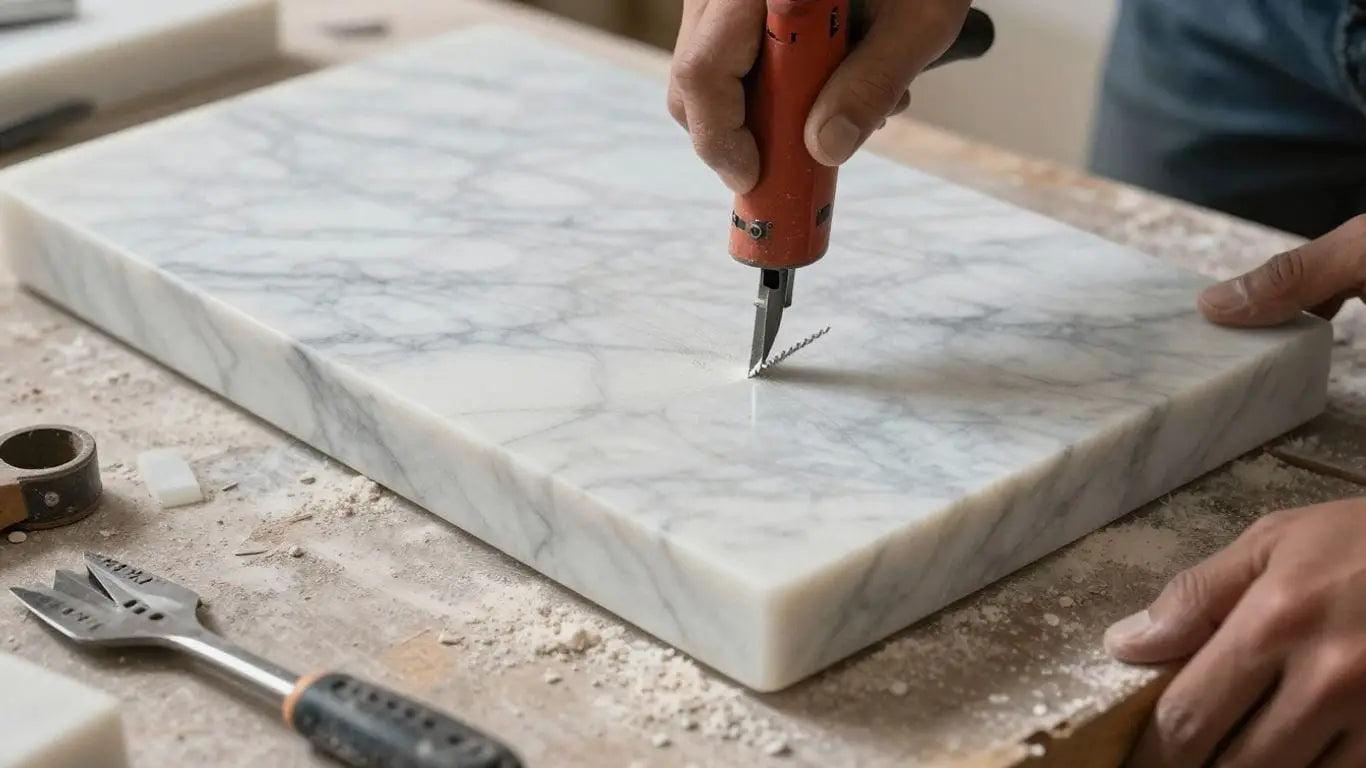
Getting those perfect edges and shapes for your marble installation might seem tricky, but it’s totally doable with the right approach. It’s all about precision, really. You want those cuts to be clean so your finished floor or wall looks like it was meant to be that way from the start.
Utilizing the Right Tools for Stone Tile Cutting
When you’re working with marble, you can’t just grab any old saw. You need tools designed for stone. A wet saw with a good diamond blade is your best friend here. It keeps the blade cool and cuts down on dust, which is a big plus. Make sure the blade is sharp and meant for natural stone. Using a dull or wrong blade can lead to a messy cut, or worse, chipping.
- Wet Saw: The go-to for clean, straight cuts.
- Diamond Blade: Specifically designed for cutting hard materials like marble.
- Angle Grinder with Diamond Blade: Useful for smaller adjustments or curves.
Case Study: Sarah wanted a custom marble backsplash for her kitchen. She initially tried using a standard tile saw, but the edges were chipping badly. After switching to a high-quality diamond blade on her wet saw and cutting slowly, she achieved the crisp, clean lines she was looking for, transforming her kitchen's look.
Techniques for Avoiding Chips and Breakage During Cuts
Marble is beautiful, but it can be brittle. The key is patience. Don't rush your cuts. Always cut slowly and steadily. If you’re cutting a tile, try to make the cut in one pass if possible. For larger pieces, you might need to score and snap, but with marble, a wet saw is usually better. Also, plan your cuts so that any edges that will be visible are done with extra care. Sometimes, you can hide cut edges against walls or in corners, which makes things a lot easier.
Always support your material properly when cutting. A wobbly piece of marble is much more likely to break or chip.
Finishing Cut Edges for a Polished Appearance
Once you’ve made your cuts, you might need to clean up the edges. A simple sanding block or an edge polisher can smooth out any rough spots. If you want a really professional look, especially on edges that will be exposed, you can use a diamond hand pad or a router with a specific stone bit to create a beveled or rounded edge. This not only looks good but also makes the edge safer to the touch. If you’re looking to buy marble tiles online in the USA, remember that the finish on the cut edges can make a big difference in the final appearance of your project.
Example: For a marble shower niche, precise cuts are a must. Using a wet saw for the main cuts and then a diamond hand pad to slightly round the exposed edges ensures a safe and polished finish that looks professionally done. This attention to detail is what makes a marble installation truly stand out.
Grouting and Sealing Marble Surfaces
Applying Grout for a Seamless Marble Finish
Once your beautiful marble tiles are set and the mortar has cured, it’s time to fill those gaps. Grouting is where your installation really starts to look finished. It’s not just about filling space; it’s about creating a unified surface that’s both stunning and protected. We recommend using a high-quality grout specifically designed for natural stone. This ensures compatibility and longevity for your marble. When applying, work the grout into the joints diagonally using a grout float. This technique helps pack the grout in tightly, avoiding air pockets. Remember to work in manageable sections so the grout doesn't start to set before you can clean it up.
Allowing Grout to Cure Properly Before Sealing
This step is super important. You can’t rush the curing process for grout. It needs time to harden fully. Typically, this takes about 48 to 72 hours, but always check the grout manufacturer's recommendations. Trying to seal too early can trap moisture, leading to discoloration or a weak bond. Patience here pays off big time for the final look and durability of your marble installation. Think of it as letting a fine wine breathe before enjoying it – the results are worth the wait.
The Role of Sealing in Protecting Marble Investments
Marble is a natural stone, and like many natural materials, it’s porous. This means it can absorb liquids, which can lead to stains. Sealing creates a barrier that helps prevent this. It’s a critical step in protecting your investment and keeping your marble looking its best for years to come. A good quality stone sealer will not only guard against stains but also make cleaning much easier. You can find a wide selection of marble tiles online in the USA, and sealing is a must for any of them.
Sealing your marble is the final protective layer that preserves its natural beauty.
Here’s a quick rundown of why sealing matters:
- Stain Resistance: It significantly reduces the chance of spills like wine, oil, or coffee penetrating the stone.
- Moisture Protection: Helps prevent water damage and discoloration, especially in areas like bathrooms or kitchens.
- Easier Maintenance: A sealed surface is simpler to clean, as dirt and grime have a harder time adhering.
- Longevity: Proper sealing contributes to the overall lifespan and durability of your marble installation.
Case Study: The Kitchen Countertop Transformation
Sarah and Tom were renovating their kitchen and decided on beautiful Carrara marble countertops. They meticulously installed the tiles, but after a few months, a red wine spill left a faint stain that wouldn't come out. They realized they hadn't sealed the grout properly after installation. After consulting with a professional, they had the grout re-cleaned and then sealed with a high-quality impregnating sealer. The difference was remarkable; the new sealer repelled a subsequent coffee spill completely. This experience taught them the absolute necessity of proper sealing for natural stone surfaces. It’s a small step that makes a huge difference in protecting your beautiful marble countertops.
Proper grouting and sealing are not just finishing touches; they are integral parts of the installation process that safeguard your marble's beauty and structural integrity. Skipping these steps is like building a beautiful house and forgetting to put a roof on it – you're leaving your investment vulnerable.
Calculating Marble Material Needs
Getting your marble calculations right is super important. Mess this up, and you're either short on material mid-project (a total headache!) or you've got way too much leftover, which is just wasted money. Let's break down how to figure out exactly how much you need.
Measuring Square Footage for Accurate Material Estimates
First things first, you need to know the size of the area you're covering. Grab a tape measure and get those dimensions. For a simple rectangular or square room, it's just length times width. If your space is more complex, break it down into smaller, manageable shapes (like rectangles and squares) and add up their areas. Don't forget to measure any tricky nooks or crannies. This gives you your base square footage.
Always double-check your measurements before ordering. It's better to be precise now than to deal with problems later.
Accounting for Waste and Cuts in Marble Orders
This is where most people slip up. You can't just buy the exact square footage of your room. Why? Because you'll be cutting tiles to fit edges, around doorways, and for any special patterns. Plus, sometimes a tile might have a small flaw, or you might accidentally chip one during installation. This is called the 'waste factor'.
For natural stone like marble, it's standard practice to add between 10% and 20% extra to your total square footage. For really complex layouts or if you're buying smaller, more intricate pieces like mosaics, you might even want to go up to 25%. This extra bit covers those inevitable cuts, potential breakage, and ensures you have a few spare tiles for future repairs.
Here’s a quick look at how it works:
| Project Area (sq ft) | Waste Factor (%) | Extra Material Needed (sq ft) | Total Order (sq ft) |
|---|---|---|---|
| 100 | 10% | 10 | 110 |
| 100 | 15% | 15 | 115 |
| 100 | 20% | 20 | 120 |
Remember, ordering a little extra upfront is far cheaper than having to place a second, smaller order later. Stone batches can vary, and you might not be able to get an exact match if you run short.
Understanding Marble Variations and Sample Recommendations
Marble is a natural stone, and that's part of its charm! But it also means that no two pieces are exactly alike. The color, veining, and even the texture can vary from one batch to another. What you see in a photo online or even in a showroom might not be 100% identical to what you receive. This is why it's so important to order samples. Seeing a sample in your own space, with your lighting, will give you the best idea of what to expect. It helps manage expectations and ensures you're happy with the final look. If you're planning a large installation, consider ordering samples from different batches if possible to see the range of variation. This step is key to avoiding surprises and ensuring your project turns out just as beautiful as you imagined. You can easily buy marble tiles online USA and request samples to be sure.
Exploring Marble Product Options and Collections
Marble isn't just one thing; it's a world of natural beauty waiting to transform your space. When you're thinking about marble installation, the first step is really getting to know what's out there. We've got a huge selection, from classic tiles to unique slabs, and even decorative pieces. It’s all about finding that perfect fit for your home or project.
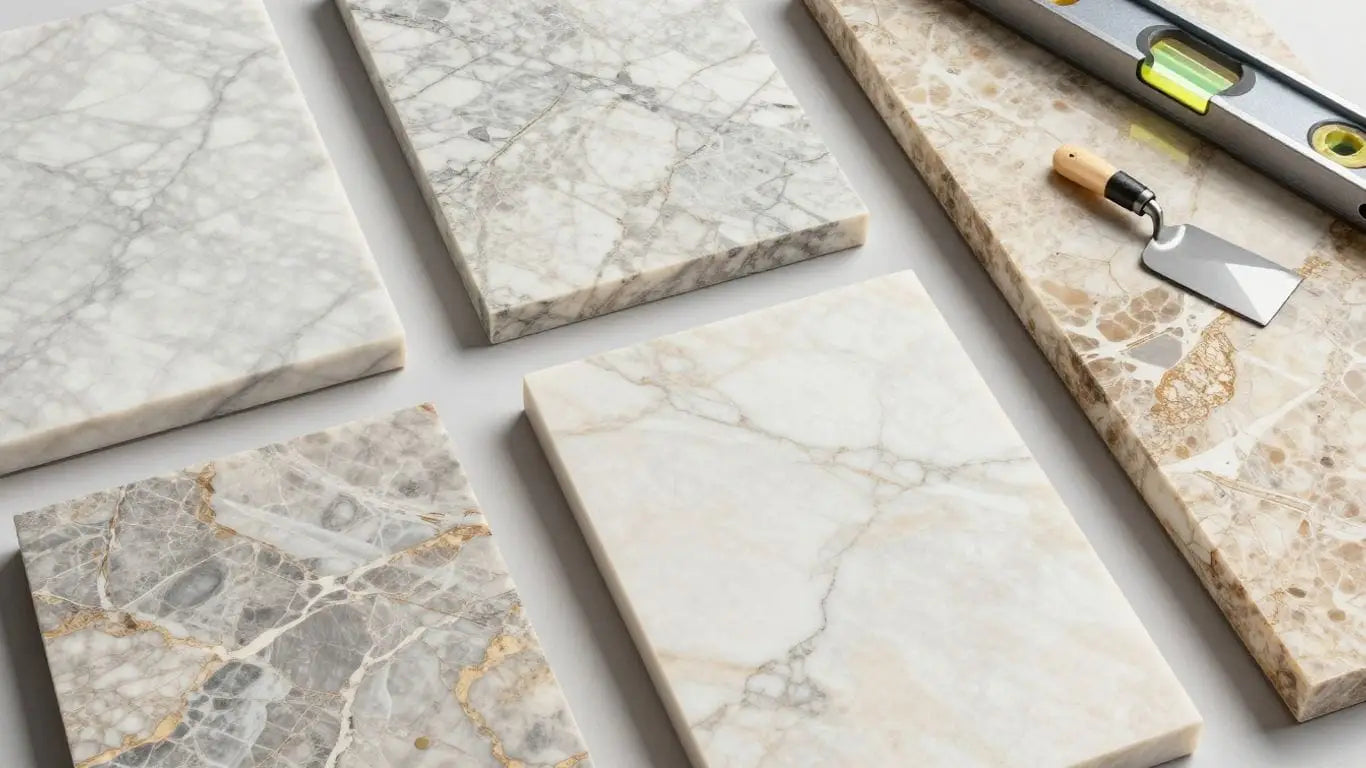
Discovering the Beauty of Marble Tiles and Slabs
Marble tiles are incredibly popular for a reason. They bring that timeless elegance to floors, walls, and backsplashes. Think about the classic Carrara White, with its soft gray veins on a pure white background, or the warm, inviting tones of Crema Marfil. These aren't just tiles; they're pieces of art for your home. We have them in all sorts of sizes and finishes, from polished to honed, so you can get exactly the look you want. If you're planning a kitchen remodel or a bathroom update, our marble tiles are a fantastic choice. You can even buy marble tiles online USA from us and have them delivered right to your door.
Marble slabs, on the other hand, are for those bigger statements. Countertops, vanity tops, or even a dramatic feature wall – slabs offer a more continuous, luxurious look. Imagine a Calacatta Gold slab with its bold veining and rich golden hues. It truly makes a space feel special. We source the finest marble from quarries around the world, so you know you're getting top quality.
Enhancing Designs with Marble Mosaics and Medallions
Want to add a little something extra? Marble mosaics and medallions are perfect for that. Mosaics come in all sorts of patterns – think herringbone, hexagon, or even intricate custom designs. They're amazing for backsplashes, shower floors, or accent walls. They let you play with color and texture in a really creative way. A small mosaic detail can make a huge difference in a room's overall feel.
Medallions are like the jewelry of marble installations. These are pre-designed pieces, often circular or intricate, that serve as a stunning focal point. Imagine a marble medallion in the center of your entryway floor or as a decorative element on a wall. They add a level of sophistication that's hard to match.
Considering Marble Pavers for Outdoor Applications
Don't forget about your outdoor spaces! Marble pavers are a beautiful way to extend that sense of luxury beyond your home's walls. Patios, walkways, pool decks – marble pavers can handle it all. They offer a natural, elegant look that blends well with landscaping. While they require proper sealing and maintenance, the aesthetic payoff is significant. They're a step up from standard concrete or brick, giving your outdoor areas a high-end feel. We have options like Tundra Gray Marble that work wonderfully outdoors, offering durability and natural beauty.
Case Study: The Miller Residence
The Miller family wanted to update their master bathroom. They chose Carrara White marble tiles for the floor and shower walls, paired with a delicate Carrara White mosaic for the backsplash behind the vanity. The result was a spa-like retreat that felt both classic and incredibly fresh. They mentioned how seeing the actual tiles in person, thanks to our sample service, made all the difference in their final decision.
Case Study: Downtown Bistro Project
A local bistro wanted to create a sophisticated dining atmosphere. They opted for Nero Marquina marble slabs for their bar top, which provided a dramatic, high-contrast look. For the entryway, they installed a custom marble medallion featuring a geometric pattern. The combination of the bold black marble and the intricate medallion design significantly elevated the restaurant's ambiance, drawing compliments from patrons.
When selecting marble, always consider ordering samples. Natural stone has inherent variations in color and veining, and seeing a sample in your home's lighting is the best way to confirm your choice and avoid surprises.
Cost-Saving Strategies for Marble Projects

Marble can seem like a big investment, but smart choices can make it surprisingly affordable. We're here to show you how to get that luxurious look without overspending. Let's explore some clever ways to manage your budget.
Clearance Marble Items: Quality at an Affordable Price
Don't overlook the savings on clearance marble! At Surfaces Galore, we often have discontinued items, overstock, or sale marble available at significantly reduced prices. These pieces are still high-quality natural stone, perfect for smaller projects, accent areas, or even DIY endeavors. You might find slight variations, but that's the beauty of natural stone – each piece is unique. It’s a fantastic way to buy marble tiles online USA for less.
- High-Quality Material: Get the elegance of marble at a fraction of the cost.
- Unique Character: Minor variations add to the stone's natural charm.
- Versatile Use: Great for vanities, backsplashes, or creative projects.
Case Study: Sarah wanted a marble backsplash in her kitchen but had a tight budget. She found exactly what she needed in our clearance section – beautiful Calacatta Gold marble tiles that were discontinued. She saved over 40% compared to the original price and achieved a stunning, high-end look for her kitchen.
Understanding the Affordability of Travertine vs. Marble
While marble is the king of luxury, travertine offers a similar natural stone appeal at a more budget-friendly price point. Travertine has a beautiful, earthy look with natural pits and variations, making it a great alternative for flooring, patios, and walls. If you love the natural stone aesthetic but need to keep costs down, travertine is definitely worth considering. It’s generally more affordable than marble, though prices can vary based on quality and finish.
| Stone Type | Typical Price Range (per sq ft) | Common Uses |
|---|---|---|
| Marble | $5 - $20+ | Countertops, flooring, walls, decorative |
| Travertine | $3 - $10+ | Flooring, patios, walls, landscaping |
Travertine provides a warm, rustic charm that can be just as impactful as marble's classic elegance, often at a more accessible price point. It’s a smart choice for homeowners looking for natural beauty on a budget.
Exploring Bulk Purchase Discounts for Large Orders
Planning a large-scale renovation or a commercial project? Buying in bulk can lead to significant savings. When you're ready to buy marble tiles online USA for a substantial area, inquire about our bulk purchase discounts. We can often offer better pricing for larger quantities, making your project more cost-effective. This is especially true if you're looking at specific marble collections or slabs for a big job. Don't hesitate to reach out to our sales team to discuss your needs and potential volume discounts. It’s a great way to secure premium materials for less when you need a lot.
Case Study: A developer was renovating a multi-unit apartment complex and needed durable, elegant flooring. By purchasing a large quantity of Bianco Dolomite marble tiles directly from us for all units, they qualified for a significant bulk discount, saving thousands of dollars on the overall project cost while still delivering a high-value finish to the properties. This allowed them to buy marble tiles online USA with confidence and a better bottom line.
Maintaining Your Marble Installation
Your stunning marble installation deserves the best care to keep it looking its best for years to come. Proper maintenance isn't just about cleaning; it's about protecting your investment and preserving that timeless elegance. Think of it as a spa day for your stone.
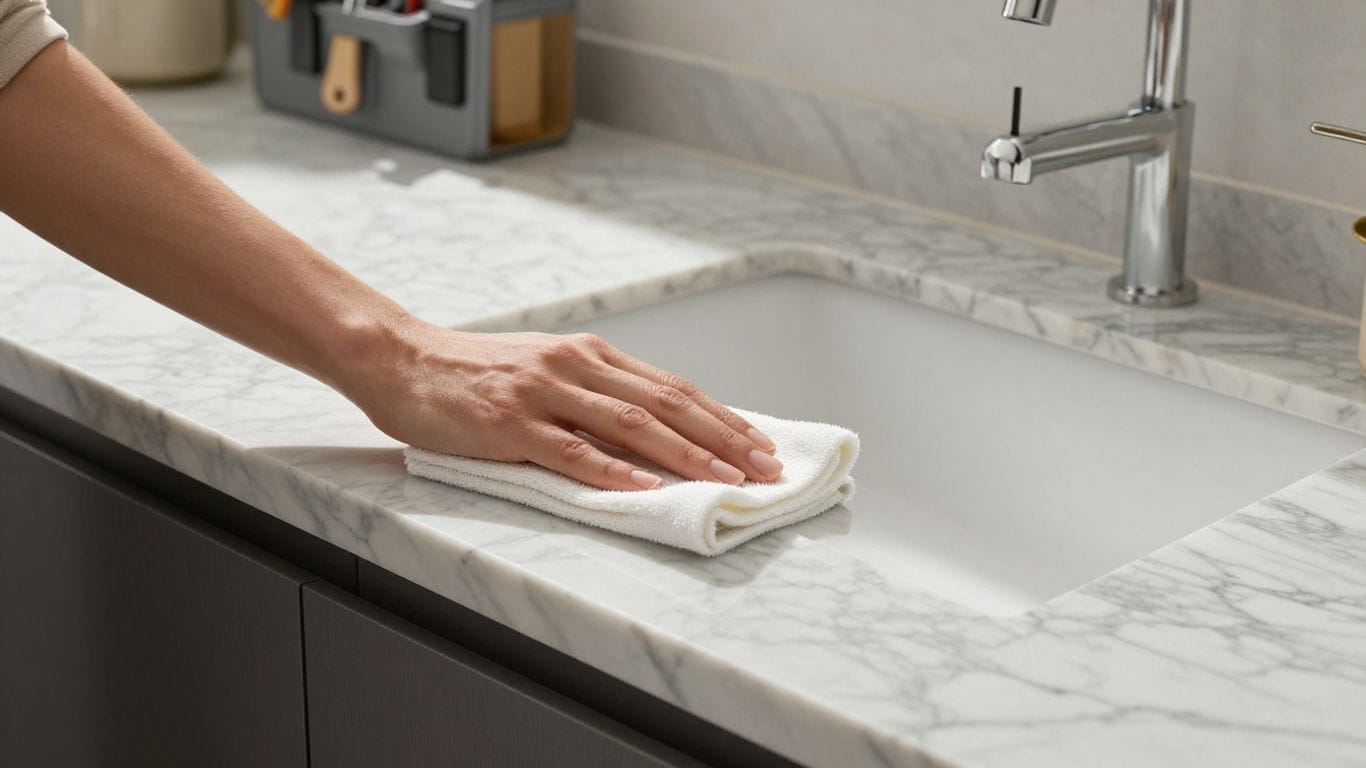
Essential Cleaning and Maintenance for Natural Stone
Keeping your marble pristine is simpler than you might think. The key is consistency and using the right methods. Regular cleaning prevents dirt and grime from settling into the stone's natural pores.
- Daily Wipe-Downs: A quick sweep or dust mop daily removes grit that can scratch the surface over time.
- Weekly Cleaning: Use a soft cloth dampened with water and a stone-safe cleaner.
- Spill Management: Address spills immediately. Blot, don't wipe, to prevent spreading.
Choosing Appropriate pH-Neutral Cleaners
This is where many people go wrong. Harsh chemicals, even common household cleaners, can etch or dull your marble's finish. You need products that are gentle yet effective.
Always opt for cleaners specifically labeled as pH-neutral and safe for natural stone. This protects the sealant and the stone itself from damage. Avoid anything acidic like vinegar or lemon juice, or alkaline like bleach.
Using the wrong cleaner can lead to permanent damage. If you're unsure, stick to plain water and a soft cloth for most daily cleanups. For tougher spots, a dedicated stone cleaner is your best bet. You can find great options when you buy marble tiles online USA.
The Importance of Regular Sealing for Stain Prevention
Marble is naturally porous, meaning it can absorb liquids. Sealing creates a barrier that helps prevent stains from setting in. Think of it like waterproofing your stone.
Regular sealing is your best defense against spills and etching. How often you need to seal depends on the type of marble and how much traffic it gets. A good rule of thumb is to reseal at least once a year. You can test if your marble needs sealing by dripping a small amount of water onto the surface. If it beads up, your sealant is still working. If it soaks in and darkens the stone, it's time to reseal.
Case Study: The Miller Residence
The Millers installed a beautiful Carrara marble countertop in their kitchen. Initially, they were diligent with cleaning but neglected sealing. After about six months, they noticed a faint ring from a coffee mug and a slight discoloration from a spilled glass of red wine. After a professional cleaning and resealing, they committed to an annual sealing schedule. Now, two years later, their countertop still looks as stunning as the day it was installed, with no new stains or etching.
Case Study: The Chen Family's Bathroom
The Chen family chose a stunning white marble for their master bathroom vanity. They used a pH-neutral cleaner daily and resealed every 10 months. Despite frequent use, including makeup spills and toothpaste splatters, the marble remained pristine. Their proactive approach to maintenance meant their bathroom vanity maintained its luxurious appearance without any signs of wear or staining, proving that consistent care pays off.
Shipping and Handling of Marble Orders
Getting your beautiful marble from our warehouse to your doorstep is a process we take very seriously. We know you're excited to start your project, and we want to make sure your materials arrive safely and on time. Let's talk about how we handle shipping and what you can expect.
Understanding Shipping Timelines for In-Stock Items
When you order marble tiles online in the USA, you want to know when they'll arrive. For items we have ready to go, shipping typically takes between 1 to 8 business days. This timeframe allows us to carefully pack your order and get it on its way. We work with reliable carriers to ensure your stone travels securely. Remember, the current global logistics environment can sometimes cause delays, especially with maritime routes. This means that while we aim for prompt delivery, unexpected issues can arise. For example, the quartz market in early 2026 faces a high-cost, constrained logistics environment, likely to persist due to ongoing issues with maritime routes like the Strait of Hormuz. This situation impacts supply chain costs and availability. We'll always keep you informed if there are any significant changes to your expected delivery.
Expedited Handling Options for Prioritized Dispatch
Need your marble faster? We offer expedited handling. This means your order gets top priority in our warehouse. We'll process and dispatch it quicker than standard orders. It's important to know that expedited handling doesn't mean same-day or overnight shipping, especially with heavy, fragile natural stone. However, it does mean your order gets special attention from the moment you click 'buy'. This can shave off valuable time from the initial processing stage, getting your materials closer to you sooner. It’s a great option if you're on a tight schedule and want to move your project forward quickly.
Procedures for Damaged Shipments and Replacements
We pack everything with extreme care, but sometimes, despite our best efforts, damage can happen during transit. It's rare, but it's something we're prepared for. If your marble arrives with visible damage, please don't refuse the shipment unless it's completely destroyed. Instead, take clear pictures of the damaged product right away. Contact our customer support team immediately with these photos. We'll review the situation to see if a replacement is needed. Our goal is to make this process as smooth as possible for you. We want to make sure you get the beautiful, undamaged marble you ordered for your home.
Case Study: The Kitchen Countertop Transformation
Sarah in California was renovating her kitchen and ordered stunning Calacatta Gold marble slabs. She opted for expedited handling to speed up her project. While her order arrived within the estimated 5 business days, one slab had a minor chip on the edge. She immediately contacted our support team, sent photos, and we arranged for a replacement slab to be shipped out within 24 hours. The rest of the project proceeded without major delays, and Sarah was thrilled with her new kitchen.
Case Study: The Bathroom Floor Project
Mark in Texas ordered a large quantity of Carrara White marble tiles for his bathroom. His order was processed with standard shipping. Unfortunately, due to an unforeseen issue with the shipping carrier, his delivery was delayed by two days. We proactively notified Mark of the delay and offered a small discount on his next purchase as an apology. Despite the slight delay, the tiles arrived in perfect condition, and Mark was very pleased with the quality and the way we handled the situation.
When ordering natural stone, especially online, it's always wise to factor in a small buffer for potential shipping or handling delays. While we strive for efficiency, the nature of transporting delicate materials means occasional hiccups can occur. Understanding these procedures upfront helps manage expectations and ensures a smoother experience for your marble installation project.
Getting your beautiful marble to your home is a top priority for us. We carefully pack and ship every order to make sure it arrives safely. Want to know more about how we handle your marble? Visit our website for all the details on our shipping and handling process.
Wrapping Up Your Marble Project
So, we've gone over a lot of details about marble installation costs. It's not just about the price tag of the stone itself, but also the prep work, the actual laying of the tiles, and what happens after. Thinking about all these steps helps you get a clearer picture of the total expense. Remember, investing in good quality marble from places like Surfaces Galore, and making sure it's installed right, really pays off in the long run. It makes your home look great and adds lasting value. If you're ready to move forward, don't hesitate to reach out to the experts at Surfaces Galore for a quote or to check out their amazing selection. They can help you find just what you need to make your project a success.
Frequently Asked Questions
How do I figure out how much marble I need for my project?
First, measure the length and width of the area you want to cover. Multiply those numbers to get the square footage. Always add about 10-15% extra to cover mistakes, cuts, or future repairs.
Can I see marble samples before I buy?
Yes! At Surfaces Galore, we offer marble samples so you can check out the color and texture in person before making a big purchase.
Is travertine usually cheaper than marble?
Most of the time, travertine costs less than marble. Prices can change based on the quality and finish, but travertine is a good choice for budget-friendly projects.
Will the marble I get look the same as the pictures online?
Marble is a natural stone, so each piece is unique. Colors and veining can vary, which is why we recommend ordering a sample to see what you’ll actually get.
What’s the best thickness for marble tiles?
For floors, tiles that are 3/8 inch to 1/2 inch thick are common. If you’re doing countertops, slabs are usually thicker—either 3/4 inch or 1-1/4 inch.
Do you offer custom cuts for marble?
Yes, Surfaces Galore can cut marble to fit your special needs, like custom shower shelves, thresholds, or unique shapes for your project.
What’s the best way to clean and care for natural stone like marble?
Use a pH-neutral cleaner made for natural stone. Stay away from harsh or acidic cleaners, as they can damage marble. Also, sealing your marble regularly helps protect it from stains.
How long does shipping take for marble orders?
For in-stock marble, shipping usually takes between 1 and 8 business days, depending on where you live. We ship nationwide and offer expedited handling if you need your order faster.
Leave a comment