
Marble tile calibration explained: precision for design success

TL;DR:
- Proper calibration standardizes marble tile thickness, flatness, and dimensions for seamless installation.
- Calibrated tiles reduce lippage, accelerate installation, and lower labor and callback costs.
- Always verify supplier calibration documentation to ensure quality and avoid costly project issues.
Most marble tile installation failures share a common root cause that rarely gets discussed on the job site. Uneven joints, persistent lippage, and mismatched tile heights are not random bad luck. They trace directly back to calibration quality, or the lack of it. Marble tile calibration is a manufacturing process that standardizes the thickness, flatness, and dimensions of natural stone tiles, and understanding it is the difference between a flawless finish and an expensive remediation call. This article walks you through exactly what calibration is, how it works, and how to use that knowledge to protect your projects.
Table of Contents
- What is marble tile calibration?
- How marble tile calibration works: A step-by-step breakdown
- Calibration vs. rectification: What’s the difference and why does it matter?
- Why calibrated tiles are critical: Benefits for quality, installation, and cost
- Why tile calibration is underappreciated—and how to get it right
- Source calibrated marble for fail-safe installations
- Frequently asked questions
Key Takeaways
| Point | Details |
|---|---|
| Calibration defined | Calibrated marble tiles have uniform thickness, flatness, and dimensions, ensuring quality results. |
| Quality assurance | Specifying calibrated tiles prevents lippage, uneven finishes, and reduces installation headaches. |
| Calibration vs. rectification | Calibration standardizes thickness while rectification refines tile edges for tight joint lines. |
| Supplier verification | Always request calibration specs and tolerances when sourcing marble tiles for professional jobs. |
What is marble tile calibration?
Calibration is not the same as general stone processing. Most natural stone goes through some form of cutting and finishing before it ships, but calibration is a specific, controlled step that brings tiles to a uniform standard across three measurable attributes: thickness, flatness, and overall dimensions. Without it, two tiles from the same quarry block can vary enough to create visible height differences at every joint.
The marble tile calibration importance becomes clear the moment you try to install uncalibrated stone in a large-format floor. You spend more time shimming, adjusting mortar beds, and grinding down high spots than you do actually laying tile. That is labor cost that was never in the budget.
Here is what calibration actually standardizes:
- Thickness: Every tile is ground to a consistent depth, typically within fractions of a millimeter.
- Flatness: The tile face is leveled so there is no bow, warp, or center crown.
- Dimensional accuracy: Length and width are controlled so tiles align predictably in any pattern.
Think of it this way: natural marble is quarried from the earth, and no two slabs are identical. Calibration is the manufacturing step that takes that beautiful, unpredictable material and gives it the consistency a professional installation demands.
“Marble tile calibration standardizes thickness, flatness, and dimensions through grinding and polishing,” which is what separates a tile ready for precision installation from one that requires constant field correction.
If you are still building your foundational knowledge of the material itself, reviewing what is marble tile will give you the context to make better sourcing decisions from the start. Calibration is not a premium add-on. For any project where aesthetics and longevity matter, it is a baseline requirement.
How marble tile calibration works: A step-by-step breakdown
Every calibrated marble tile passes through a defined sequence of mechanical processes before it reaches your project. Understanding these stages helps you ask better questions of your supplier and catch red flags before materials arrive on site.
- Block extraction and primary cutting: Marble is quarried in large blocks, then gang-sawed into slabs of approximate thickness. This step is rough and intentionally oversized to allow for material removal in later stages.
- Secondary cutting into tiles: Slabs are cut into individual tile units using bridge saws or water-jet equipment. Dimensions are close but not yet precise.
- Mechanical grinding: This is the core calibration step. Tiles move through a calibrating machine fitted with rotating abrasive heads. Calibration uses mechanical grinding with fine abrasives and tight monitoring to achieve precise thickness across the entire tile surface.
- Surface polishing: After grinding, tiles are polished to the specified finish, whether honed, polished, or brushed. The flatness achieved in grinding makes this step consistent.
- Quality control inspection: Finished tiles are measured with digital calipers and flatness gauges. Any tile outside the accepted tolerance range is pulled from the batch.
Here is a quick reference for typical calibration tolerances used in the industry:
| Attribute | Standard tolerance | High-precision tolerance |
|---|---|---|
| Thickness variation | ±0.5 mm | ±0.3 mm |
| Flatness (bow/warp) | ±0.5 mm | ±0.2 mm |
| Length/width variation | ±0.5 mm | ±0.3 mm |
These numbers matter on the job site. A 0.5 mm thickness variance across a large floor adds up to visible lippage at grout joints. High-precision calibration reduces that risk significantly.

Pro Tip: Before you place any marble order, ask your supplier for the calibration tolerance sheet for that specific product. If they cannot produce one, treat that as a warning sign. Reputable suppliers document this data because it protects both parties.
For a broader look at how calibration fits into the full installation workflow, the marble floor installation tips guide covers the downstream steps that depend on getting calibration right. You can also explore marble origins and quality to understand how quarry source affects raw material consistency before calibration even begins.
Calibration vs. rectification: What’s the difference and why does it matter?
This is where many design professionals get tripped up, and the confusion leads to real project problems. Calibration and rectification are two separate processes that address different aspects of tile quality. Specifying the wrong one for your application creates mismatched expectations and installation headaches.
Calibration focuses on thickness and flatness; rectification involves edge cutting for tight grout lines. That single distinction changes everything about how you specify and install the tile.
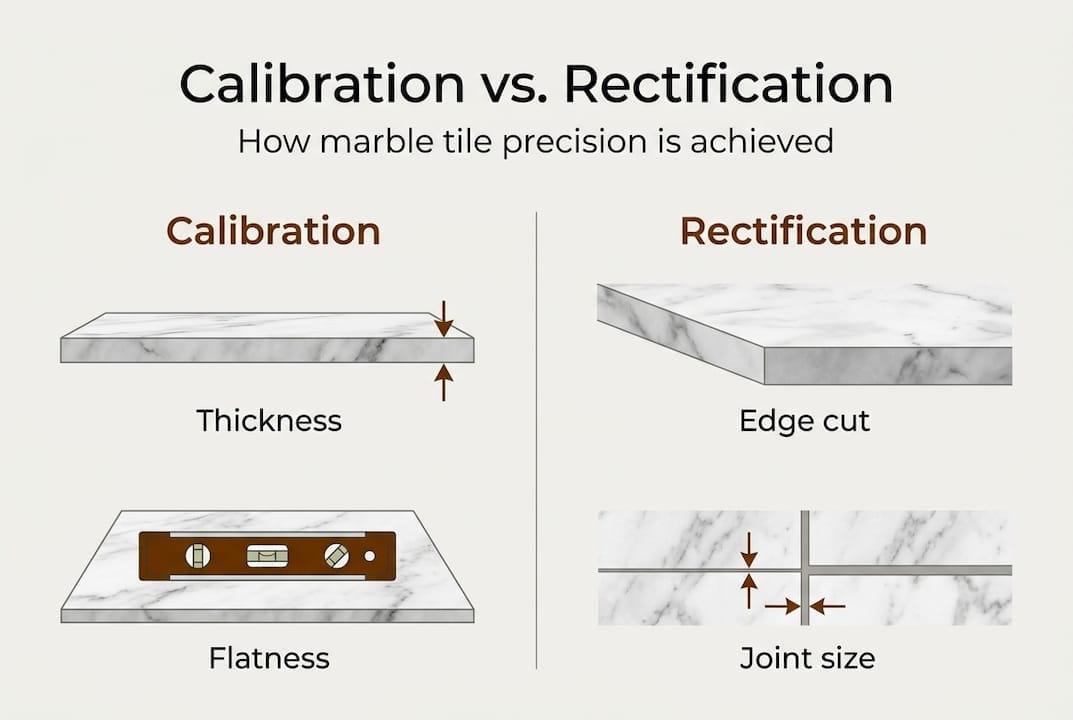
| Feature | Calibration | Rectification |
|---|---|---|
| Primary focus | Thickness and flatness | Edge precision and dimensional accuracy |
| Method | Mechanical grinding of tile face | Precision cutting of tile edges |
| Result | Consistent height across tiles | Consistent size for minimal grout joints |
| Best for | All installations requiring flat surfaces | Large-format tiles, minimal grout joint designs |
| Grout joint width | Standard (2 mm or wider) | Tight (1 mm or less possible) |
Here is why the confusion is costly. A contractor specifies calibrated tile expecting tight 1 mm grout joints, only to find that calibration alone does not control edge straightness. The result is inconsistent joint widths across the floor, which looks unprofessional and may require relaying sections.
Conversely, a designer specifies rectified tile for a wet area without confirming calibration, and the installer discovers significant thickness variation between tiles. Lippage appears even with perfect edge alignment.
The right answer for most high-end marble projects is tile that has been both calibrated and rectified. These are not mutually exclusive processes. Many premium tiles go through both.
Key questions to ask when specifying:
- Is this tile calibrated, rectified, or both?
- What are the documented tolerances for each process?
- What minimum grout joint width does the manufacturer recommend?
For current design applications and how calibration and rectification affect material choice, the marble selection tips resource breaks down the specification process in practical terms. If you are tracking where the market is heading, marble tile trends shows how large-format and minimal-joint designs are making both processes increasingly important.
Why calibrated tiles are critical: Benefits for quality, installation, and cost
The technical details of calibration only matter if they translate into better project outcomes. They do, and the impact shows up in ways that affect your schedule, your budget, and your reputation.
Calibrated tiles reduce lippage, enable thinner mortar beds, tighter grout joints, and predictable installation. Uncalibrated tiles cause uneven surfaces and higher labor costs. That last point is the one that hits hardest in practice.
Here is what working with properly calibrated marble actually looks like on a job site:
- Faster layout and setting: Tiles seat consistently without constant mortar adjustment.
- Thinner mortar beds: Consistent thickness means you are not compensating for variation with extra material.
- Reduced lippage: Flat, uniform tiles align at joints without height differences that catch light and feet.
- Fewer callbacks: The finished surface holds up visually over time without the micro-movement that poorly calibrated tiles experience.
- Cleaner grout joints: Consistent tile geometry means joints stay even throughout the installation.
- Predictable labor hours: When tiles behave consistently, installers can accurately estimate time and cost.
The flip side is equally instructive. Projects that use uncalibrated or poorly calibrated marble often see installation time double on large-format floors. Installers spend hours correcting what the factory should have controlled. That time comes out of your margin or your client relationship.
Pro Tip: Always request calibration tolerance documentation before specifying or ordering any marble tile. Review it alongside the marble tile shade range specs to get a complete picture of what you are actually purchasing. For exterior applications, calibration is even more critical. The outdoor marble tiling process involves additional variables where tile consistency directly affects drainage, safety, and long-term performance.
Why tile calibration is underappreciated—and how to get it right
After years of working directly with designers, architects, and contractors, we have noticed a consistent pattern: calibration is the specification detail that gets skipped most often, and it is the one that causes the most expensive problems.
The reason is partly invisible. You cannot see calibration quality in a product photo or a showroom sample. It only reveals itself during installation, when it is too late to send the material back without a fight. Projects using lower-grade, poorly calibrated marble routinely face doubled installation time and increased callbacks, yet the tile itself looked fine in the sample.
The fix is straightforward but requires discipline. Always request supplier calibration specs, tolerance documentation, and compare vendors before committing to a source. A supplier who documents their calibration process is one who stands behind their product. One who cannot produce that data is asking you to take a risk they are not willing to share.
We also recommend building marble supplier comparison into your standard pre-purchase workflow. Calibration specs vary significantly between suppliers at similar price points, and that variation directly affects your installation cost and finish quality. The professionals who consistently deliver premium results treat calibration documentation as non-negotiable, not optional.
Source calibrated marble for fail-safe installations
If you are ready to realize the benefits of perfectly calibrated marble, sourcing from a supplier who prioritizes documentation and quality control is your most important next step.

At Surfaces Galore, we provide detailed calibration documentation with our marble tile products and give design professionals direct access to our sourcing expertise. As a direct importer based in Anaheim, California, we ship nationwide and work closely with designers, architects, and contractors who need reliable specs, consistent quality, and honest answers before materials ship. Browse our marble collection and connect with our team to get the calibration data your next project deserves.
Frequently asked questions
What does calibration mean for marble tile?
Calibration is the manufacturing process that standardizes marble tile thickness, flatness, and dimensions, ensuring consistent, seamless installation across the entire surface.
How does calibrated marble tile help prevent lippage?
Calibrated tiles reduce lippage by ensuring uniform thickness across every tile in a batch, so tiles seat at the same height without creating dangerous or unsightly height differences at joints.
Is calibration the same as rectification for marble tiles?
No. Calibration controls thickness and flatness through face grinding, while rectification involves edge cutting to achieve precise dimensions and enable tight grout joints. Premium installations often require both.
What should I look for in supplier calibration specs?
Request tolerance documentation that specifies acceptable thickness and flatness variation in millimeters, and compare vendors on those numbers before committing to a purchase.


Leave a comment