
Home Tile Renovation Guide 2026: 30% Less Edge Chipping

Choosing natural stone tiles for your kitchen or bathroom renovation can feel overwhelming. Between selecting marble versus travertine, mastering installation techniques, and avoiding costly mistakes, homeowners often struggle to achieve the premium results they envision. This guide simplifies every step, from selecting the right stone to proper installation techniques and maintenance, so you can confidently transform your space with durable, elegant natural stone tiles.
Table of Contents
- Introduction To Premium Natural Stone Tiles For Home Renovation
- Prerequisites: Tools, Materials, And Surface Conditions Before Starting
- Step By Step Installation Process For Natural Stone Tiles
- Common Mistakes And Troubleshooting During Tile Renovation
- Maintenance, Cleaning, And Sealing Best Practices
- Expected Outcomes: Timelines, Costs, And Durability Benchmarks
- Discover Premium Natural Stone Tiles At Surfaces Galore
- Frequently Asked Questions About Home Tile Renovation With Natural Stone
Key takeaways
| Point | Details |
|---|---|
| Material selection and prep | Choosing the right natural stone and ensuring proper surface preparation are critical for renovation success. |
| Installation fundamentals | Use recommended tools and follow stepwise installation methods for durability and aesthetic appeal. |
| Avoid common pitfalls | Improper sealing and ignoring moisture barriers lead to costly failures; fix these issues proactively. |
| Maintenance schedule | Regular resealing every 12 to 24 months preserves stone beauty and function. |
| Timeline expectations | Professional tile renovations typically take one to two weeks with adherence to safety guidelines. |
Introduction to premium natural stone tiles for home renovation
Natural stone tiles elevate kitchen and bathroom spaces with timeless beauty and durability. Marble and travertine stand out as the most popular premium options for homeowners seeking luxurious, long lasting surfaces. Understanding their unique characteristics helps you make informed material choices that align with your design vision and maintenance preferences.
Marble delivers striking veining patterns and a polished elegance that instantly transforms any room. Its softer composition requires annual sealing to protect against stains and etching, especially in high traffic kitchens. When properly maintained, marble adds substantial value and sophistication to your home.
Travertine tiles offer a rustic, textured look and are durable when sealed properly. Their warm earth tones and naturally pitted surface create inviting spaces in both traditional and contemporary designs. Sealing every one to two years maintains their longevity in kitchen and bath settings.
Both tile types require specific care routines to preserve their appearance. Consider these factors when selecting your stone:
- Slip resistance based on finish type (polished, honed, or tumbled)
- Maintenance commitment including sealing frequency and cleaning requirements
- Aesthetic preferences for veining patterns versus textured surfaces
- Budget allocation for materials, installation, and ongoing care
Pro Tip: Test samples in your actual space under different lighting conditions before committing to large orders. Natural stone variations mean each tile tells its own story.
Explore detailed guidance on picking floor tiles for kitchens and bathrooms to refine your selection. For marble enthusiasts, review the best marble types for kitchens to match your style. Bathroom renovators benefit from choosing stone for bathrooms with moisture considerations in mind.
Understanding natural stone flooring characteristics helps you appreciate the investment you are making in quality materials.
Prerequisites: tools, materials, and surface conditions before starting
Successful natural stone tile installation begins long before you mix adhesive. Gathering the right tools, securing quality materials, and preparing your surface properly prevents frustrating delays and ensures professional results. Skipping these foundational steps increases the risk of tile failure and costly repairs.
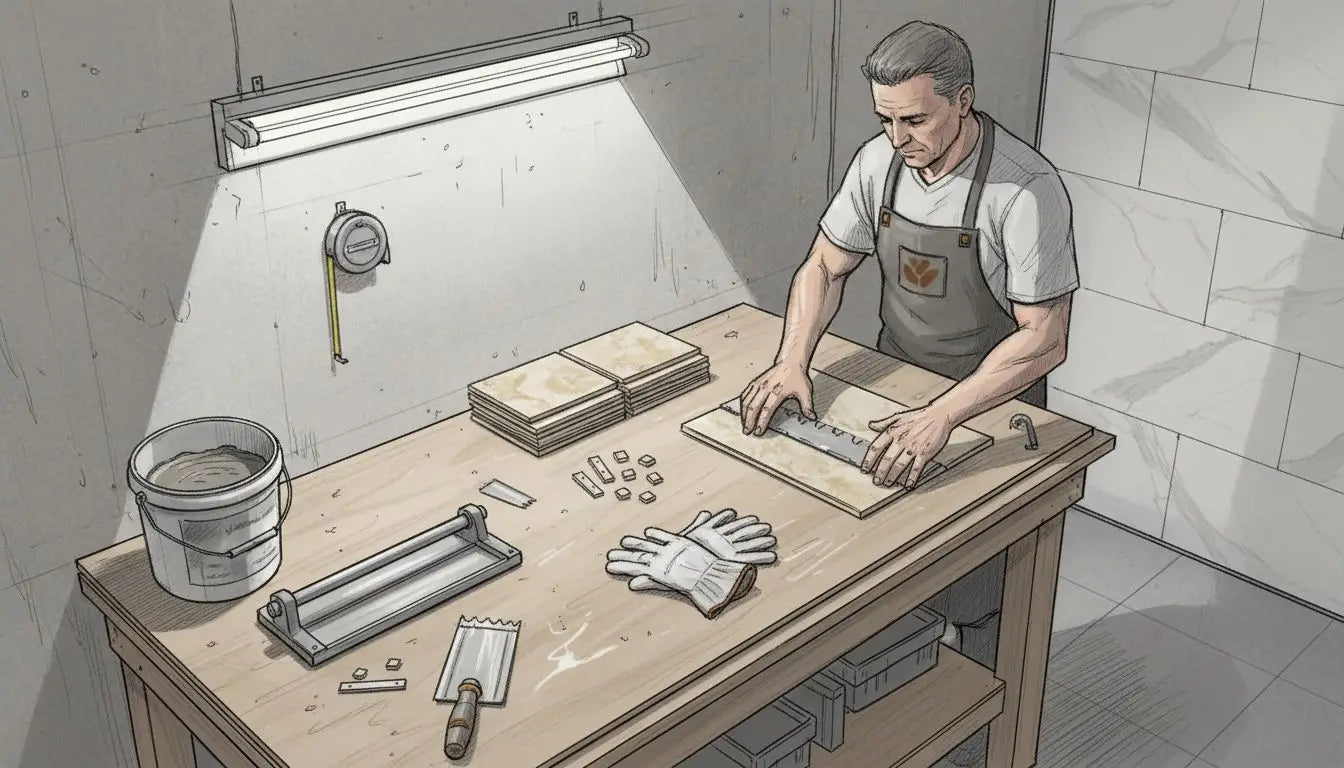
Essential tools streamline your installation workflow. Stock your workspace with notched trowels sized for your tile thickness, tile spacers for consistent grout lines, and leveling systems to prevent lippage. Add mixing buckets for adhesive preparation, rubber mallets for setting tiles, and a quality tile cutter or wet saw for precise cuts. Safety gear including heavy duty gloves, protective goggles, and dust masks protects you throughout the project.
Material selection directly impacts installation success and longevity. Purchase stone specific adhesive formulated for natural stone tiles, as standard thinset can cause discoloration. Choose grout designed for natural stone that resists cracking and moisture penetration. Acquire high quality stone sealer appropriate for your marble or travertine type, plus premium tiles with minimal variation if pattern matching matters.
Proper surface preparation including thorough cleaning, leveling, and moisture assessment is critical to ensure stone tile adhesion and durability. Your subfloor must be clean, dry, and level within one eighth inch over ten feet. Remove all debris, old adhesive residue, and contaminants that could compromise bonding.
Install moisture barriers in wet areas like bathrooms to prevent water damage beneath your tiles. Use a moisture meter to verify readings below manufacturer specifications before proceeding. This simple step prevents adhesive failure and tile detachment months after installation.
| Preparation Task | Required Tools | Success Criteria |
|---|---|---|
| Surface cleaning | Shop vacuum, scraper, degreaser | No dust, debris, or grease present |
| Leveling | Level, self leveling compound | Within 1/8 inch over 10 feet |
| Moisture check | Moisture meter | Below 4% for wood, 3% for concrete |
| Barrier installation | Membrane, roller, utility knife | Complete coverage in wet zones |
Pro Tip: Double check moisture levels with a moisture meter before starting to avoid costly tile failure months after installation.
For comprehensive material selection guidance, review ordering natural stone step by step to ensure you purchase the right quantities and specifications.
Step by step installation process for natural stone tiles
Installing natural stone tiles requires methodical execution and attention to detail at each phase. Following this sequential approach ensures your renovation achieves both visual appeal and structural integrity. Rushing through steps compromises adhesion and can lead to premature tile failure.
-
Verify your surface is clean, level within one eighth inch over ten feet, and dry before installation. Remove any remaining dust with a damp cloth and allow complete drying. This foundation determines how well your tiles will bond and remain secure for decades.
-
Plan your tile layout to minimize cuts and create balanced visual flow. Dry fit tiles across your space, marking cut lines and pattern alignment. Start from the room center and work outward to maintain symmetry. This planning prevents awkward narrow cuts along visible edges.
-
Apply stone specific adhesive using a notched trowel sized for your tile thickness. Spread adhesive in small sections you can tile within 15 minutes before it skins over. Hold the trowel at a 45 degree angle for consistent ridges that ensure proper coverage.
-
Set each tile firmly into the adhesive with a slight twisting motion. Insert spacers between tiles for uniform grout lines, typically three sixteenths inch for natural stone. Use a level frequently to maintain flat alignment and prevent lippage. Allow adhesive to cure 24 to 48 hours before walking on tiles or grouting.
-
Mix grout formulated for natural stone following manufacturer ratios precisely. Apply with a rubber float held at 45 degrees, forcing grout deep into joints. Work diagonally across tiles to prevent pulling grout from joints. Clean excess grout with a damp sponge immediately to avoid stubborn haze on stone surfaces.
-
Seal tiles within 24 hours after grout dries completely. Apply sealer with a clean applicator in thin, even coats, allowing penetration time per product instructions. Buff away excess before it dries to prevent streaking. Reseal every 12 to 24 months based on traffic levels and stone type.
| Installation Step | Key Tools | Critical Success Factor |
|---|---|---|
| Surface prep | Level, vacuum | Flatness within 1/8 inch |
| Layout planning | Chalk line, spacers | Balanced pattern, minimal cuts |
| Adhesive application | Notched trowel | Even ridges, proper coverage |
| Tile setting | Rubber mallet, level | No lippage, consistent spacing |
| Grouting | Float, sponge | Complete joint fill, clean surface |
| Sealing | Applicator, microfiber | Even penetration, no residue |
Pro Tip: Bevel marble tile edges before installation to reduce chip risk by 30 percent, especially on corners and high traffic areas.
For travertine specific techniques, consult the travertine tiling process guide. Marble installations benefit from understanding marble tile matching explained to achieve cohesive patterns.
Common mistakes and troubleshooting during tile renovation
Even experienced DIYers encounter challenges when working with natural stone tiles. Recognizing frequent errors before they become permanent problems saves time, money, and frustration. Most issues stem from inadequate preparation or using products not formulated for natural stone.
Failing to seal tiles or resealing infrequently tops the list of costly mistakes. Unsealed natural stone absorbs liquids rapidly, leading to deep stains and etching from acidic substances. Improper sealing and grout choice cause high failure rates in home natural stone renovations. Seal immediately after grout cures and maintain resealing every one to two years based on usage intensity.
Ignoring moisture barriers in bathrooms and other wet areas invites disaster. Water penetration beneath tiles causes adhesive breakdown and potential mold growth. Always install waterproof membranes on subfloors in moisture prone zones and verify complete dryness with a moisture meter before beginning installation.
Using standard grout instead of formulations designed for natural stone creates multiple problems. Regular grout can leach minerals that stain porous stone surfaces and lacks the flexibility needed for natural stone’s thermal expansion. Follow manufacturer recommendations strictly and purchase grout labeled specifically for marble or travertine.
Uneven surface preparation results in lippage, where tile edges sit at different heights creating trip hazards and an unprofessional appearance. This occurs when subfloors exceed the one eighth inch variance over ten feet or when adhesive application lacks consistency. Invest time in thorough leveling before installation begins.
Key troubleshooting solutions include:
- Remove grout haze immediately with stone safe pH neutral cleaners, not acidic products
- Address loose tiles promptly by removing, cleaning old adhesive, and resetting with fresh material
- Fill small chips with color matched epoxy to prevent moisture intrusion
- Correct minor lippage by grinding high spots carefully with diamond pads
Pro Tip: After spotting grout haze, clean with a stone safe cleaner promptly to prevent permanent marks that require professional restoration.
Understand the importance of sealing marble tiles and sealing travertine benefits to avoid the most common renovation failures.
Maintenance, cleaning, and sealing best practices
Protecting your natural stone tile investment requires consistent maintenance and appropriate cleaning methods. Stone tiles that receive proper care maintain their beauty for decades, while neglected surfaces show wear within months. Your daily habits make the biggest difference in long term appearance.
Use pH neutral, stone safe cleaning agents exclusively on natural stone surfaces. Acidic cleaners including vinegar, lemon juice, and many commercial bathroom cleaners etch marble and travertine, creating dull spots that cannot be buffed away without professional refinishing. Alkaline cleaners can also damage stone over time.
Avoid abrasive scrubbers, steel wool, and harsh chemicals that scratch or dull stone finishes. Soft microfiber mops and cloths clean effectively without surface damage. For stubborn dirt, use a soft bristle brush with your stone safe cleaner rather than increasing cleaner strength.
Clean spills immediately to prevent staining, especially from acidic foods, oils, and colored liquids. Wine, coffee, and citrus juices penetrate unsealed stone quickly, creating permanent discoloration. Blot spills rather than wiping to avoid spreading.
Sealing natural stone tiles preserves appearance and protects against stains, with resealing recommended every 12 to 24 months. High traffic areas and frequently wet surfaces require more frequent sealing. Test your seal annually by placing water droplets on the surface. If water beads up, your seal remains effective. If it absorbs quickly, reseal immediately.
Prevent etching and damage through smart daily practices:
- Place cutting boards under all food preparation to protect from acidic ingredients
- Use trivets and hot pads under cookware to prevent thermal shock
- Install felt pads under furniture legs to prevent scratches during movement
- Sweep or vacuum regularly to remove grit that acts like sandpaper underfoot
- Wipe acidic substances immediately, even from sealed surfaces
Review detailed information about sealing marble tiles and sealing travertine benefits to understand product selection and application techniques. Additional natural stone maintenance guidance covers seasonal care and deep cleaning methods.
Expected outcomes: timelines, costs, and durability benchmarks
Setting realistic expectations for your natural stone tile renovation helps you plan effectively and budget appropriately. Understanding typical project durations, cost ranges, and performance benchmarks prevents surprise delays or expenses. These factors vary based on room size, material selection, and whether you hire professionals or tackle installation yourself.
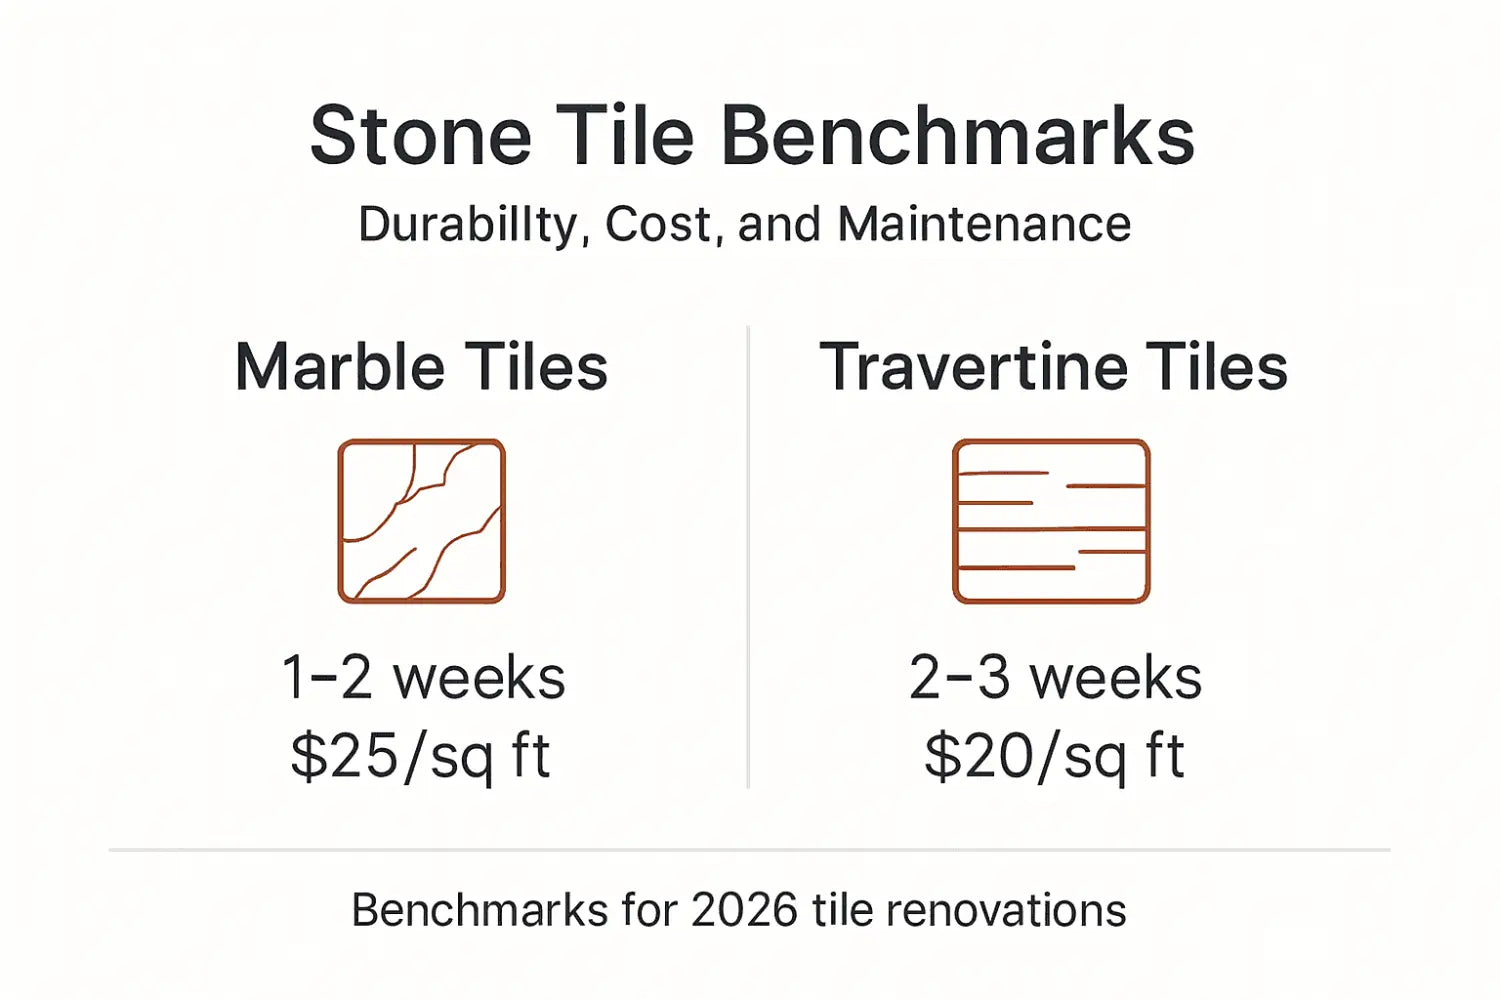
Typical kitchen or bathroom natural stone tile renovation projects take one to two weeks depending on size and complexity. Smaller bathrooms may complete faster, while large kitchens with intricate patterns require extended timelines. Factor in curing times for adhesive and grout, which cannot be rushed without compromising results.
Premium marble tiles command higher upfront costs but deliver unmatched aesthetic appeal with their unique veining and polished elegance. Expect to invest more in materials, specialized adhesives, and potentially professional installation given marble’s delicate nature. Travertine provides rustic charm at more moderate price points, making it popular for budget conscious homeowners seeking natural stone character.
Budget comprehensively for all project components beyond just tile costs. Account for stone specific adhesives, grout formulated for natural stone, high quality sealers, essential tools if you lack them, and professional labor if you choose expert installation. Moisture barriers, underlayment materials, and surface preparation supplies add to total investment.
Durability benchmarks indicate successful installation and proper maintenance:
- Tiles remain firmly bonded without hollow sounds when tapped
- Grout lines stay intact without cracking or crumbling
- No staining appears on properly sealed and maintained surfaces
- Finish retains its original appearance without dullness or etching
- Water beads on sealed surfaces rather than absorbing quickly
Plan for ongoing sealing maintenance every 12 to 24 months to sustain these performance levels. Budget approximately $200 to $400 annually for sealer and cleaning products depending on square footage.
| Feature | Marble Tiles | Travertine Tiles |
|---|---|---|
| Typical timeline | 1 to 2 weeks | 1 to 2 weeks |
| Material cost range | Premium to luxury | Moderate to premium |
| Sealing frequency | Annually | Every 1 to 2 years |
| Durability with care | Decades | Decades |
| Aesthetic character | Polished elegance, veining | Rustic texture, earth tones |
Learn about ordering natural stone to understand material sourcing and delivery timelines. Compare specific marble varieties through the premium marble tile comparison to align your budget with aesthetic goals. Additional details on natural stone kitchen renovation timelines and costs help refine your project plan for 2026.
Discover premium natural stone tiles at Surfaces Galore
Transforming your vision into reality starts with selecting exceptional materials from trusted sources. Surfaces Galore offers an extensive collection of premium natural stone tiles, including stunning marble and travertine options perfect for your kitchen or bathroom renovation.
Explore curated selections that showcase the natural beauty and durability your project deserves. Our detailed product information helps you confidently choose tiles that match your style preferences and functional requirements.
Access comprehensive design guides and expert tips tailored specifically for kitchen and bathroom renovations. From material selection through installation guidance, Surfaces Galore supports your project at every stage. Begin your journey by exploring our natural stone guide to understand material characteristics. Review types of natural stone to compare options, then discover how to select natural stone for timeless spaces that elevate your home.
Frequently asked questions about home tile renovation with natural stone
How often should I reseal my marble tiles?
Reseal marble tiles annually in high traffic areas like kitchens, or every 12 to 18 months in bathrooms with moderate use. Test your seal by placing water droplets on the surface; if water absorbs rather than beading, reseal immediately regardless of timeline.
Is it safe to install natural stone tiles myself?
DIY installation is feasible for homeowners with tile experience and proper tools, though marble’s delicate nature requires extra care. First time installers should consider hiring professionals for expensive marble projects while travertine offers more forgiving installation for confident DIYers.
What is the best way to prevent tile edge chipping?
Bevel tile edges before installation to reduce chipping risk by 30 percent, especially on corners and high traffic thresholds. Use edge trim or bullnose tiles on exposed edges, and avoid dropping heavy objects near tile edges during and after installation.
Which stone type is better for kitchens: marble or travertine?
Marble delivers unmatched elegance and works beautifully in kitchens where aesthetics are paramount, though it requires diligent maintenance and annual sealing. Travertine offers excellent durability with less maintenance intensity, making it ideal for busy family kitchens prioritizing function alongside beauty.
How do I clean natural stone tiles without damaging them?
Use only pH neutral cleaners specifically labeled for natural stone, avoiding all acidic products like vinegar or lemon based solutions. Clean with soft microfiber mops or cloths, blot spills immediately rather than wiping, and never use abrasive scrubbers that scratch the surface.
Leave a comment